• October 2025 Turning Challenge: Natural Edge Bowl! (click here for details)
  • Congratulations to Pat Miller for "Heart Shaped Box" being selected as Turning of the Week for October 13, 2025 (click here for details)
  • Welcome new registering member. Your username must be your real First and Last name (for example: John Doe). "Screen names" and "handles" are not allowed and your registration will be deleted if you don't use your real name. Also, do not use all caps nor all lower case.

Adjusting Nichols lathe tailstock

Joined
Nov 15, 2020
Messages
897
Likes
800
Location
Huntington, VT
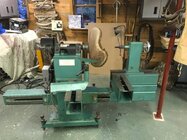
I am getting a Nichols lathe on a long term loan - my friend needs to make room in his tiny shop for a 30" bandsaw - and I am wondering if anyone here has a good procedure for aligning the tailstock. The quill is adjustable up/down and l/r at the front and back of the headstock weldment to allow for movement of the horizontal beam supporting the ways. For roughing out a blank between centers I think alignment is not critical, and once a flat or tenon for a faceplate or chuck is established getting the tailstock center to meet the blank's centerpoint seems simple enough, but aligning the tailstock quill with the spindle centerline is less straightforward. The beam will not likely be moved often, but if and when it is I want to be able to get an accurate orientation.
00K0K_ifyOAV6IU6gz_0CI0t2_600x450.jpg
I envision tramming the tailstock by mounting a disc with a pin on my Oneway threaded tailstock center. and rotating the projecting pin to square the tailstock to a flat face of a blank mounted on a faceplate. Other ideas?
 
I have no idea, but man, what a beast!
 
I have no idea, but man, what a beast!
It is a beast. 30" swing over the ways, 50" over the gap and I am guessing close to 5' maximum between centers. It has a lift arm with an 800# winch and a jackshaft setup with a maximum speed of under 200 rpms in the lowest range. We have to shift it Sunday to make room for the bandsaw - trundle it across the yard over some plywood sheets to a tree, sling a chain hoist over a limb to lift it into a truck and 30 miles down the road to my shop where I can pick it off with a tractor. Sometimes I wonder what my wife must think about all this. I may be doing my friend a favor by stabling his beast until he builds a proper shop but it could be addictive.
 
Last edited:
After a night of sleep... about the only other option may be a laser contraption. In the construction world, laser jigs are used for vertical and horizontal layout for everything from long foundations and stud walls to ductwork and piping runs. Searching "construction laser" just now netted sub-$100 devices at HF, to a couple hundred $$ at big box home stores to quite expensive at other sources.

Did John Nichols have a written procedure for machine setup and alignment? Anything out there on the 'net?
 
Searching "construction laser" just now netted sub-$100 devices at HF, to a couple hundred $$ at big box home stores to quite expensive at other sources.
You might look at gunsight lasers. $20 or more
These should be easy to fit into the tailstock. Might slide into a center you have or drill turn and turn a wooden adapter
 
Thanks, that should work in an adapter bored and fit to the morse taper.
It would be interesting to see your final design.
One suggestion, when shooting a laser into shiny metal parts, wear sunglasses (preferably green tinted for a red laser). You can pick up cheap shades/clip-ons at the drug store.
 
I have a laser alignment device for my milling machine - quite accurate. The cylindrical shaft on the laser fits into a #2MT collet but I use it with an R8 collet on the mill. I've also mounted it in a Jacobs chuck on my drill press. (Perfect for drilling a hole in a precise spot.)

I don't know how well it would work for long distances. For a milling machine alignment distances are usually short.

Read "Chris' Tips" at the bottom for more info.

JKJ
 
I think I can answer this one, and it's actually quite easy to do depending on just how accurate you want to get your tail stock aligned and doesn't require anything too fancy. Lazers are really inaccurate and can't measure anything unless your using the multi multi 10's of thousands
$$$$ of very specialized lazer systems that can measure extremely accurately. But I said easy, not short to explain because the proper answer just isn't that simple. And there's various levels of experiece any may or may not have that might read this later.

You would need at a minimum a dial or digital caliper, for multiple good reasons and if I was buying my first set of calipers, I'd not be buying at the cheapest possible price. More in the mid range price level. $60 level or a bit more. Better of course would be an actual micrometer. But I need to start with some basic measurement terms, methods and accuracy definitions first. And contrary to what most assume including most metal working hobbyist's, dial or digital calipers are only trustworthy to at best + - .002" for even the very best one's. If it's important or requires being exact enough, I don't trust any caliper measurement including my expensive Mitutoyo's to be completely trustworthy under about .005". And yes I have checked mine and my own measurement techniques against proper and certified gauge blocks. Yes they will do much better than that .005", but there best accuracy is only under ideal conditions and being very careful about my technique. When I need to know it's correct and actually be sure it's under that .005" number, then caliper measurements aren't the correct tool. Used within there limits they are a fast and excellent tool, and for my own use, they get me close enough to where I might then need better and much higher accuracy measurements. Or sometimes caliper measurements are more than good enough. For checking that tail stock alignment, calipers could still get you pretty close, or close enough.

However and it literally doesn't matter what the dial or display is showing, the mechanical assembly and design calipers use isn't really capable of much better than that .002". What the dial or display divisions are showing on any measurement tool is it's resolution and absolutely not the tools level of accuracy. Almost everyone keeps getting that confused or misunderstood. The resolution term needs to be properly understood and it only means how many digits there are to the right of the decimal point. Or the tools lowest division it's capable of displaying as an analog or digital number. A measuring tools repeatability and accuracy are both something completely different. A measurement tools repeatability also doesn't mean it's guaranteed to be highly accurate. It can be extremely repeatable over multiple measurements, and that's also highly desirable, but if it's always for example .005" from the actual part size, it's still not an accurate measurement. However when used as a comparison gauge or tool, calipers can still be used quite accurately "IF" good repeatable measurement techniques are used. For smaller diameter items, it's best to slowly and lightly close the calipers jaws using your thumb and forefinger and not that thumb wheel to gently close the jaws while wiggling them a bit to ensure the calipers jaw faces are seating down flat and square onto the part surface. For larger measurements where you can't use your thumb and fore finger, even Mitutoyo recomends gently closing the caliper against the part using both hands for the best accuracy any caliper can deliver. That thumb wheel most calipers have is only really meant for fast coarse adjustments. It can be used while measuring, as long as you understand it takes such a light and gentle touch first, and that takes a lot of practice. Always use as close as possible the same amount of closing pressure between your thumb and forefinger, or closing them with both hands should you decide to use that method.

Secondly and when ever possible do NOT measure out towards the jaw tips with any caliper. Because of their mechanical design, measuring out towards the jaw tips just increases inaccuracy. Sometimes there's no choice, but it does increase the chances of even less accurate measurements. The moving jaw due to very minor but still mandatory clearances to allow it to move along the beam of the caliper also allow that jaw to flex a tiny amount either inwards or outwards. The jaw faces then aren't properly parallel to each other. On round surfaces, that's even more important to measure as deep inside the jaws as possible. The inside caliper jaws and measuring hole sizes are even less accurate for a few very good reasons I won't go into right now. Ok all this is maybe a bit more than most here might want to know about measurement. But it's important enough to matter, and there's simply way too much misunderstood, and while almost for sure well meant, still completely wrong information about accurate caliper measurements almost everywhere online. My Mitutoyo calipers have a .0005" digit on the end of its display. That was added probably because it was cheap to do, and some might even believe it enough to be an increased sales tactic. But I never pay any attention to that number because the calipers simply can't measure down to that level other than just randomly being lucky once in awhile. With my own checking against randomly picked gauge block sizes, that might only happen 1-3 times out of 10 measurements.

There's a lot more to lathe alignment, but as far as getting the tail stocks center line centered on the head stocks center line. I'm trying to keep this simple and about what was asked. First measure the tail stocks quill outside diameter. Again that consistent measurement technique. And I'd want to take at least 5 measurements to double check there isn't any inconsistency in your measurements. Write each one down and average them if needed. Now it's probably a bit tricky with hand turning, but a highly experienced turner should be able to do it even if it takes a few trys at it. Chuck up something like a piece of Delrin plastic, or likely harder to do well, a piece of 6061 aluminum that's a bit larger in diameter that your tail stock quills outside diameter. Or I suppose a short scrap of extremely dense and very hard hardwood could be used instead. It would need to be a wood type that doesn't compress easily at all. And you only need a short piece of whatever material your turning, at most maybe an inch or two long outside the chuck jaws. From now on that piece stays in the chuck until the test measurements are completely done. By however you want to do it and I'm not a wood turner yet, face the part flat or very slightly concave, then turn a short parallel section maybe 1/2" long to the same diameter as your tail stocks quill measurement is. Take as long as it takes to get that correct and as exact as possible. Very fine sand paper at the end would likely getting to a matching size and parallel easier, and you also want a very smooth and even surface finish. It also wouldn't hurt to comparison measure the diameter your attempting to turn and sand down, and the tail stock quill OD as continuing trial measurements as you slowly creep up on getting that matching dimension.

Ok lets assume you've now got that turned part end to an exact size done and your turned and sanded parts OD does match the tail stocks OD. Now spotlessly clean the lathe bed, remove the tool rest and slide the tail stock up until the face of it's quill almost but not quite touches the face of your turned part. With a wood turning lathe and no carriage in the way like a metal turning lathe would have, there's two separate ways I'd take my tail stock measurements. The first with the tail stocks quill retracted, but always with the bed and quill lock set. The second, move the tail stock back a bit and extend the quill almost to it's full travel extension. Again set the bed and quill lock before any measurements are taken. That's important! But at no time do you want to ever bump against the face of your turned part. A good way to gauge where the end of your tail stocks quill is would be a strip of printer paper between the face of your part and the face of the tail stocks quill. Slowly keep extending the quill until you just start feel a light drag on the paper as it's lightly pulled past both surfaces that are facing each other. That should get the end of the tail stocks quill within around .003"- .004" from touching the face of your turned part. Again set the tail stocks bed and quill lock.

Now set your caliper jaws so each side of each jaw spans across both your turned part and the quills OD. Visually keep your caliper or micrometer square and 90 degrees to the part and tail stocks quill. Measure with the caliper or micrometer held vertically. Again I'd take at least 5 separate measurements just to be sure and write each one down. Now measure across those same two surfaces with the caliper or micrometer held in the horizontal position, again at least 5 measurements and written down. Any tail stock misalignment either vertically or horizontally will show a larger measurement number in each direction than your tail stocks quill OD is. It also measures how much the tail stocks quill is out to the lathes head stock. Make your adjustments, remeasure etc, etc, etc until you get the alignment correct. Only then can you remove your turned part from the chuck.

There is a slightly less involved, quicker and a bit less accurate method using two steel dead centers in the head and tail stock and a steel ruler between them. But it's best used with metal turning lathes where a fresh 60 degree center point can be turned on a piece of scrap metal so it's known to be 100% concentric to the head stocks center of rotation.

Outside the original thread question, but just in case and for any that might have one, a dial indicator and magnetic base attached to either the lathe chuck or face plate and rotating that around your tail stocks quill WILL NOT WORK!!!! And this short video shows precisely why.
View: https://www.youtube.com/watch?v=u08SfxVgxNg
Decades before that video was put up, I spent a couple of very frustrating hrs trying to figure out why my tail stocks center line appeared to be quite low compared to my head stock before I finally clued in what the actual cause was while swinging an indicator around the tail stocks OD. But even for wood workers and especially those with wood surfacing, cutting and turning equipment, table saws, planers, joiners, lathes etc, I'm 100% convinced owning at least a cheaper off shore magnetic base and .001" reading dial indicator isn't in my opinion really optional. There's absolutely far too many benefits to have one over the relatively minor cost once you do understand what there capable of checking.

Run out checks are just part of what they can do. As another example, even router tables with specialized matching router bits for doing complex interlocking joints and once the correct vertical height settings are established with test cuts for the first time, anyone who has a mag base and indicator can then use that, and then with known numbers to write down that exact router bit elevation, and then re- use the same numbers any time the same router bits are used every single time. There's then no more trial cuts needed each time a router bit set like that is set up. There's a great deal of methods used in metal machining that can be used equally well while wood working and for quicker and much more accurate results. Wood working simply has zero need for even .001" accuracy, but the same is not true for the machines and there alignments any wood worker might be using. There's also further checks on wood lathe head and tail stocks I haven't mentioned, and having a magnetic base and indicator would again be helpful. If you happen to own a drill press, tramming and adjusting the table so it's square in X,Y to the spindle rotation is another excellent use. In fact my very first power tool over 40 years ago was a drill press, and the reason I did buy my first magnetic base and dial indicator that I'm still using often. However, even the much cheaper indicators still operate with some very close tolerances, they don't like contamination inside them at all. Their best kept stored away and only used when there isn't a lot of dust present. And don't ever oil the internals unless you know exactly what your doing. Even half a drop of the correct oil is getting close to too much.
 
A measurement tools repeatability also doesn't mean it's guaranteed to be highly accurate.
This was a terrific description. When I was studying surveying, one of the first points the professor drove home was the difference between accuracy and precision. Accuracy, simply stated, is nearness to the truth and precision is repeatability. As Peter says, they are completely different things.
 
I think I can answer this one, and it's actually quite easy to do depending on just how accurate you want to get your tail stock aligned and doesn't require anything too fancy. Lazers are really inaccurate and can't measure anything unless your using the multi multi 10's of thousands
$$$$ of very specialized lazer systems that can measure extremely accurately. But I said easy, not short to explain because the proper answer just isn't that simple. And there's various levels of experiece any may or may not have that might read this later.

You would need at a minimum a dial or digital caliper, for multiple good reasons and if I was buying my first set of calipers, I'd not be buying at the cheapest possible price. More in the mid range price level. $60 level or a bit more. Better of course would be an actual micrometer. But I need to start with some basic measurement terms, methods and accuracy definitions first. And contrary to what most assume including most metal working hobbyist's, dial or digital calipers are only trustworthy to at best + - .002" for even the very best one's. If it's important or requires being exact enough, I don't trust any caliper measurement including my expensive Mitutoyo's to be completely trustworthy under about .005". And yes I have checked mine and my own measurement techniques against proper and certified gauge blocks. Yes they will do much better than that .005", but there best accuracy is only under ideal conditions and being very careful about my technique. When I need to know it's correct and actually be sure it's under that .005" number, then caliper measurements aren't the correct tool. Used within there limits they are a fast and excellent tool, and for my own use, they get me close enough to where I might then need better and much higher accuracy measurements. Or sometimes caliper measurements are more than good enough. For checking that tail stock alignment, calipers could still get you pretty close, or close enough.

However and it literally doesn't matter what the dial or display is showing, the mechanical assembly and design calipers use isn't really capable of much better than that .002". What the dial or display divisions are showing on any measurement tool is it's resolution and absolutely not the tools level of accuracy. Almost everyone keeps getting that confused or misunderstood. The resolution term needs to be properly understood and it only means how many digits there are to the right of the decimal point. Or the tools lowest division it's capable of displaying as an analog or digital number. A measuring tools repeatability and accuracy are both something completely different. A measurement tools repeatability also doesn't mean it's guaranteed to be highly accurate. It can be extremely repeatable over multiple measurements, and that's also highly desirable, but if it's always for example .005" from the actual part size, it's still not an accurate measurement. However when used as a comparison gauge or tool, calipers can still be used quite accurately "IF" good repeatable measurement techniques are used. For smaller diameter items, it's best to slowly and lightly close the calipers jaws using your thumb and forefinger and not that thumb wheel to gently close the jaws while wiggling them a bit to ensure the calipers jaw faces are seating down flat and square onto the part surface. For larger measurements where you can't use your thumb and fore finger, even Mitutoyo recomends gently closing the caliper against the part using both hands for the best accuracy any caliper can deliver. That thumb wheel most calipers have is only really meant for fast coarse adjustments. It can be used while measuring, as long as you understand it takes such a light and gentle touch first, and that takes a lot of practice. Always use as close as possible the same amount of closing pressure between your thumb and forefinger, or closing them with both hands should you decide to use that method.

Secondly and when ever possible do NOT measure out towards the jaw tips with any caliper. Because of their mechanical design, measuring out towards the jaw tips just increases inaccuracy. Sometimes there's no choice, but it does increase the chances of even less accurate measurements. The moving jaw due to very minor but still mandatory clearances to allow it to move along the beam of the caliper also allow that jaw to flex a tiny amount either inwards or outwards. The jaw faces then aren't properly parallel to each other. On round surfaces, that's even more important to measure as deep inside the jaws as possible. The inside caliper jaws and measuring hole sizes are even less accurate for a few very good reasons I won't go into right now. Ok all this is maybe a bit more than most here might want to know about measurement. But it's important enough to matter, and there's simply way too much misunderstood, and while almost for sure well meant, still completely wrong information about accurate caliper measurements almost everywhere online. My Mitutoyo calipers have a .0005" digit on the end of its display. That was added probably because it was cheap to do, and some might even believe it enough to be an increased sales tactic. But I never pay any attention to that number because the calipers simply can't measure down to that level other than just randomly being lucky once in awhile. With my own checking against randomly picked gauge block sizes, that might only happen 1-3 times out of 10 measurements.

There's a lot more to lathe alignment, but as far as getting the tail stocks center line centered on the head stocks center line. I'm trying to keep this simple and about what was asked. First measure the tail stocks quill outside diameter. Again that consistent measurement technique. And I'd want to take at least 5 measurements to double check there isn't any inconsistency in your measurements. Write each one down and average them if needed. Now it's probably a bit tricky with hand turning, but a highly experienced turner should be able to do it even if it takes a few trys at it. Chuck up something like a piece of Delrin plastic, or likely harder to do well, a piece of 6061 aluminum that's a bit larger in diameter that your tail stock quills outside diameter. Or I suppose a short scrap of extremely dense and very hard hardwood could be used instead. It would need to be a wood type that doesn't compress easily at all. And you only need a short piece of whatever material your turning, at most maybe an inch or two long outside the chuck jaws. From now on that piece stays in the chuck until the test measurements are completely done. By however you want to do it and I'm not a wood turner yet, face the part flat or very slightly concave, then turn a short parallel section maybe 1/2" long to the same diameter as your tail stocks quill measurement is. Take as long as it takes to get that correct and as exact as possible. Very fine sand paper at the end would likely getting to a matching size and parallel easier, and you also want a very smooth and even surface finish. It also wouldn't hurt to comparison measure the diameter your attempting to turn and sand down, and the tail stock quill OD as continuing trial measurements as you slowly creep up on getting that matching dimension.

Ok lets assume you've now got that turned part end to an exact size done and your turned and sanded parts OD does match the tail stocks OD. Now spotlessly clean the lathe bed, remove the tool rest and slide the tail stock up until the face of it's quill almost but not quite touches the face of your turned part. With a wood turning lathe and no carriage in the way like a metal turning lathe would have, there's two separate ways I'd take my tail stock measurements. The first with the tail stocks quill retracted, but always with the bed and quill lock set. The second, move the tail stock back a bit and extend the quill almost to it's full travel extension. Again set the bed and quill lock before any measurements are taken. That's important! But at no time do you want to ever bump against the face of your turned part. A good way to gauge where the end of your tail stocks quill is would be a strip of printer paper between the face of your part and the face of the tail stocks quill. Slowly keep extending the quill until you just start feel a light drag on the paper as it's lightly pulled past both surfaces that are facing each other. That should get the end of the tail stocks quill within around .003"- .004" from touching the face of your turned part. Again set the tail stocks bed and quill lock.

Now set your caliper jaws so each side of each jaw spans across both your turned part and the quills OD. Visually keep your caliper or micrometer square and 90 degrees to the part and tail stocks quill. Measure with the caliper or micrometer held vertically. Again I'd take at least 5 separate measurements just to be sure and write each one down. Now measure across those same two surfaces with the caliper or micrometer held in the horizontal position, again at least 5 measurements and written down. Any tail stock misalignment either vertically or horizontally will show a larger measurement number in each direction than your tail stocks quill OD is. It also measures how much the tail stocks quill is out to the lathes head stock. Make your adjustments, remeasure etc, etc, etc until you get the alignment correct. Only then can you remove your turned part from the chuck.

There is a slightly less involved, quicker and a bit less accurate method using two steel dead centers in the head and tail stock and a steel ruler between them. But it's best used with metal turning lathes where a fresh 60 degree center point can be turned on a piece of scrap metal so it's known to be 100% concentric to the head stocks center of rotation.

Outside the original thread question, but just in case and for any that might have one, a dial indicator and magnetic base attached to either the lathe chuck or face plate and rotating that around your tail stocks quill WILL NOT WORK!!!! And this short video shows precisely why.
View: https://www.youtube.com/watch?v=u08SfxVgxNg
Decades before that video was put up, I spent a couple of very frustrating hrs trying to figure out why my tail stocks center line appeared to be quite low compared to my head stock before I finally clued in what the actual cause was while swinging an indicator around the tail stocks OD. But even for wood workers and especially those with wood surfacing, cutting and turning equipment, table saws, planers, joiners, lathes etc, I'm 100% convinced owning at least a cheaper off shore magnetic base and .001" reading dial indicator isn't in my opinion really optional. There's absolutely far too many benefits to have one over the relatively minor cost once you do understand what there capable of checking.

Run out checks are just part of what they can do. As another example, even router tables with specialized matching router bits for doing complex interlocking joints and once the correct vertical height settings are established with test cuts for the first time, anyone who has a mag base and indicator can then use that, and then with known numbers to write down that exact router bit elevation, and then re- use the same numbers any time the same router bits are used every single time. There's then no more trial cuts needed each time a router bit set like that is set up. There's a great deal of methods used in metal machining that can be used equally well while wood working and for quicker and much more accurate results. Wood working simply has zero need for even .001" accuracy, but the same is not true for the machines and there alignments any wood worker might be using. There's also further checks on wood lathe head and tail stocks I haven't mentioned, and having a magnetic base and indicator would again be helpful. If you happen to own a drill press, tramming and adjusting the table so it's square in X,Y to the spindle rotation is another excellent use. In fact my very first power tool over 40 years ago was a drill press, and the reason I did buy my first magnetic base and dial indicator that I'm still using often. However, even the much cheaper indicators still operate with some very close tolerances, they don't like contamination inside them at all. Their best kept stored away and only used when there isn't a lot of dust present. And don't ever oil the internals unless you know exactly what your doing. Even half a drop of the correct oil is getting close to too much.
Thanks for the lengthy reply. As a woodworker who has been using a digital caliper and dial indicator for 40 years I appreciate your attention to detail and cautions about accuracy and precision.

Your procedure for checking the tailstock alignment appears to be good for a conventional lathe but I am not sure it applies well to this particular problem. If you look at the photo in post #1 you can see that the tailstock ways are stacked atop a beam that slides through the headstock weldment. The sides of the sliding beam are machined while its housing is not machined inside. My concern is that the tailstock alignment will vary depending on the beam extension, and the recommended procedure would require turning a reference surface at the end of a relatively long piece of stock (max. center distance is about 5'). Not impossible but perhaps difficult without deflection

Perhaps a practical approach for this particular lathe would be to use your method for alignment at the most common, short beam extension and simply adjust the tailstock center to a center point on the individual workpiece using the built-in adjustments on the tailstock mount when the beam is extended.
 
Last edited:
Tim caught my mistake, sorry for that and I should have read through what I typed much better than I did. 😣

Your 100% correct Kevin about the method I mentioned only works with the tail stock up close to the head stock. That's at best about all you can do for the tail stocks vertical position when it's up close. Wood turning obviously has vast differences between how it's done and metal turning since the rotating parts position and alignment between the head and tail stock are pretty much taken care of by hand and eye. It wouldn't be nearly as accurate as a proper .0002" per ft. reading machinist level, but setting the lathe bed very close to the head stock and then just a carpenters level on the bed with the level shimmed to a center bubble position, then extending the bed to the right as far as you can would give you a rough idea of how much bend and sag that sliding beam has. And it will be a lot.

Quite obviously that's a very well designed and certainly commercial level lathe. You also have a massive extension the bed and tail stock are capable of moving over the entire range of travel. Plus a lot of suspended weight to support just with that square tube. For simple design and physics reasons, that makes no logical sense as it is right now. But there's indicators on the base of the head stock that I think provide some hints. It has what appears to be 4 threaded leveling adjusters, and those were designed in and added for a very good reason. My best guess is those were meant to sit in enlarged feet, maybe something hockey puck sized or a bit larger. Originally those feet may even have been meant to be grouted onto or into a concrete floor. If it were me? I think I'd do a quick visual check under the very bottom of the sliding lathe bed, or on its lower right hand end. If that was designed like almost any long travel machine tool, I'd almost bet you'll find evidence where an adjustable support would have been bolted to and used directly under or on the right end of the lathe bed. If the design is what I suspect it is and given the lathes size, weight and length at it's full bed extension. Then I think it's more than likely the design used a second long plate with another 4-6 leveling screws, or possibly a simple set of sliding ways set and leveled on the floor much like the head stocks end, and long enough to cover the beds left to right travel.

If my guesses are correct? A new lathe installation would have used a proper machinist's level to first get the head stock true in both X & Y without the bed and sliding assembly attached at all. Any sliding way surface or support plate on the right side leveled the same, the bed and slide installed. Then most likely a screw threaded bottom or right hand end support leg adjusted until lathe bed is also level in X,Y over it's full travel. So aligning the tail stock quill up close to the head stock would still be true for it's Z axis elevation at whatever length the bed was moved to. Again all just guesses on my part. And while not nearly as convenient, but even the usual carpenters level and a cheap hydraulic jack under the bottom of the lathe bed and reset each time the bed gets moved would do almost as well. I've seen a whole lot of metal and weld cracks even on up to 4" thick steel over my career. In my own shop, I've measured and seen some heavy metal cross sections bend a surprising amount, including 1" thick steel plate just from the wooden floor structure under it and changes of a few points of humidity. I've been dealing with that for multiple decades. Without using a support under the right hand end of the bed, that will almost certainly start causing weld cracks on the partially welded sliding and location faces given a bit of time. Even more so due to vibrations and oscillation forces from out of balance large parts when roughing them into shape. Partial welds like that just don't cope well with any loads or vibration in the shear direction.

Another guess, but given that machined and possibly surface ground with those welded on faces on the front of bed slide. There's almost for sure the same on the bottom surface of that sliding square tube. If so, then either fixed wear surfaces, or more likely screw adjustable pads would have been used on both the inside of at least one vertical face and on the inside bottom of the tube the bed slides through. If there's any tool marks still visible on those unpainted surfaces? Any very faint longitudinal lines or no real visible tool marks at all would indicate being surface ground. Partial radial marks or a cross hatch pattern would indicate either just a milled finish or Blanchard ground after milling. Your lathe picture doesn't expand enough to be sure, but I'd think those would be hardened surfaces and so most likely surface ground.
 
From what I have read perhaps 150 of these lathes were custom made by one man in various configurations back in the 1990s. The one in my shop is very similar to the one in the photo but the head and tailstock are blocked up two inches. The headstock weldment is designed to be filled with sand for more stability. It is not highly engineered by any means but it is pretty rugged and adjustable. I have seen a picture of a similar machine with adjustable supports under the right end of the adjustable beam but this unit was not so equipped. The screw feet did come with 6" round steel pads. The beam surfaces are machined but not hardened, and it is a loose fit in its surrounding tube, with bolts on both sides and plenty of opportunity for inaccuracy, thus my initial question about tailstock alignment. The spindle is 2" diameter but supported by rudimentary twin bearing pillow blocks and is not hardened. It's easy to see why Nichols got out of the business after Oneway came along, but it's hard to see a Stubby without Nichols coming to mind.

This is not my main lathe. I happen to have room for it while my friend builds a bigger shop, and I will use it for the (very) occasional oversize piece. I probably will never extend the beam as I can turn about 53" between centers on my Oneway, but your comments on the design are helpful.
 
Back
Top