• May 2025 Turning Challenge: Long Neck Hollowform! (click here for details)
  • Congratulations to Phil Hamel winner of the April 2025 Turning Challenge (click here for details)
  • Congratulations to Paul Hedman and Donna Banfield for "Fire and Ice" being selected as Turning of the Week for 5 May, 2025 (click here for details)
  • Welcome new registering member. Your username must be your real First and Last name (for example: John Doe). "Screen names" and "handles" are not allowed and your registration will be deleted if you don't use your real name. Also, do not use all caps nor all lower case.

Back-filling laser designs with color

Joined
Jun 16, 2004
Messages
1,261
Likes
1,446
Location
Colorado Springs, CO
For those of you who have a laser (or want one), for woodturning embellishing...here's a process that'll help avoid color "leakage" into un-lased wood areas.

- Finish sand your piece to 320/400 grit
- Apply alcohol dye for the main color effect, let dry. I'm using Chroma-Craft wood dye (see video below)
- Apply one coat of sanding sealer, let dry. I'm using Mylands
- One more light sanding with 320 or 400 grit
- Apply four or more coats of gloss clear spay-on varnish/lacquer, let dry between each coat
- Lase your design into the wood, cutting through the finish and into bare wood. I'm using a 5w output diode laser, set at 90% power and 2000mm/minute travel
- Apply a liberal coating of acrylic paint to the lased surfaces, and wipe off any access paint quickly, before it dries. My favorite brand for this application is Pebeo Fantasy Prisme Paints

 
Thanks Ed, I just recently upgraded my laser to a 5.5 watt version and have been experimenting with some laser cut panels I add to turnings. Your description of using the laser to embellish using colored finishes is an excellent addition to the potential uses of lasers. Thanks for posting this!
 
About 6 to 10 years ago I had some urns laser engraved with names by a local shop using a machine similar to the Epilog unit controlled by a DOS based computer. The method he used to color the engraving consisted of powders where he would first engrave the text into the wood then without disturbing the work piece he spread the powder on the text and rerun the the text to burn in the powder. The result was perfectly colored text. Recently I had need of getting more done but I couldn't reach him so I went to another engraver who had no idea what I was talking about.
So the question is does anyone recognize this technique?
 
Good looking yo yos Ed. Trans axle/ball bearing axles? Kits, or do you source them otherwise? Played with them a bit....

robo hippy
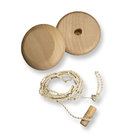
These are very cheap (<$1 each) fixed axle kit yo-yos that I tune up and then decorate...using them as cheap blanks to practice new-to-me lasing techniques, before putting the laser to work on exotic wood lathe-turnings. Here's the source: https://www.craftparts.com/product/2-1-4-yo-yo-kit/
YOB225-2.jpg
 
There used to be trans axle available, but it has been a long time since I made yo yos. I did find that weighing them was the best way to get them so that they would spin without wobble. I could always get close by measuring, but on a 1/100 gram scale, that worked better.

robo hippy
 
I was surprised to learn when I had a platter laser engraved that he wanted it finished before hand. Seem in raw wood the laser burns outside the lines and is hard to remove. You've perfected that way beyond what I was doing. Beautiful.
 
Back
Top