• It's time to cast your vote in the December 2025 Turning Challenge. (click here for details)
  • Congratulations to Pat White for "Sicilian Mosaic" being selected as Turning of the Week for December 29, 2025 (click here for details)
  • Welcome new registering member. Your username must be your real First and Last name (for example: John Doe). "Screen names" and "handles" are not allowed and your registration will be deleted if you don't use your real name. Also, do not use all caps nor all lower case.

Black filler

Joined
Nov 21, 2008
Messages
89
Likes
9
Location
Greenwood, SC
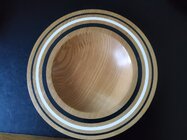
Long story short - I need to fill screw holes on the bottom of a bowl. I decided to turn a “mote” as a decorative ring which will hide the screw holes, see photo. Now I need to fill the ring with a filler, preferably black. I’ve tried adding black dye to Bondo filler - didn’t work. Thought about black CA glue. I’m sure someone has come up with a solution. Suggestions as what to use will be greatly appreciated.

IMG_0942.jpeg
 
I need to fill screw holes on the bottom of a bow
Black CA might "wick" out from the holes and get into the surrounding grain.

What we (friends and I) use for many things is an epoxy called PC-7. My potter friend uses it a lot.
Mixed, it's thick black paste, could probably be applied with a syringe a plastic tip, with the tip cut off a little. (I keep these around the farm). Could be smoothed with a small tool before curing. I use tiny Stainless Steel doiuble-ended spatulas for small such things. After setting up, it can be sanded, filed, chiseled if needed.

I buy the 1 lb in two cans quantity. You can buy it in small containers. Most hardware stores also carry it.

I'd still seal the surrounding area first.

JKJ
 
Here is the recipe that I use. Black CA glue mixed with Black Chalk dust. Works great for large area fills. Mix the glue and chalk dust then apply to area to be filled like you would with putty. When mixed with the chalk, you have a 5 to 10 minute working time depending upon the ratio of glue to chalk and temperature. Dries hard within 15 minutes. Turns great and is easily sanded if needed. Chalk dust is about $3 at Home Depot. Have not had issues with fade or bleed into surrounding wood, however that may be due to the type of woods that I have used. I would check on test piece.

Jay Peterson
IMG_8435.jpg
 
Before we had 4 jaw scroll chucks, the stock faceplate hole covering was felt. You could inlay a felt circle there for a really cheap fix. Cork and leather would also work. Even a ring of wood would look nice.
 
Or you could cut a ring in some black wood and glue it in there. Or walnut that you color with ebonizing solution or marine boot polish dye.
 
Or turn a wood a different color wood ring. Glue and then turn it smooth. Now you have an accent ring out of wood.

Regardless, you have options
 
Suggestions as what to use will be greatly appreciated.
Another possibility is pewter.
poor molten pewter in then turn it flush

Pewter won’t adhere to the wood so a dovetail in the wall will hold it to the wood
The screw holes should hold it on.

Pewter melts at about 450 degrees.

you can literally melt pewter in a tin can using a torch

Rule #1 hot pewter looks like cold pewter.

The pewter rings on this gavel were made by wrapping cardboard around it with a small funnel in the cardboard (spew) to pour the molten pewter through.
This was a gift gavel for a club president - not a very good photo
Rings can be poured right into a groove keep it near level to fill the groove.


IMG_1025.jpegIMG_1028.jpeg
 
CA with used coffee grinds. The moist coffee grinds help the CA set, the color comes out a dark blackish color similar to the dark knots in wood. and it easily turns back to flush as well as sands easily.

Sounds a bit messy but I like this idea! 👍🏻 I’ll give it a try next time I need to fill something.
 
I second the use of milliput which comes in a variety of colours. Check this out
View: https://youtu.be/vAyxbfEGQ8U?si=uihMnJ7cW_IR0s0E

There are quite quite few videos on YouTube and I've used both the black and white to great effect. Don't forget to dovetail your cutout for added security.
Enjoy
Watched your attached video on the Milliput. Seems like a lot of work and I really need a more Jet Black color. I'm filling 1/8" gooves that I make as ornamental embellishments with my Ornamental turning machine. Tried Black CA glue and was not happy with the results at all......runs all over and again very messy. Thinking about 5 minute epoxy mixed with Black Chalk line chalk.........what do you think?
 
Thinking about 5 minute epoxy mixed with Black Chalk line chalk.........what do you think?
That's what I do, but with fine sanding dust of whatever wood color I need. And I didn't know there was black chalk line chalk, that sounds like the perfect fix. I'll pick up a bottle next time I'm at the hardware store.

Heck, different color chalks for different effects. A small running crack filled blue could be a "river turning", like the colored resins filling slab "river tabletops".

Start stiring in a relatively small amount of powder, you'll realize in seconds if you need a little more. That way you won't sacrifice anything for the epoxy itself.
 
It only took 10 minutes to ensure it was mixed properly. Then I left it for 24 hours before turning off the excess, and sanding and polishing. As for wanting jet black, take a look at my small change bowl and the top of a wide rimmed bowl. Inlays are black and white Milliput. After sanding and polishing I don't think you would get anything much blacker. Good luck which ever way you choose to go. Hope you have a happy, prosperous, and importantly, healthy New Year.
 

Attachments

  • 20260102_151314.jpg
    20260102_151314.jpg
    302.9 KB · Views: 7
  • 20260102_151147.jpg
    20260102_151147.jpg
    226.8 KB · Views: 7
Another vote for Milliput. I'm using it more and more. It sands easier than epoxy and can easily be thinned to a consistency you like. If it was structural I'd probably use epoxy.
 
Another vote for Milliput. I'm using it more and more. It sands easier than epoxy and can easily be thinned to a consistency you like. If it was structural I'd probably use epoxy.
Interesting, I didn't know that you could 'thin' it! The Milliput I use is an epoxy putty so I would be interested in the way you thin it. It would certainly help on occasions.
 
Interesting, I didn't know that you could 'thin' it! The Milliput I use is an epoxy putty so I would be interested in the way you thin it. It would certainly help on occasions.

I watched numerous videos on youtube when I bought my first Milliput by a guess you'd call modelling people. Some used water and some used alcohol. Both worked fine for me but I normally use alcohol. It takes very little to thin it so go easy with it at first.
 
I use the regular Milliput brand (I buy mine on amazon) which as I understand it, is an epoxy. It is much easier to sand than regular two part epoxy though. I use my fingers to push it into whatever void I'm filling and sometimes tape off the surrounding area to avoid pushing any excess into any open pores/grain of the surrounding wood.
 
I have used Bondo body filler mixed with black masonry dye to fill knot holes. It works well
 
Like Webb said, I would turn a recess and put in a piece of matching or contrasting wood. Any repair will show, no matter what you do, especially if you fill just the holes.

robo hippy
 
It only took 10 minutes to ensure it was mixed properly. Then I left it for 24 hours before turning off the excess, and sanding and polishing. As for wanting jet black, take a look at my small change bowl and the top of a wide rimmed bowl. Inlays are black and white Milliput. After sanding and polishing I don't think you would get anything much blacker. Good luck which ever way you choose to go. Hope you have a happy, prosperous, and importantly, healthy New Year.

That looks great, really clean!

I don't know if it was mentioned anywhere: another filler sometimes used is powered metal. I make a number of things with powdered copper and brass in grooves:
1767377486775.jpeg
(Yikes, I see I did this about 12 years go. If I made this today I'd consider a more delicate stem and base. That looks kind of "chunky" to me now. The person who got it said they loved it but maybe they lied.)

I have Ted Sokolowski's DVD. Here's a preview on youtube:
View: https://www.youtube.com/watch?v=GJiMyr3yb8M


JKJ
 
Back
Top