
Greetings all ,
Getting back into turning after a several decade hiatus. Have progressed lately from twig pots, to segmented, to hollow forms, to hybrid resin, and recently onto Bowl From a Board.
The result of my first attempt (16" diam bowl) turned out OK but getting there was rather frustrating due to massive burning issues when parting off the rings (except the first ring).
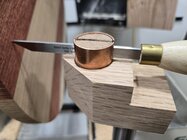
I built a tool rest jig to steady the 1/16" Sorby parting tool along with later "sinking" the whole tool into a larger DIY handle. The first ring (at 45 deg. angle) parted off fine. The remaining rings
were a nightmare of burning wood (almost gave up several times). Tried varying lathe speeds, tool rest height, attack angle (45, 50, 55), flipping the tool, all to no avail.
The wood used is cherry, bloodwood, oak and walnut (all dry).
Any advice and/or suggestions (other than scrapping this idea for a bandsaw solution ;-) is most appreciated.
Here's a "project progress" link showing filmstrip of all pics from along the way - Burned Bowl From a Board
Thanks !
Steve
Getting back into turning after a several decade hiatus. Have progressed lately from twig pots, to segmented, to hollow forms, to hybrid resin, and recently onto Bowl From a Board.
The result of my first attempt (16" diam bowl) turned out OK but getting there was rather frustrating due to massive burning issues when parting off the rings (except the first ring).
I built a tool rest jig to steady the 1/16" Sorby parting tool along with later "sinking" the whole tool into a larger DIY handle. The first ring (at 45 deg. angle) parted off fine. The remaining rings
were a nightmare of burning wood (almost gave up several times). Tried varying lathe speeds, tool rest height, attack angle (45, 50, 55), flipping the tool, all to no avail.
The wood used is cherry, bloodwood, oak and walnut (all dry).
Any advice and/or suggestions (other than scrapping this idea for a bandsaw solution ;-) is most appreciated.
Here's a "project progress" link showing filmstrip of all pics from along the way - Burned Bowl From a Board
Thanks !
Steve
![20241106_135430[1]_min.jpg](/community/data/attachments/65/65737-6538d2e723d7dcf3129f4b0667ff9a9b.jpg?hash=ZTjS5yPX3P)
![20240806_140450[1]_min.jpg](/community/data/attachments/65/65738-f65a89c40c564638c37f15d40bb2501d.jpg?hash=9lqJxAxWRj)


![20241119_120658[1]_min.jpg](/community/data/attachments/66/66147-b84dcbc354021fc2803c18470d758d1c.jpg?hash=uE3Lw1QCH8)
![20241118_143141[2]_min.jpg](/community/data/attachments/66/66148-ff6ce3bc04f581e85058a283dde1e77d.jpg?hash=_2zjvAT1ge)
![20241118_144620[1]_min.jpg](/community/data/attachments/66/66149-6b2dddf9a5d7df00ec515b1eb0887162.jpg?hash=ay3d-aXX3w)

