• We just finished moving the forums to a new hosting server. It looks like everything is functioning correctly but if you find a problem please report it in the Forum Technical Support Forum (click here) or email us at forum_moderator AT aawforum.org. Thanks!
  • Beware of Counterfeit Woodturning Tools (click here for details)
  • Johnathan Silwones is starting a new AAW chapter, Southern Alleghenies Woodturners, in Johnstown, PA. (click here for details)
  • Congratulations to Dave Roberts for "2 Hats" being selected as Turning of the Week for April 22, 2024 (click here for details)
  • Welcome new registering member. Your username must be your real First and Last name (for example: John Doe). "Screen names" and "handles" are not allowed and your registration will be deleted if you don't use your real name. Also, do not use all caps nor all lower case.

Calabash bowls

Joined
Jan 12, 2022
Messages
28
Likes
14
Location
Bixby, Oklahoma
I recently got several peices of fresh pecan and I didn't want to wait 6 months after roughing to be able to finish them so I decided to turn a bunch of calabash style bowls. I really love the way a good calabash looks and feels and wanted to try doing a bunch of smaller ones. To say the least I am not really happy with the ones I have been doing and am looking for some input and help on how to make these better or tips to make the process easier. My biggest issue right now is getting a consistent wall thickness throughout the whole thing, the base of most of the bowls are thin, does anyone have any good tips for this issue? or is this an issue?
Here are some images to show the issues and for general C&C
605BEB9E-28B0-4CF8-A0B3-D88F60BB31BE.jpeg47306E8B-4CBF-4101-B7E5-C30AA7EB50D9.jpeg
Any tips, suggestions, or critiques are welcome and greatly appreciated.
 

hockenbery

Forum MVP
Beta Tester
TOTW Team
Joined
Apr 27, 2004
Messages
8,642
Likes
4,985
Location
Lakeland, Florida
Website
www.hockenberywoodturning.com
I use calipers as I hollow so I know the thickness.

I don’t know what the wall thickness of traditional bowls would be.

From a practical usableness and drying success point of view
The bowl on the right would be just fine.
The bowl on the left is borderline too thin. Might see light through it if held toward a bright light.
Might be prone to crack if given some rough use.
 
Joined
Nov 15, 2020
Messages
450
Likes
309
Location
Huntington, VT
I use a "cheater stick" as long as the distance from my headstock to my chuck jaws to gauge the bottom thickness. Hold the stick against the casting and measure from its end out to the bowl rim, then compare that to the depth read by sighting across the rim to a tape or rule seated in the bottom of the bowl.
 

Emiliano Achaval

Administrator
Staff member
Beta Tester
TOTW Team
Joined
Dec 14, 2015
Messages
3,317
Likes
4,271
Location
Maui, Hawaii
Website
hawaiiankoaturner.com
I recently got several peices of fresh pecan and I didn't want to wait 6 months after roughing to be able to finish them so I decided to turn a bunch of calabash style bowls. I really love the way a good calabash looks and feels and wanted to try doing a bunch of smaller ones. To say the least I am not really happy with the ones I have been doing and am looking for some input and help on how to make these better or tips to make the process easier. My biggest issue right now is getting a consistent wall thickness throughout the whole thing, the base of most of the bowls are thin, does anyone have any good tips for this issue? or is this an issue?
Here are some images to show the issues and for general C&C
View attachment 44555View attachment 44556
Any tips, suggestions, or critiques are welcome and greatly appreciated.
The bottoms look ok. The best one is the one on the left, talking about which one looks like a Calabash. The left one would be a Palewa or low-sided calabash. One thing that ancient calabashes have in common is a very thick bottom, so I leave a thicker bottom in mine. There are no straight lines in a true calabash. All your sides are way too straight. When they become taller, they curved in and then straighten out a bit, that would be more of a Ku'oho style. I do mine with the 40/40 grind. That means I have to do the bottom with a bottom bowl gouge. The best way to do the transition area is with a #5 Badger tool from Mike Hunter Tools. Since that is 100 % end grain it does not matter which way you go, so a pull cut works best. You can then join the bottom and the top nicely, concentrating on the inside curve. More than anything you need the rule of thirds. The apex or widest point is one-third up, then starts to go in. I use several different gauges to see how thick the wall is. You have to measure often. The Tomkins gauge is a good one, as well as a homemade bottom reader. I would add that there are no oval calabashes. You have to rough turn and then finish when is dry. It all depends on the wood. Koa warps too much goes oval. But Milo and Kou you can finish it the day the tree was felled. The bible of the Hawaiian Calabash is the book by Irving Jenkins, The Hawaiian Calabash. Because of my 95 demos about the calabash, the price has gone up, from $30 to $250 and more.
 
Joined
Jan 12, 2022
Messages
28
Likes
14
Location
Bixby, Oklahoma
Thank you all for the help. I did not know that the wood determined if the bowl was twice turned or not. Since these will be oval after drying I will label them as being inspired by the Calabash bowl. I still want to continue using these pieces for this, so I will turn some more today and will post the end results for continued critiquing. Thanks again to you all for the help, I really appreciate it a lot.
 
Last edited:
Joined
Aug 14, 2007
Messages
5,493
Likes
2,842
Location
Eugene, OR
I have one video, Finding the Bottom of the Bowl, which describes how to use the cheater stick, which saves you from having to do the math in your head.... Before reading Elimilano's comments, my first thought was that the top needed to be a bit more closed, or turned in. I use the D shaped bent wire for determining wall thickness. It was a David Ellsworth idea, very simple and practical. I am too cheap to cut them in half.... I do like an even thickness all the way through the bowl, sides, transition, and across the bottom. I think that makes for a longer lasting bowl. To sand out a warped bowl, and all of mine are warped, I use an articulated arm that I made for sanding, and lathe speeds down to 15 rpm or less. Yup, another video that I did. The articulated arm allows you to spin the bowl by hand since the drill is resting on the arm rest.

robo hippy
 
Joined
Jan 12, 2022
Messages
28
Likes
14
Location
Bixby, Oklahoma
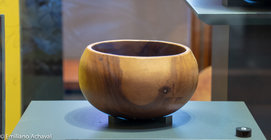
Alright I just finished up two more bowls and cut them in half for some more C&C
9C77E9DF-FA18-42EF-B134-8868B0D57B48.jpeg33F7D68D-87A1-4141-A8A1-BB0CA03308EF.jpeg
I checked more often with my calipers and I checked my depth multiple times as I neared the bottom, I use the chuck key sighted across the rim to check my depth but the gauge is a good idea. I made a point to leave the bottom a little thicker and that worked out well in my eyes at least. I don't have a carbide, so I did use a scraper a little bit on the bottom of the bowl at right to clean it up a little bit which helped in the corners a bit. I did taper the sides a tad to see how that would go with the thicker bottom.
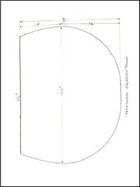
@Emiliano Achaval I did the the thickest part 1/3 of the way up instead of 2/3, which is what I did on the original ones. I was pleasantly surprised how nice these felt and the fact that they weren't any more difficult to turn then the original ones. Are these more traditionaly accurate? I also did some looking and found a used copy of Irving Jenkins book for a good price and went ahead and ordered it and look forward to reading it.
@robo hippy , the bowls I am cutting in half are the ones with major cracks, from poor blank lay out on the log, so they are fire wood anyways and if I can learn from firewood then I am happy.
The calipers I have been using are the small jackovsky calipers but I will try out the wire calipers on the next batch and see how they do.
I have seen your videos on the armrest and on the depth gauge and I think they are brilliant. My only problem is for the gauge, I would need several for each chuck and some of the longer jaws that I have.
I sand these while they are green and find that works well for the ones I have been doing. I really like your armrest I just haven't taken the time or discovered my dire need to make one just yet.
Thanks again to you all for the help and please continue to give your thoughts on these bowls and what I can do better next time. I really appreciate this and it really is already making a difference.
 
Last edited:

Emiliano Achaval

Administrator
Staff member
Beta Tester
TOTW Team
Joined
Dec 14, 2015
Messages
3,317
Likes
4,271
Location
Maui, Hawaii
Website
hawaiiankoaturner.com
I like the one on the left. The one on the right is too flat on the bottom, and the apex is too low. You are going in the right direction. To bring the apex point up you have to cut all the way from the bottom. YOu can get into a tug of war and end up with a thimble. For a low sided I would bring in more of the curve at the top. These are the shape of the Umeke Mana'ai, a small bowl given to kids when they turned 1 year old. You will see some in the book. I have seen them several times at the bishop museum. They have Queen Emma's little Mana'ai. I would not call the one on the right a calabash. The left one, yes. I like how you have sapwood. Most, if not all pre-contact calabashes had that characteristic. I have attached Queen Emma's Umeke Mana'ai. I took the picture myself at the museum. The sketch was made by Elmer Adams. If you follow that and you be in good hands.
 

Attachments

  • QueenEmma.jpg
    QueenEmma.jpg
    238.5 KB · Views: 67
  • 2007_01_003.jpg
    2007_01_003.jpg
    24.9 KB · Views: 79
Joined
Jan 12, 2022
Messages
28
Likes
14
Location
Bixby, Oklahoma
Wow! thank you for the info and for these pictures! They were really helpful as were your pointers on my earlier bowls. I turned several today and the last one I am very pleased with. B92601AC-FDA4-47B4-8DE0-FF744567BA9F.jpeg58C2FE14-017D-415B-9EC6-4F45E753F7C9.jpeg
I tried to bring it in a little more and adjusted my base angle to get a better rounded bottom.
Is this better?
Thanks again for the feedback, it really has helped tremendously.
 

Emiliano Achaval

Administrator
Staff member
Beta Tester
TOTW Team
Joined
Dec 14, 2015
Messages
3,317
Likes
4,271
Location
Maui, Hawaii
Website
hawaiiankoaturner.com
Here's an interesting interview with Emiliano about the forms and history of calabash bowls interview
That was a fun interview. I was more than happy to collaborate with the great Ernie Conover. He is definitely a legend and has done so much for woodturning. I was bursting with pride when he said he was a lucky guy to be able to call me his friend!
 

Emiliano Achaval

Administrator
Staff member
Beta Tester
TOTW Team
Joined
Dec 14, 2015
Messages
3,317
Likes
4,271
Location
Maui, Hawaii
Website
hawaiiankoaturner.com
Wow! thank you for the info and for these pictures! They were really helpful as were your pointers on my earlier bowls. I turned several today and the last one I am very pleased with. View attachment 44600View attachment 44601
I tried to bring it in a little more and adjusted my base angle to get a better rounded bottom.
Is this better?
Thanks again for the feedback, it really has helped tremendously.
That is definitely a Calabash. Well done. One way to make sure you nailed the bottom is to do the floating test. Take a picture from the side, barely an inch should be touching the surface that is sitting on. It's OK to make a small concave area the size of a quarter, but not necessarily. Calabashes seem to be "floating" on the surface. A common mistake is to make the bottom too pointy or too flat. You then have a sandbag effect, wrong, and or is not floating, wrong again. I like the thickness of the bottom, it is after all a utilitarian bowl that will be used for generations to come and you want it to be sturdy. The thickness gives a nice feel in your hand and makes go upright nicely when you rock it. Once you master this shape, you have the taller side-grain shape and then the hardest one of them all the Pu'ahala, the end grain calabash, is always taller than wider. You will see some beautiful pictures when you get the book. How much did you pay for it? The calabash journey is a fun long, endless road, there is always room for improvement. Aloha!
 
Joined
Jan 12, 2022
Messages
28
Likes
14
Location
Bixby, Oklahoma
Thank you, I have been interested in the calabash for a while and was happy with the ones I was doing, although I had a nagging suspicion I was doing something wrong. All of these tips and pointers has made making these bowls easier and more enjoyable now that I have some concrete guidelines to follow.
I got the book for used $125 on Abebooks.com. New copies are closer to $200 but this was in good condition so I am happy.
Thanks again for your help.
 
Joined
May 4, 2010
Messages
2,449
Likes
1,877
Location
Bozeman, MT
I have attached Queen Emma's Umeke Mana'ai. I took the picture myself at the museum. The sketch was made by Elmer Adams. If you follow that and you be in good hands.
Emiliano, in a prior post in this thread you said the widest part should be 1/3 of the way from the bottom, but in Queen Emma's mana'ai and the attached sketch, the widest part looks to be 1/3 from the TOP. Can you clarify?
 
Back
Top