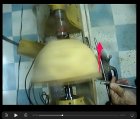
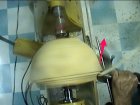
I have to be doing something very wrong. I can do spindle work all day with a skew and have no catches. The second I try hollowing a bowl with a bowl gouge every thing goes to crap.. I can't get the darn things to work without a catch every minute or two. I can use an old fashioned 50 yr old shallow bowl gouge without catches. But these new fangled things have ruined over half the bowls I have worked on. The darn things are round in the shank and roll over extremely easy, the edge being on the upper side just causes the things to roll over and then I get a big spiral shaped scrape into my bowl. I went back and watched you tube videos again. I do not get these things.
-
January 2026 Turning Challenge: Turned and Bent! (click here for details) -
Congratulations to Phil Hamel, People's Choice in the December 2025 Turning Challenge (click here for details) -
Congratulations to David Wyke for "Maple Platter #567" being selected as Turning of the Week for January 5, 2026 (click here for details) -
Welcome new registering member. Your username must be your real First and Last name (for example: John Doe). "Screen names" and "handles" are not allowed and your registration will be deleted if you don't use your real name. Also, do not use all caps nor all lower case.
You are using an out of date browser. It may not display this or other websites correctly.
You should upgrade or use an alternative browser.
You should upgrade or use an alternative browser.
Catches and more catches
- Thread starter Perry Hilbert
- Start date
I have been turning since 2011. Mostly pens, pepper mills, mallets and some small bowls. I've realized it's a whole nother world turning bowls. I turned a 10x3 bowl over the weekend and it was the first successful bowl I have turned where the tenon hasn't blown out and everything went well. It was all rooted in Sharp tool, good anchor, riding the bevel (which I didn't really get until this weekend) light cuts and going slow. I'm not saying you have any of these problems, just saying that it finally all came together for me. I had watched probably a hundred videos, but without the trash can full of failed bowls, I wouldn't have gotten to the place where I've got a victory, I know it's just a matter of time and practice. By the way, yes, spindle turning by comparison was surprisingly easy to pick up.
The bottom of the bowl gouge, the bevel, must stay in contact with the inside of the bowl. That's what keeps it from catching. The groove of the bowl gouge points towards the interior of the bowl. If you've got a sharp bowl gouge and you present it correctly to the wood, it's easy.....usually. Take small cuts and work from the rim of the bowl to the bottom. Depending on the angle of your grind and the depth of the bowl, you may not be able to get the bottom. I'll often do that with a scrapper.
- Joined
- Apr 27, 2004
- Messages
- 9,309
- Likes
- 6,082
- Location
- Lakeland, Florida
- Website
- www.hockenberywoodturning.com
best thing is to take a class where you can learn.. however with the current Corona virus it will be many months before classes become available.
One of the easy said hard to do things:
If you don’t let the wood drive onto the tool you won’t get a catch
A big difference in spindle and bowl turning is that in spindle turning the tools are held in front of your body in bowl turning the handle of the tool is almost always against your body.
you may benefit from watching the video of demo I do on roughing a bowl.
I can answer questions about my video and can take a look at any video you can take of your gouge work.
what I do.
Cut with the gouge nearly level to floor.
Set the tool rest so the the gouge is cutting at center when level to the floor.
Hold the handle against you body. The forward hand let the thumb push the slightly in the direction of the bevel. The cutting is done moving your body.
Shift weight from your back foot to the front foot whose toe is in the direction you are cutting.
Roll you hips slightly to turn curves.
Begin the cut with the flute at 3 o’clock or 9 o’clock depending on how you are holding the tool.
Then rotate the tool so the flute points up slightly at 3:00 or 10:00

You can pick up a lot of the basic watching the video below.
All bevel riding cuts with an Ellsworth ground gouge
Also shape has a lot to do with ease of hollowing. Hemispherical easiest for most to hollow,
here the gouge is positioned to make a cut

you can see the cut.

Fast forward to 10:10 to see the bevel riding in “slow motion”
Fast forward to 20:19 to see hollowing the bowl. ( this starts with the handle across the ways. I pull it to my body..
Roughing green bowl
View: https://www.youtube.com/watch?v=Lo0bGSafZq4
One of the easy said hard to do things:
If you don’t let the wood drive onto the tool you won’t get a catch
A big difference in spindle and bowl turning is that in spindle turning the tools are held in front of your body in bowl turning the handle of the tool is almost always against your body.
you may benefit from watching the video of demo I do on roughing a bowl.
I can answer questions about my video and can take a look at any video you can take of your gouge work.
what I do.
Cut with the gouge nearly level to floor.
Set the tool rest so the the gouge is cutting at center when level to the floor.
Hold the handle against you body. The forward hand let the thumb push the slightly in the direction of the bevel. The cutting is done moving your body.
Shift weight from your back foot to the front foot whose toe is in the direction you are cutting.
Roll you hips slightly to turn curves.
Begin the cut with the flute at 3 o’clock or 9 o’clock depending on how you are holding the tool.
Then rotate the tool so the flute points up slightly at 3:00 or 10:00

You can pick up a lot of the basic watching the video below.
All bevel riding cuts with an Ellsworth ground gouge
Also shape has a lot to do with ease of hollowing. Hemispherical easiest for most to hollow,
here the gouge is positioned to make a cut

you can see the cut.

Fast forward to 10:10 to see the bevel riding in “slow motion”
Fast forward to 20:19 to see hollowing the bowl. ( this starts with the handle across the ways. I pull it to my body..
Roughing green bowl
Last edited:
Hockenbery has some excellent points. I would add that there are several professionals doing live demos these days including Trent Bosch and Lyle Jamieson. I just spent ten bucks to join Bosch last week on-line for a Hollow Form demo. It was almost as good as being there, because there was interaction, like when somebody watching said he'd like a closer view of the gouge edge while cutting, and Trent adjusted the camera angle to provide a better view.
I bet you could even find someone to do a one-on-one live demo with you these days.
One question I have is what kind of gouge and grind are you using? Can you post a photo of your gouge here?
BTW, when I first tried a bowl gouge instead of a scraper, I put the gouge in a drawer and went back to scrapers for a long time before I got some one-on-one assistance.
If you can study the tool you are using and visualize how it can catch on the piece you are turning you will comprehend most of your challenges. Each tool will have its limitations and learning those limitations will make the process easier if you can see the working end of the tool in your mind and know how far you can roll the tool before it will catch. Once you get deeper into a bowl the angle of the cut changes and the cutting edge of the tool is approaching the surface from a different angle and if you lose focus or don't have the "muscle memory" in your cutting technique the chances of catching the wings on the bowl gouge increase.
There is lots of good advice above.
I've seen a number of new turners (myself included back in the day) have bad catches inside of bowls because the gouge was in the wrong orientation when it was pushed into the wood.
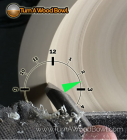
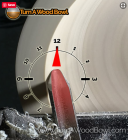
Here's what it should look like, flute pointed toward the center of the bowl, often described as the flute in the 3 o'clock position. Cutting takes place at or near the tip, on the right hand wing, the lower cutting edge:

Below is a picture of what can get you into trouble. Flute pointing toward the ceiling (12 o'clock position) or rolled over even more towards 11 o'clock. Attempt cutting with the left hand wing. Bad catch. Bowl flies out of chuck. Bad language ensues.

So that's something I suggest you check right away. Make sure your flute is pointing in the right direction (2:30 - 3 o'clock, toward the center of bowl) and that you are cutting on the lower, right hand wing side of the tip.
5/6 Edit/addition: Two more suggestions: Make sure the gouge is horizontal. The pictures above seem to show the gouge pointed up hill with the tip higher than the handle. It's better if the gouge is horizontal, (parallel to the floor). And be sure you are cutting on the center line of the bowl.
The images came from this article which has lots more good advice on avoiding catches: https://turnawoodbowl.com/no-catches-using-a-bowl-gouge-with-confidence/
I've seen a number of new turners (myself included back in the day) have bad catches inside of bowls because the gouge was in the wrong orientation when it was pushed into the wood.
Here's what it should look like, flute pointed toward the center of the bowl, often described as the flute in the 3 o'clock position. Cutting takes place at or near the tip, on the right hand wing, the lower cutting edge:

Below is a picture of what can get you into trouble. Flute pointing toward the ceiling (12 o'clock position) or rolled over even more towards 11 o'clock. Attempt cutting with the left hand wing. Bad catch. Bowl flies out of chuck. Bad language ensues.

So that's something I suggest you check right away. Make sure your flute is pointing in the right direction (2:30 - 3 o'clock, toward the center of bowl) and that you are cutting on the lower, right hand wing side of the tip.
5/6 Edit/addition: Two more suggestions: Make sure the gouge is horizontal. The pictures above seem to show the gouge pointed up hill with the tip higher than the handle. It's better if the gouge is horizontal, (parallel to the floor). And be sure you are cutting on the center line of the bowl.
The images came from this article which has lots more good advice on avoiding catches: https://turnawoodbowl.com/no-catches-using-a-bowl-gouge-with-confidence/
Last edited:
- Joined
- Apr 27, 2004
- Messages
- 9,309
- Likes
- 6,082
- Location
- Lakeland, Florida
- Website
- www.hockenberywoodturning.com
One thing I should have mentioned. @Tom Albrecht sort of did.
If your bowl gouge is not ground properly it could be impossible to use without getting a catch.
Any gouge need a contiguous convex edge wing tip to wing tip.
Flat is ok. Dips will not work.
If your bowl gouge is not ground properly it could be impossible to use without getting a catch.
Any gouge need a contiguous convex edge wing tip to wing tip.
Flat is ok. Dips will not work.
Dave's pictures should be very helpful, but they look to me like you're supposed to have the gouge angled upward, and this is not correct. You do not want the handle low and the cutting nose pointed upwards--you want the tool horizontal, as Al said in his first post. (Yes, guys, when you get more accomplished you may do things differently, but for a new turner, horizontal is the way to safely start)
Perry, from your comment on how the top edge is catching in the wood, it sounds like you're using the tool too close to the second picture. If so, Glenn Lucas has a simple trick to help you keep your gouge out of the danger zone--put a line down the center of the flute with a red sharpie. When turning, if you see the whole width of the red line, you've got the tool rolled with too much flute upwards. To start, keep the flute pointing horizontally to the inside of the bowl so you can't see the red line. When you get more comfortable, after you start a cut horizontal, you can roll the tool with a little more flute showing, right up to just a peek of red line showing.
Perry, from your comment on how the top edge is catching in the wood, it sounds like you're using the tool too close to the second picture. If so, Glenn Lucas has a simple trick to help you keep your gouge out of the danger zone--put a line down the center of the flute with a red sharpie. When turning, if you see the whole width of the red line, you've got the tool rolled with too much flute upwards. To start, keep the flute pointing horizontally to the inside of the bowl so you can't see the red line. When you get more comfortable, after you start a cut horizontal, you can roll the tool with a little more flute showing, right up to just a peek of red line showing.
Dave's pictures should be very helpful, but they look to me like you're supposed to have the gouge angled upward, and this is not correct. You do not want the handle low and the cutting nose pointed upwards--you want the tool horizontal, as Al said in his first post. (Yes, guys, when you get more accomplished you may do things differently, but for a new turner, horizontal is the way to safely start)
I totally agree with your comment on holding the gouge horizontal. I edited my original post to include that comment. Thanks.
Odie
Panning for Montana gold, with Betsy, the mule!
I totally agree with your comment on holding the gouge horizontal.
Not necessarily........there are times when you can break the rules, and get better results than you could without breaking the rules. In many cases, by twisting the gouge along the longitudinal axis one way.....then the other way, as you proceed around the transition from wall to bottom of the interior, the cut can be substantially improved.
This information may not be appropriate for new turners, though......because it involves substantial risk.....even though when done by an experienced turner, it can have incredible results in the quality of the cut.
(Often times, the cleanest cut that can be achieved, is that which is extremely close to having a disastrous catch.)
Play by the rules when learning, new turners.......but, keep this information in the back of your mind until you get some serious saddle time!
-----odie, the eccentric old guy!-----
Odie, I agree with you too. Suggestions like hold the gouge horizontal or cut only with the right hand wing aren't absolute rules, never to be broken. I cut with the left hand wing often, especially on bowls that curve inward at the rim. And holding the handle lower gives a more shearing cut that can help reduce tearout in difficult wood. But, in general, for beginners wanting to avoid catches, horizontal, cutting on the right is the safest way to start.
And it's really unfortunate that we are all are isolated. Hands on instruction from someone who's figured out the bowl gouge is very helpful when getting started.
And it's really unfortunate that we are all are isolated. Hands on instruction from someone who's figured out the bowl gouge is very helpful when getting started.
Well, you need a play date with an accomplished turner. Most likely it is a presentation issue as in how do you stick a sharp piece of metal into spinning wood without it catching.... That would be a fairly simple fix. Some do like to cut with the flutes up. It can be done, but if you come off the bevel at all, you get a catch. I always have my flutes rolled over on the side on both inside and outside of the bowl. I have seen people with the flutes pointed straight up and plunging the nose of the gouge straight into the wood like a scraper. I have made all of these mistakes, and most of them more than once, if for no other reason, just to figure out what went wrong.
I have a bunch of mostly bowl turning videos up on You Tube.
robo hippy
I have a bunch of mostly bowl turning videos up on You Tube.
robo hippy
Thank you to all. especially Hockenbery for the detailed explanation. Like everything else I try, I need to review this a few times before I try again. I made dozens of bowls back in the late 1960's with the gouge that came in the older craftsman sets of that era. Was away from turning for almost 50 years and things have changed drastically, except that the wood still turns. The tools and methods of mounting the wood have so many more options. .
Lyle Jamieson has an excellent video on bowl turning. It's four hours long so I digest it in one hour segments. He also mentions the red
Sharpie line down the flute. Well worth the $$$, IMHO.
Remember, one good turn deserves another.
Sharpie line down the flute. Well worth the $$$, IMHO.
Remember, one good turn deserves another.
