• July 2025 Turning Challenge: Turn a Multi-axis Weed Pot! (click here for details)
  • Congratulations to James Seyfried for "NE Red Oak II" being selected as Turning of the Week for July 21, 2025 (click here for details)
  • Welcome new registering member. Your username must be your real First and Last name (for example: John Doe). "Screen names" and "handles" are not allowed and your registration will be deleted if you don't use your real name. Also, do not use all caps nor all lower case.

Cherry burl orientation and epoxy

Joined
Dec 29, 2022
Messages
1,088
Likes
1,303
Location
USA
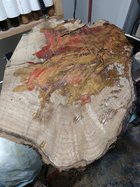
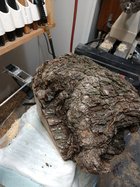
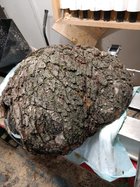
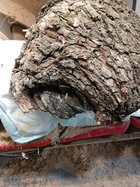
This was one of the first burls I collected and it was really punky and ate up in the middle.

Today I started to dump 3 different colors of epoxy in the ant holes and punkiness of the middle of it. Is this going to be a WOW when it's done or a what the #$%^$ is that? Anyone have a bowl picture of something they have done similar? Had only maybe 6 ants crawl out because I went over it pretty good with a pick and blow gun. I'm sure there is still some trapped in the epoxy. Character?

Also with a burl I know it's a crap shoot but what would be a good way to orient it? Bark to the top of the bowl or to the bottom? It's roughly 22" x 14" and the thickest is 6-8". Depending on how I turn it some or most of the epoxy might get turned away if I go thin enough. 400 ml of epoxy is all it took so far.
 

Attachments

  • IMG_20230711_204929860.jpg
    IMG_20230711_204929860.jpg
    557.3 KB · Views: 60
  • IMG_20230712_090824212.jpg
    IMG_20230712_090824212.jpg
    635 KB · Views: 26
  • IMG_20230712_090833175.jpg
    IMG_20230712_090833175.jpg
    590.4 KB · Views: 25
  • IMG_20230712_090845705.jpg
    IMG_20230712_090845705.jpg
    648.3 KB · Views: 27
22”x14” - I would look at trimming the long direction down to 14”, leaving a piece for a hf and maybe some small finder bowls or boxes, etc. trimming corners may leave mat’l for small turnings.

I tend to like natural edges so bark up, but its hard to tell from just one pic. You could look a leaving the piece whole if natural edge.
 
I agree with Doug, cut that chunk into smaller pieces. Think about the types of turnings you want to make, as well as where the epoxy is, and map it out. By that, I mean draw on the chunk, and then cut apart accordingly.
 
Also with a burl I know it's a crap shoot but what would be a good way to orient it?
Inspect the sides of the piece (like, cut off some of the edges and look there). You should be able to get a feel for how deep the figure is. Some burls, the figure is just near the outer surface - these I usually like to turn with the bottom of the bowl towards the outside to capture as much of that figure as possible. Although turning a natural-edge bowl will get that figure around the edges (but it looks different - usually lines rather than eyes). If the figure is deep, maybe it's a good candidate for a natural edge if you can capture some burl figure in the bottom.
 
Hard to tell from a photo which way to orient it, but the grain pattern shown suggests there is a big component of ’onion‘ burl figure there that is sometimes not that spectacular. Because the epoxy seems to cover it, it’s hard to tell if that area has more of the ‘fingers’ that create the swirling grain patterns. Trimming it down to a more workable blank will, as has been pointed out, give a better look at the grain structure and result in usable scraps. At this Stage its a crap shoot…ya just got to go with your best shot.
On orientation - if you find a section with the fingers, since that’s where the swirl is, I prefer to keep these close to the surface and will orient the blank so they are most apparent as the bowl is viewed best - if I’m planning an open shape, shallow bowl the inside bottom of the bowl is most apparent when viewed in use. If the bowl is a deeper shape where the outside surface near the rim is often the star, that’s where I’d try to place the best grain - in this case, I’d always core out the inside to avoid turning the best stuff into shavings.
 
Last edited:
Hard to tell from a photo which way to orient it, but the grain pattern shown suggests there is a big component of ’onion‘ burl figure there that is sometimes not that spectacular. Because the epoxy seems to cover it, it’s hard to tell if that area has more of the ‘fingers’ that create the swirling grain patterns. Trimming it down to a more workable blank will, as has been pointed out, give a better look at the grain structure and result in usable scraps. At this Stage its a crap shoot…ya just got to go with your best shot.
On orientation - if you find a section with the fingers, since that’s where the swirl is, I prefer to keep these close to the surface and will orient the blank so they are most apparent as the bowl is viewed best - if I’m planning an open shape, shallow bowl the inside bottom of the bowl is most apparent when viewed in use. If the bowl is a deeper shape where the outside surface near the rim is often the star, that’s where I’d try to place the best grain - in this case, I’d always core out the inside to avoid turning the best stuff into shavings.
Unfortunately the epoxy had to cover it because that was where it was the softest and had all the ant trails. If I slice it thinner for say a small platter I'm sure I'll be adding more epoxy. I'm hoping the epoxy in the ant trails will create something interesting too but probably will just be a lot of holes after I turn all the ants in half.
 
I agree with Jeff Smith that it is not a real burl but a problem that is overgrown, it is layers like in a onion, yes extra figure but has not the burl eyes a real burl has.

Of course we can't see and feel the piece, but I would probably start with cutting the problem wood away, then have another look to see what's left over of usable good wood with lots of figure.


These are much smaller, but similar in original start

Burrs.jpg


circled what I would maybe save if it is what I think it actually is, if you have this then you can decide what to make top or bottom, :)

Onion burl.jpg
 
Anyone have a bowl picture of something they have done similar?
In reply to #1

The pics are of a collaborative effort cherry burl. I turned the bowl and a turner friend and I filled the voids with two part epoxy. We added black dye while mixing the epoxy. After the epoxy dried, I put the bowl back on the lathe, final turned it and finished the foot. I applied several coats of Wipe on Poly followed by a coat of Renaissance wax.DSCF0008.JPGDSCF0012.JPGDSCF0021.JPGDSCF0029 (1).JPG
 
The most common burls around here are cherry and they tend to have a lot of voids and bark inclusions. When I started turning the stuff I would fill the voids with epoxy but it was a never-ending process as it's almost impossible to fill all the holes without a vacuum chamber. I tend to leave them be now for "non-functional" pieces. The punky stuff is better avoided in my opinion.
 
If the wood is punky enough that it needs help regular epoxy is not going to help much. You would need to use a stabilizing resin like cactus juice. I like to cut big burls into multiple hollow forms with the tops on the bark side. Then either leave the voids and natural edges in or fill and extend the rim with resin. A before and after i know its not for everyone but its a way to make something ugly look nice.
rough turned cherry burl.jpgcherryresin1.JPG
 
Back
Top