• It's time to cast your vote in the April 2025 Turning Challenge. (click here for details)
  • Congratulations to Steve Bonny for "A Book Holds What Time Lets Go" being selected as Turning of the Week for 28 April, 2025 (click here for details)
  • Welcome new registering member. Your username must be your real First and Last name (for example: John Doe). "Screen names" and "handles" are not allowed and your registration will be deleted if you don't use your real name. Also, do not use all caps nor all lower case.

Chris Kemler

Joined
Jun 30, 2014
Messages
4
Likes
0
Location
Carrollton, Texas
Hello all,
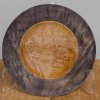
I hope you and your collective wisdom can give me some help with this platter- View attachment 7629.
It is 10" and I used black leather dye on the rim. I'm thinking I will gold leaf a reveal between the black and the dished area, but the black is just not doing it for me. Any suggestions for making this thing better?

Thanks,
Chris
 

Attachments

  • DSC_0977.jpg
    DSC_0977.jpg
    475.4 KB · Views: 129
Chris......I think you're right. The dark rim would have looked better if it were distinctly black. That somewhat purple color just isn't coming off very well. Maybe more coats of the leather dye would get it darker.....? Possibly the dye is penetrating too much. Maybe something like a sanding sealer underneath would limit penetration and bring out the black a bit better.......(haven't tried this, only a guess)

I can't give a knowledgeable opinion on this......only guesswork.

ooc
 
I agree with Odie. Another few layers of black will make it stand out more. Have you applied finish yet. Finish will change the look of the black. However if you do finish it then the black dye won't penetrate as well. try it on some scrap.
 
Hi Chris, welcome to the AAW forum and the turning vortex, although I suspect that you have been turning for quite a while. That platter has great figure and also looks like it has lots of chatoyance. I'll be the contrarian and suggest with all of the great figure, it would be better to to use a colored dye rather than a pigmented stain to color the rim. While pigments color the wood, they also somewhat mask the ability of the wood to reflect light that accentuates the grain pattern in highly figured wood. Here is an example of a maple platter that I made a few years ago.

http://www.aawforum.org/photopost/showfull.php?photo=9092

I used TransTint dye (dark blue, blue, and yellow) that I got at Rockler Hardware in Arlington. Lately, I have been using Chestnut brand dyes from Wood World just north of TI which is reasonably close to you. The process that I use for dyed rim platters is similar to the method used by Jimmy Clewes.

BTW, if you haven't checked out the Dallas Area Woodturners, I believe that they hold their meetings at Wood World.

Thanks for the feedback, Bill. I actually got the board I used from Wood World and am a DAW member. I used the board to turn 5 12" platters with no coloring. This one I wanted to do some experimenting on. A previous experiment went awry with red TransTint. I'll have to keep trying. Point taken on the pigment vs. dye. I guess leather dye would be pigment based.
 
If you want to try what Bill suggests just use 4/0 steel wool and take the black down until it is only left in the birds eyes and curl. Then add a different color. It can be a dye or an ink, both are transparent.
 
Apply the first color, usually the darkest color on the inner part of the rim and feather it out towards the outer edge. Next use 400 grit sandpaper to sand the color so that it is mostly bare wood on the outer edge and lightly sanded on the inner edge. Apply the next lighter color to cover the entire rim then sand it back a bit to expose some of the bare wood. If the DAW has one of the Jimmy Clewes videos, check it out to learn how he does it. That beats me trying to explain it in a few sentences. Or you could consider buying some of his videos. Wood World would be happy to sell them. :D

When I used TransTint, I fount that it was easy to get the strength too intense. Just a little dye mixed with lots of alcohol works well. Even easier are the Chestnut dyes.
 
Chris, I think it would be a shame to cover up some of the character in that wood with a total black. If I am not wrong the shoe dye is oil based. I made the mistake of dipping a work in my poly mix that I had used that on. I thought it was dry but it bled black into my mix so bad I jerked it out. I now use a black waterbased dye and mix acrylic black into it and brush it on. I do as many coats till very black. Very thinned down as to soak in. Any area to be natural wood has been sealed with finish before doing any black. But I like the advise you have been given about other colors also. And I also agree with others that you seem to be no newbie.
 
Bill, I like your advice and our DAW meeting is Thursday, so I'll check out a video before I do anything else. Thanks.

And I also agree with others that you seem to be no newbie.
Kelly, thanks for the kind words.

I've been a serious woodworker for 5 years, showing locally and regionally with some critical success. I bought my American Beauty last year at SWAT and consider myself turning seriously since then. In February, my employer gave me the opportunity go have a go at it full time (read: got laid off). I have a retail venue for my turnings and older furniture pieces, and two group shows in the last quarter lined up for furniture pieces. Hopefully I'll be able to make some sales this fall.
 
I took delivery of my Robust AB at SWAT in 2011. The next year, I got the Robust outboard turning attachment and steady rest and the Advanced Lathe Tools (Steve Sinner) boring bar rig. If you think that you will ever need to turn anything larger than 25 inches, the Robust outboard attachment is really rock solid.
 
Chris, I think you have a very good start on a great looking platter. However, it's hard to tell from the picture but do you have a finish on top of the dye. One of the things that Jimmy Clewes talks about that really enhances the effect of the dye is a lacquer finish. It really helps take the flatness out of the dye. I think that would help a lot. Give it a try.
Steve
 
I'm far from an expert on turning but I appreciate the look you are trying to achieve. You will find a great bunch of folks and a trainload of info here. I'm intrigued by the overall grain of the wood. Thanks for the photo and a good question that gives info to all of us. Welcome!
 
Hello all,
I hope you and your collective wisdom can give me some help with this platter- View attachment 7629.
It is 10" and I used black leather dye on the rim. I'm thinking I will gold leaf a reveal between the black and the dished area, but the black is just not doing it for me. Any suggestions for making this thing better?

Thanks,
Chris
(Really, you didn't call me!?)

I like the chestnut dies, but I have several different black dies and tints you can borrow.

The problem you have is if the black gets too dark, you loose the chatoyance and figure in the rim. May not be a big deal because it would focus attention on the figured center.
 
..... So, what advantages do the Chestnut dyes have over the Trans Tint? (other than maybe price, those are expensive!)

While the TransTint dyes seem expensive, one little two ounce bottle is enough to make about a half gallon after it is diluted. The Chestnut dyes seem to be far less expensive until you realize that what you see is what you get. You might be able to get away with diluting it a little. Chestnut dyes supposedly have a very small amount of shellac in it. That is supposed to help prevent too much interaction when layering multiple colors. Perhaps, but the effect apparently is very subtle. I have not noticed a major difference except that the hues are a bit different. I think that the TransTint blue is a true blue while the Chestnut blue is more like cyan. Chestnut green is brighter than TransTint green.

One other cost factor to consider is that the cost of getting five basic colors of TransTint will set you back a C note. The same set up with Chestnut dyes is less than half that amount -- something to consider if you aren't sure how much dyeing you will be doing.
 
Back
Top