I'm moving toward doing some very deep hollow forms. Working my way toward about 24" deep. Currently up to about 15" and getting comfortable with the process and order of steps. Different than a typical 5"-10" form that I do a lot of. I have a DWay hollowing rig that I started with, an articulated Simple Hollow System with a 5/8 adapter plus a home made 3/4 captured bar setup. All of these have wall thickness gauges (laser or spring finger) that let me keep an eye on wall thickness up to about 11-12" depending on the wood. After that I switch to the Roly Munro 3/4 bar with a customized tool rest.
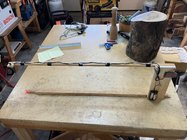
The issue was I had no way to keep an eye on wall thickness beyond about 12". I looked at making some custom calipers out of 1/8" aluminum, looked online, etc. Couldn't find anything that would work and making them got to be complicated plus they would be hard to maneuver around my steady rest, heavy, etc. I ended up making this rig. A laser setup on light but straight and stiff wood strips set at about 7/16 thickness gap between the laser and the guide. So far it seems to be light enough to manage and meets the need. Maybe add an adjustable feature to the guide stick in the future but for now if I can keep close to 7/16" - 1/2" all the way to the bottom I'll be happy. Not foolproof but like a lot of DIY tools and jigs, if you made it and know it's limitations it can work just fine. I always assume someone smarter than me has figured this out before or sees something I did wrong or could improve on. Let me know.
The issue was I had no way to keep an eye on wall thickness beyond about 12". I looked at making some custom calipers out of 1/8" aluminum, looked online, etc. Couldn't find anything that would work and making them got to be complicated plus they would be hard to maneuver around my steady rest, heavy, etc. I ended up making this rig. A laser setup on light but straight and stiff wood strips set at about 7/16 thickness gap between the laser and the guide. So far it seems to be light enough to manage and meets the need. Maybe add an adjustable feature to the guide stick in the future but for now if I can keep close to 7/16" - 1/2" all the way to the bottom I'll be happy. Not foolproof but like a lot of DIY tools and jigs, if you made it and know it's limitations it can work just fine. I always assume someone smarter than me has figured this out before or sees something I did wrong or could improve on. Let me know.