Newbie here! Part seasoned ash 9” x 5” x 5”- outside shaped. Internal recess needs to be 7” deep x3” diameter to accept a glass insert. I’ve drilled full depth with 1-3/4” Forsner bit. Using a box scraper to enlarge the hole with some success but as I go deeper the tool overhang over the tool rest will get bigger. I don’t have any sort of hollowing jig, only gouges, scrapers and standard tool test. A tool test that fitted inside the recess would help but I’ve not seen one and I’m a hobby turner with a current “production run” of 4!! Suggestions welcome!

-
July 2025 Turning Challenge: Turn a Multi-axis Weed Pot! (click here for details) -
Congratulations to Kent Reisdorph for "Sugarberry Bowl" being selected as Turning of the Week for July 14, 2025 (click here for details) -
Welcome new registering member. Your username must be your real First and Last name (for example: John Doe). "Screen names" and "handles" are not allowed and your registration will be deleted if you don't use your real name. Also, do not use all caps nor all lower case.
You are using an out of date browser. It may not display this or other websites correctly.
You should upgrade or use an alternative browser.
You should upgrade or use an alternative browser.
Deep vase
- Thread starter Michael Beswick
- Start date
Recommend you develop hollowing capability vs a tool rest approach. Hollowing capability will allow much more freedom of piece design over time.
You can buy a system or make it. You can can make your own boring bars and handles etc. for hand held.
You can buy a system or make it. You can can make your own boring bars and handles etc. for hand held.
- Joined
- Apr 27, 2004
- Messages
- 9,236
- Likes
- 5,896
- Location
- Lakeland, Florida
- Website
- www.hockenberywoodturning.com
A tool test that fitted inside the recess would help but I’ve not seen one and I’m a hobby turner with a current “production run” of 4!! Suggestions welcome!
What you are asking about is called a box tool rest. In the US Robust sells these.

Craft supplies or other turning shops might have similar in the UK.
I have gone that deep with a termite tool and a standard rest. Very light cuts when extended over the rest.
I’m confident I could go that deep with a #4 Hunter - again slow going when way over the rest
Any straight hollowing tool with 1/2 bar or larger would do the hollowing nicely to that depth.
Last edited:
A box rest really is helpful. I have the robust and a Best Wood Tools small rest (modular system). I use them both. The small one is great for little boxes. You can use a regular rest to some degree, if you can get it in far enough. An offset bar helps with that.
Be careful with big scrapers hanging out over the bar. The can be quite grabby. I suggest using a tool with a small cutting surface. This will reduce the grabbiness. Also, a bowl gouge will do most of the work safely (used correctly), but may not give you the flexibility needed to shape and even out the thickness you want for the finishing cuts. And it won't work for big undercuts. Curved negative rake scrapers of various shapes would help you too.
I have some hunter tools that really help. But, I don't find turning deep hollow forms pleasurable. So, I generally avoid making them. A hollowing rig is in my future and that will be a game changer.
Recommend you develop hollowing capability vs a tool rest approach. Hollowing capability will allow much more freedom of piece design over time.
I did think my design might have exceeded my ability!
Here in the UK there seems only to be a box rest “platform “ as part of the Robert Sorby “modular system “ which frankly looks less Robust than well, Robusts. However I have a pal who is a clockmaker and can modify/redesign the RS one.
I have persevered with a carbide tipped (round) gouge which is 1/2” diameter and has an octagonal shaft (Crown) with very gentle cuts. So far so good but I’m about 5” in on a 7” shaft so a box rest is needed!
Interesting exercise working down a 5” hole with airflow helmet and a light on a gooseneck…..
Great advice here. I've also found that a freshly sharpened 1/2" spindle detail gouge can be really helpful for getting deep and scraping the sides. You can get right into the bottom corner of the recess. if you need a bit more support, you can always turn a handle sleeve to give you a bit more leverage when your tool is extended far over the tool rest. Like Al said, light cuts will be your friend.
@Michael Beswick you might get to 7” with a 1/2” shaft, but it will be frustrating. 1/2” cutter is really too big, but can be used. You really need a 3/4” bar. With that large of an entry hole, no problem. I do not know what hollowing systems/tools are available across the pond. I’m not impressed with any of Sorby’s offerings for hollowing.
If you are handy with a 4” hand grinder, drill, and tap, you could make a tool that would use your 1/2” carbide cutter. 3/4” round bar, tapered at the tip end, make a flat for the cutter, drill and tap a hole for the cutter screw, make a simple wooden handle with ferrule (~5x the length you want to hang off), and you are in business. Can give more details if interested. I use small 8.9mm dia carbide cutters for my hand hollowing tools.
If you are handy with a 4” hand grinder, drill, and tap, you could make a tool that would use your 1/2” carbide cutter. 3/4” round bar, tapered at the tip end, make a flat for the cutter, drill and tap a hole for the cutter screw, make a simple wooden handle with ferrule (~5x the length you want to hang off), and you are in business. Can give more details if interested. I use small 8.9mm dia carbide cutters for my hand hollowing tools.
All else fails consider a dedicated hollowing tool such as https://www.woodcut-tools.com/hollowing.html or https://www.cwsonline.com.au/shop/item/rolly-munro-mega-kit
I have both and they are my go to hollowers although I have a couple of others.
I have both and they are my go to hollowers although I have a couple of others.
You can hog out a lot of the material with a ring tool or hook tool but there is a learning curve that very few turners have bothered with. The ring/hook tool is like a gouge with the handle in a different position and you use it from the center (the hole you already have) out so you are shearing the wood grain not scraping. One of the biggest problems with the ring tool is that it is cutting so fast that the shavings jam up in the ring, but that is a minor problem compared to the speed of clearing wood. The common problem is holding the tool with the cutting edge facing straight up which will result in a guaranteed catch.
That is an excellent tool especially for deep hollowing through a small opening. I have mounted the cutter head on a 1"/25mm shaft that is more then 1 meter long that I tapered down to the required size for mounting the Wood Cut head.All else fails consider a dedicated hollowing tool such as https://www.woodcut-tools.com/hollowing.html or https://www.cwsonline.com.au/shop/item/rolly-munro-mega-kit
I have both and they are my go to hollowers although I have a couple of others.
@Don Wattenhofer Would love to see a photo of the piece you made that required a 1m shaft
7" deep with a 3" opening is a long way to go with little room to work on seasoned ash using standard tools. I've gone through an evolution of hollowing setups but early on I simply extended my tool rest into the opening best I could and sometimes turned in reverse so I could see what I was doing. Very light cuts with my carbide scrapers tilted at an angle was workable but still very easy to get a grab or catch in the bottom. Slow and careful. My experience is 5” is about at far as I can get comfortably with 1/2” steel shaft tools, depending on the wood. 5/8 will go a bit further and 3/4 is a must for deeper forms. If you plan on hollowing more then getting or making a system is a must in my opinion. If not then maybe just fight through these pieces and be done.
I don't do anything more then 12" deep and I don't use any stabilized hollowing rigs. The long heavy shaft/handle is all the stabilizing I need. The Wood cut cutter I can make a deep enough cut to stop the lathe without loosing control.@Don Wattenhofer Would love to see a photo of the piece you made that required a 1m shaft

This solid walnut urn is about 12" deep and was hollowed using my original arm brace handle and my long and heavy tools. The main body is 13" high X 8" diameter out side with an internal volume of 325 cubic inches.
Beg Buy Borrow a 3"Forstner bit and you have removed most of all the difficult wood, than use a spindle gouge to cut the remaining wood out, you will get experience doing the less difficult part, "you got to be able to walk before you can run"Newbie here! Part seasoned ash 9” x 5” x 5”- outside shaped. Internal recess needs to be 7” deep x3” diameter to accept a glass insert. I’ve drilled full depth with 1-3/4” Forsner bit. Using a box scraper to enlarge the hole with some success but as I go deeper the tool overhang over the tool rest will get bigger. I don’t have any sort of hollowing jig, only gouges, scrapers and standard tool test. A tool test that fitted inside the recess would help but I’ve not seen one and I’m a hobby turner with a current “production run” of 4!! Suggestions welcome!
")
Last edited:
You could also consider an extension for your Forstner bit. I have one that adds about 100mm, and is about 20mm in diameter. There are 2 small set screws that secure the shaft of the forstner bit. 1 3/4" would stress this set up quite a bit, but if you go slow....
I've also done pieces with a narrow scraper that were 7" deep, but it was years ago, I can't remember how I got away with it, and I'm too old to try it again. You might get or make a simple, straight Ellsworth or John Jordan style hollowing tool. Drill a 3/16-1/4" hole in the end of a 3/4" bar, fit a 2" long by 3/16 x 3/16 high speed steel bar into the hole, CA glue it in, sharpen as a tiny scraper, and you can go a lot deeper.
I've also done pieces with a narrow scraper that were 7" deep, but it was years ago, I can't remember how I got away with it, and I'm too old to try it again. You might get or make a simple, straight Ellsworth or John Jordan style hollowing tool. Drill a 3/16-1/4" hole in the end of a 3/4" bar, fit a 2" long by 3/16 x 3/16 high speed steel bar into the hole, CA glue it in, sharpen as a tiny scraper, and you can go a lot deeper.
Thanks for all the suggestions. As a self confessed tool "nut" (Classic British Car and a garage full of tools!), I now tend to try to "use what I've got", before buying more! Yes a 3" Forsner bit would have solved the problem as would a hollowing rig. It's a hobby and so I give away the pieces I make (if they're good enough....) Less money spent on kit = more on wood. 25miles from London means not much in the way of tree felling.
The three key points seem to be: I need the fulcrum nearer the contact point and a heavier tool to minimise vibration and add "mass". And fine cuts.
I have one of these https://azcarbide.com/product/pro-hogger-hollowing-tool/ arriving soon. The screw that holds it to the shaft (10/32) is virtually identical to M5 as used by Sorby, so it will fit on my Sorby tools. Developing Doug's suggestion I can make thicker bars for this and carbide cutters. I have a Sorby "Swivel Tip", which if fitted to a thicker bar is pretty similar to Dean's suggestion above. (https://www.oliverswoodturning.co.uk/product/robert-sorby-rs211-swivel-tip-complete/)
The Sorby box rest platform looks pretty flimsy, but could be welded up with a bracing piece under the platform. There doesn't seem to be much else available in the UK, and whilst I could probably import one, its a bit of a faff for both seller and me!
The three key points seem to be: I need the fulcrum nearer the contact point and a heavier tool to minimise vibration and add "mass". And fine cuts.
Yes please, see below!If you are handy with a 4” hand grinder, drill, and tap, you could make a tool that would use your 1/2” carbide cutter. 3/4” round bar, tapered at the tip end, make a flat for the cutter, drill and tap a hole for the cutter screw, make a simple wooden handle with ferrule (~5x the length you want to hang off), and you are in business. Can give more details if interested. I use small 8.9mm dia carbide cutters for my hand hollowing tools.
I have one of these https://azcarbide.com/product/pro-hogger-hollowing-tool/ arriving soon. The screw that holds it to the shaft (10/32) is virtually identical to M5 as used by Sorby, so it will fit on my Sorby tools. Developing Doug's suggestion I can make thicker bars for this and carbide cutters. I have a Sorby "Swivel Tip", which if fitted to a thicker bar is pretty similar to Dean's suggestion above. (https://www.oliverswoodturning.co.uk/product/robert-sorby-rs211-swivel-tip-complete/)
The Sorby box rest platform looks pretty flimsy, but could be welded up with a bracing piece under the platform. There doesn't seem to be much else available in the UK, and whilst I could probably import one, its a bit of a faff for both seller and me!
I use the Universal Box Rest 1 1/2" wide X 4" depth from Best Wood Tools. Works very well.
@Don Wattenhofer thanks for following up. That’s a beautiful vase, and good information.
The pro hogger tool will work well. It is very similar to the swivel tip Lyle Jamieson sells, straight and hooked https://lylejamieson.com/product/38-inch-diameter-straight-hhs-swivel-assembly/
Be aware that as the cutting edge is moved away from the tool centerline, more handle twisting torque is applied through the tool to you. This, and catches, is why I use a hollowing rig to take the punishment.
Using a rig makes hollowing a much more pleasurable experience. Hand hollowing requires constant concentration. A lapse can result in a damaged project or worse, personal injury - dahik.
If you want to pursue a tool rest approach, take a look at Robust's box rests, you might make or find something similar - https://www.turnrobust.com/toolrest-dimensions/ Box rests work fine with relatively wide openings and less rim undercuts. Hollowing tools can do that easily, and also allow smaller openings with a lot more rim undercut. Significantly more flexibility in project design.
Last edited:
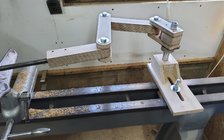
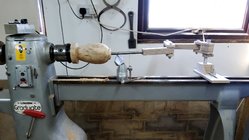
Michael, I'm on your side of the pond too. Recently started turning hollow forms and made some of my own tools mainly, as has been already mentioned, based on size which gives you the stability needed to go beyond 9 inches. I made a couple that were 15mm diameter and one at 19mm diameter, I use bright steel and bore a 6mm hole in the end. I then use 6mm bar tapped at one end and fit an Arno 6mm round cutter tool on the end which is normally used for aluminium. There are a variety of these on the market including Hope Woodturning in the UK all selling at what I consider to be silly prices. They are really easy to make if you have a grinder, a few files and a hacksaw, I did have to buy a 2.5mm tap on ebay and some button headed screws to attach the cutter. I then decided to make a hollowing jig in plywood and followed that with a metal version complete with camera to ensure even thickness. See photos.
Attachments
Last edited:
More photos of tools and jig.


I suggest you only worry about that 3" bore for a few inches, and then just waste the interior of the form to get to the right depth. No need to go 3" all the way to the bottom.
Doug- thanks for the Robust dimensions. I'll try the Sorby one (arrives today) but I'm sure it is not a 1/2" plate. However it may not need to be, as I'm closer to the cut surface.
Tim-I think your metal working ability exceeds mine! Thanks for the pics: I'm seeing my clockmaker pal later this week. He knows my (in)ability and between us we should be able to come up with a solution. Having bought this https://azcarbide.com/product/pro-hogger-hollowing-tool/, I may need to cut a flat on the end of a (tapered) bar, but I like your interchangeable cutters plus the shaft idea. Funnily enough my pal came up with the same suggestion Must be an engineering thing!
I'm intrigued by the plywood hollowing jig: was it just proof of concept or did you use it? I've just made a "steady" from scraps of wood plus 3 wheels with internal bearings. Cost about £10 plus a few bolts! It's worked so far!
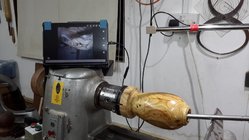
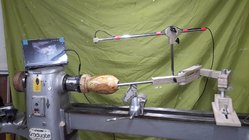
Michael there are numerous hollowing tools on the market and very few are really original just a design tweak here and there, a different name, a new product video and updated marketing spiel (sorry been round the block too many times!). Most are quite simple to make if you're fairly handy and there are lots of 'how to' examples on YouTube but if you're not thay way inclined then, as mentioned, there are plenty out there to purchase. I've used the wooden jig many times and still do, I've even given a demonstration at our local club, it works extremely well and is easy to use. Its made from pieces of plywood I had in the workshop, some Chinese bearings and a few hours of labour but I enjoy these little projects they keep me off the streets! I added the camera after watching a few videos, in my opinion it's better than a laser, more sturdy and less likely to fail because of vibration, it only cost around £20 on Amazon and I use my Samsung tablet as a monitor. There are cheaper cameras/endoscopes but many aren't that reliable. The idea for the jig itself came from
View: https://youtu.be/3N07oHFxfhU
. I made the jig and tools around 5 months ago and all the hollow forms in the pics were made in the last 3 months. Never tried hollowing before apart from a couple of weed pots so quite pleased with the outcome but still learning. The one thing I did learn quickly was that square or flat shafted tools have disastrous results if you catch the neck of a thin hollow form when you are fairly deep into the hollowing process, hence one of the reasons my shafts are round the other main reason being it's much easier to alter the presentation of the cutter to find the sweet spot.
Next, will be a simpler but larger hollowing system similar to the Jamieson model with a 1 inch shaft so I can get in deeper and safely, the main problem will most likely be the weight and torque limitations of my Union Graduate lathe. Could always make my own large bowl turning lathe I suppose.............now there's a thought!!!
I forgot to say that this really is a super forum/site with lots of great info, tips, etc --- keep it up friends.
Last edited:
The first one is done.....The Sorby Platform could do with being 2" longer and a lot of the time I felt I was stirring a stew (horizontally)! Broke all the rules: couldn't see with the air flow helmet, then couldn't see anything as the hole got longer! None of my tools were really long enough-the ferrule on the handle was inside the hole! As you all said, it was exhausting, the torque on the gouge adding to the problems! Having said all that it was a useful learning experience and showed up the limitations of my ability, my design, and the kit I have!
Tim, thanks for that video link. I just happen to have a bit of 16mm oak, so I shall have a bash at making my own jig. The AZ Carbide Pro-Hogger arrived to day which should make subsequent efforts easier though fitting it to the Sorby KT100 will have it's own limitations. Meeting the clockmaker/toolholder maker, on Thursday!
More practice needed!
@Tim Mortimer , I had to do a double (triple) take. I am very surprised and impressed that you were able to make a functional articulated arm hollower out of plywood.
Thank you Mark. It really isn't that difficult and the video which is in 2 parts gives plans, etc, I just modified it to suit. With a 3/4 inch (20mm) bar you can go 10 to 12 inches (250 to 300mm) and operate with just two fingers. The addition of the camera also made an unbelievable difference. Total cost around £40 including the endoscope camera, bearings and bar.
Take care.
Take care.
It was all going so well! I made a tool for the Pro Hogger by cutting, drilling, and tapping a 500mm piece of steel bar. Cheated and bought a handle to suit. Vibration even with a 250mm overhang was tolerable. Thought I’d smarten up the inside and…..
Tim- what was the source for your endoscope? The one I have for car mechanics is fixed focus close up!
Tim- what was the source for your endoscope? The one I have for car mechanics is fixed focus close up!
It is Fixed focus per se but the range is around 100 to 300mm. It's robust and perfect for the job, mine has been faultless to date ( that's put the mockers on it). Email me at jcsmortimer@gmail.com if you fancy a day out to look and play with the jig I made -SN5 4JP. Everyday is Sunday so available most days and make a good coffee.
Ah yes, everyone makes a funnel or two in the process, jolly amusing when it runs up the tool handle followed of course with the exclamation of 'oh shucks'It was all going so well! I made a tool for the Pro Hogger by cutting, drilling, and tapping a 500mm piece of steel bar. Cheated and bought a handle to suit. Vibration even with a 250mm overhang was tolerable. Thought I’d smarten up the inside and…..View attachment 48118
Too bad you got trough the wall of the vessel, but for this type of turning where you wanted to put a glass inserts in it as you said, the 3" forstner bit would have worked well, and you would only need to clean-up/sand the inside, now on to te next oneIt was all going so well! I made a tool for the Pro Hogger by cutting, drilling, and tapping a 500mm piece of steel bar. Cheated and bought a handle to suit. Vibration even with a 250mm overhang was tolerable. Thought I’d smarten up the inside and…..View attachment 48118
Last edited:
Well it was “oh…something “! It was all quite controlled as the bit that came off rested on the tool shank and was contained by the tool rest! Change of design-base should make a coaster/container for red wine! I have a fourth blank for another go.Ah yes, everyone makes a funnel or two in the process, jolly amusing when it runs up the tool handle followed of course with the exclamation of 'oh shucks'
Thanks for info on the endoscope. I note it dislikes iOS! A trip to SN would be great at some point(just got back from grandchild duty in Scotland and now off to do the same in Hampshire)
I bought mine on ebay for under $20., still going strong after 5 years. There are countless models and they are updated frequently. Mine plugs into an old laptop (or phone), which does get dusty but seems to be holding up OK after several years. I think my version of Windows will quit before the laptop's hardware. Make sure you get one that has a focal distance of ~4 cm to infinite. My first endoscope did not focus sharply on the cutting bit, which is ~14 inches from the camera.Tim- what was the source for your endoscope? The one I have for car mechanics is fixed focus close up!
- Joined
- Apr 27, 2004
- Messages
- 9,236
- Likes
- 5,896
- Location
- Lakeland, Florida
- Website
- www.hockenberywoodturning.com
The joys of hand hollowing are accompanied with those too thin walls. Been there done that.Thought I’d smarten up the inside and…..
You can go through a side wall with a Jamieson system and a laser but it is hard to do.
You can add a video and still go through the sidewall but I haven’t been able to yet.
Did you hear a change in sound?
If you did. Stop turning the next time you hear.
The walls were a bit thin-my previous attempts looked bulky so this was “slimmer “ design.
Did you hear a change in sound? I’d finished with the hogger and was using a tear drop HSS scraper to improve the surface. So a different sound but I didn’t spot a change in tone till it was too late. I’m aware of the need to listen to a change in tone -particularly for a newbie!
Did you hear a change in sound? I’d finished with the hogger and was using a tear drop HSS scraper to improve the surface. So a different sound but I didn’t spot a change in tone till it was too late. I’m aware of the need to listen to a change in tone -particularly for a newbie!
- Joined
- Apr 27, 2004
- Messages
- 9,236
- Likes
- 5,896
- Location
- Lakeland, Florida
- Website
- www.hockenberywoodturning.com
as using a tear drop HSS scraper to improve the surface
Before I use a scraper. I check the wall thickness with calipers. I open the calipers and close them lightly on my fore finger on the outside. Then I slide the calipers down the wall. My finger protects the outside.
If my finger feels an increase in pressure that part of the wall is a tiny bit thick. a pinched finger it is too thick.
If the calipers come off my finger it’s too thin.
I also use the teardrop to cut the last 1/8 to 1/4” of wall thickness.
If I get enough shavings to blow them out I check the wall with calipers.
I cut the inside wall in steps of 3-4”. This leaves a 1/2-3/4 thick supporting wall to minimize vibrations
I have been thinking about building one of these. Trying to scale from the picture it looks like the three arms are about 19mmx19mmx229mm.Michael, I'm on your side of the pond too. Recently started turning hollow forms and made some of my own tools mainly, as has been already mentioned, based on size which gives you the stability needed to go beyond 9 inches. I made a couple that were 15mm diameter and one at 19mm diameter, I use bright steel and bore a 6mm hole in the end. I then use 6mm bar tapped at one end and fit an Arno 6mm round cutter tool on the end which is normally used for aluminium. There are a variety of these on the market including Hope Woodturning in the UK all selling at what I consider to be silly prices. They are really easy to make if you have a grinder, a few files and a hacksaw, I did have to buy a 2.5mm tap on ebay and some button headed screws to attach the cutter. I then decided to make a hollowing jig in plywood and followed that with a metal version complete with camera to ensure even thickness. See photos.
Is that correct?
Pat
Neat!If my finger feels an increase in pressure that part of the wall is a tiny bit thick. a pinched finger it is too thick.
If the calipers come off my finger it’s too thin.
I confess to the cardinal sin-I was trying to finish it and rushed it.

