Follow along with the video below to see how to install our site as a web app on your home screen.
Note: This feature may not be available in some browsers.
The forum upgrades have been completed. These were moderate security fixes from our software vendor and it looks like everything is working well. If you see any problems please post in the Forum Technical Support forum or email us at forum_moderator (at) aawforum.org. Thank you
Congratulations to Chad Eames for "Red Tines" being selected as Turning of the Week for February 23, 2026
(click here for details)
AAW Symposium demonstrators announced - If the 2026 AAW International Woodturning Symposium is not on your calendar, now is the time to register. And there are discounts available if you sign up early, by Feb. 28. Early Bird pricing gives you the best rate for our 40th Anniversary Symposium in Raleigh, North Carolina, June 4–7, 2026. (There are discounts for AAW chapter members too) For more information vist the discussion thread here or the AAW registration page
Welcome new registering member. Your username must be your real First and Last name (for example: John Doe). "Screen names" and "handles" are not allowed and your registration will be deleted if you don't use your real name. Also, do not use all caps nor all lower case.
I started to do some segmented bowls to empty out the flat scrap bin. To get the rings flat, I made a large MDF disc that goes on my face plate, attached some hook (and loop) to it. I then put some 4” klingspor paper on it.
Questions.
The paper eventually catches at the seams between strips during sanding and lifts. I’ve ordered some actual disc paper but I wonder if there are any tricks for making the adjacent strips of paper work?
Are there any jig ideas for bringing the ring to the sanding disc other than just holding it there with my hands? Through carelessness I let one slip and broke apart the segments. That lesson has been learned! I sort of imagine something where I can attach the disk to the tail stock and gently move it to contact the disc.
I see little tables that ride the lathe bed but that wouldn’t work for something as tall and narrow as a ring.
I found the best way to flatten a big ring is using my drum sander. Since it’s open on one end, I put half in and hand spin it like you would cut a circle on a bandsaw.
On a large disc, I use 3M spray adhesive and stick the regular sandpaper to the disc. I use a small C clamp on one side so I have a handle and free hand the rest of the ring.
Yes a drum sander would be great, but I have no room. I wonder why no one makes one that can rotate up for storage against a wall.
I guess your advice is that spray adhesive (or sticky backed sandpaper) would not have the lifting problem of hook and loop, which isn't that secure. yes?
Regarding the c-clamp -- so the idea there is that you put a c-clamp on the "back" end (away from the disc) of the ring, sort of like the handle on a jointer push block? That seems sensible, though it would be cool to have something super quick to attach when flipping sides and that kept the fingers entirely free of the disc. It's low risk, I know, but having had a hand injury in the shop earlier this year, I'm keen on staying safe!
I started to do some segmented bowls to empty out the flat scrap bin. To get the rings flat, I made a large MDF disc that goes on my face plate, attached some hook (and loop) to it. I then put some 4” klingspor paper on it.
Questions.
The paper eventually catches at the seams between strips during sanding and lifts. I’ve ordered some actual disc paper but I wonder if there are any tricks for making the adjacent strips of paper work?
Are there any jig ideas for bringing the ring to the sanding disc other than just holding it there with my hands? Through carelessness I let one slip and broke apart the segments. That lesson has been learned! I sort of imagine something where I can attach the disk to the tail stock and gently move it to contact the disc.
I see little tables that ride the lathe bed but that wouldn’t work for something as tall and narrow as a ring.
Without more info, some questions and perhaps ideas based on guesses...
What diameter are your rings?
What grit are you using?
What is the swing on your lathe? (i.e. can it swing a sandpaper disk large enough for the an entire ring?
I have a standalone belt disk sander and use 10" adhesive-backed sanding disks. However, a quick search of Amazon showed larger disks - I saw some 24" in diameter in various grits, for example this in 100 grit:
Do you use any support or are you holding by hand?
I see Best Wood Tools offers a 4x12" steel table that attaches to the lathe banjo. If that would help, you might call for info. (Their website is sometimes not too useful)
If holding by hand and that's difficult to control, I'm wondering if it would be easier to make some sort of jam or Cole-jaws type of adapter to hold the piece from either inside or outside to keep it straight. This could be mounted on a live center in the tailstock if the rings were smaller diameter than the sanding disk.
But if the rings could be mounted and spun on the lathe, could they be flattened with a scraper?
I too use a drum sander (Performax 22/44) but my place would be a long walk from where you live! Are you in a woodturning club or know anyone in a woodworking club. Many have equipment and are willing to share.
Also, a friend took a glued-up table top to a local cabinet shop and they ran it through their big sander - don't know if they charged him anything.
Also, I have a roll of coarse grit sandpaper, maybe 18-24" wide (can't remember). I may have gotten it from a bin at Klingspor, can't remember that either! I've occasionally torn off a piece and taped it to my workbench and used it to flatten things - pushing across the paper by hand. Worked well but not real fast.
Also, for glueups (not for segmented but solid wood for Beads of Courage boxes and such), I've had good success by holding a big sanding block against the face. I glued some 2" wide coarse sandpaper to a fairly long 2x2 (using spray adhesive) and hold it against a surface while turning the wood at a low speed.
The pieces I usually use are like these, about to be glued together
Of course, these already have a way to attach them to the lathe! But if you used something like cole jaws or perhaps double-sided woodturners tape to attach a ring to an MDF disk in the lathe, a big sanding block might work. With coarse grit it's surprisingly fast to flatten a layer.
I made a disc from MDF and added a faceplate to mount to lathe. Later redid that by gluing a sacrifical block in place of the faceplate and turned a tenon for mounting in chuck. I ordered pressure sensitive sand paper discs to mount on the sanding disc. It worked very well. Oh one thing you will need to do is face off the disc before mounting paper to make sure it is in one plane. You could probably use sheet sandpaper and spray adhesive if you wanted a disc 8 inches or less.
The way I do it is terribly slow, but easy and accurate, and doesn’t require any new machinery.
1) put ring into Cole jaws on lathe. Hold sandpaper board against ring to flatten one side. My gluing can be messy, so sometimes flatten with scraper first. I just use a flat board with sandpaper wrapped around it. Maybe 4” wide, and long enough to cover both rims of the ring.
2) move Cole jaws from headstock to tail stock using chuck adapter on live center.
3) mount bottom of form on headstock. Flatten with sandpaper board held in hand.
4) apply glue. Use tail stock as clamp to hold ring in place. Cole jaws keep it centered, and allow rotating as needed for alignment. Hold clamped until glue grabs. I can normally find other things to do in the shop while I wait.
5) repeat for each ring.
If I had a drum sander it would allow me to glue multiple rings at once, but then I might have problems with alignment. Plus there’s lots of other things I would spend $1,000 on before a drum sander.
I started to do some segmented bowls to empty out the flat scrap bin. To get the rings flat, I made a large MDF disc that goes on my face plate, attached some hook (and loop) to it. I then put some 4” klingspor paper on it.
Questions.
The paper eventually catches at the seams between strips during sanding and lifts. I’ve ordered some actual disc paper but I wonder if there are any tricks for making the adjacent strips of paper work?
Are there any jig ideas for bringing the ring to the sanding disc other than just holding it there with my hands? Through carelessness I let one slip and broke apart the segments. That lesson has been learned! I sort of imagine something where I can attach the disk to the tail stock and gently move it to contact the disc.
I see little tables that ride the lathe bed but that wouldn’t work for something as tall and narrow as a ring.
Just saw this thread. I had been thinking about the same thing recently. One idea I had was using an mt2 to 1" 8tpi adapter (NOT live) to put a stationary chuck on the tailstock. That chuck would hold a sanding disk with a tenon. A chuck with cole jaws on the headstock side would hold the ring. Now the tailstock could be used to slowly, gently bring the disk to the ring while everything stays perpendicular. Think that might work? Any dangers I haven't thought of?
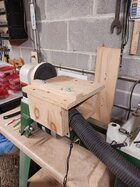
In the past used a spindle adapter to mount my old Shopsmith 12" steel sanding disk to the headstock and mounted rings in cole jaws on the tailstock.
Also in the past used a diy drum sander for my shopsmith for ring sanding as seen here.
Eventually made room for, and bit the bullet on cost, for a Supermax drum sander.
Sanding anything and everything is now a pleasure ... something I thought I'd never say .
Hmm, first thought would be for me, on the "frugal" approach, I would do it the same way I make my rolling pins dead flat, and that is a 2 by 4 or even plywood, one end on the up hill spin side, and the other end with the abrasives on it on the down hill/tool rest side. That should be "close enough".
I also encountered the problem of uneven rings and tried several methods.
Using a drum grinder is a good and, most importantly, fast method (I was inspired by Oliver Gomis
View: https://www.youtube.com/watch?v=MqfvvO2n-Mc
). But with relatively small rings (5 inches or less), I sometimes had distortions, and the drum would chew out gouges (by the way, Oliver Gomis showed the same kind of thing in one of his videos).
Now I prefer to clamp the ring in Cole jaws on the headstock (just like Mike Novak mentioned earlier), but I only use a simple flat scraper. It's indeed slower, but easier and more reliable. I can also control the ring height this way.
I straighten all the rings on both sides, then glue them into stacks of 4 under a press.
You don't have to fasten the disk to the faceplate.
I use a larger (6"?) face plate attached to the TS. I affix a PSA sandpaper disk to a 12" square of plywood and simply place this between the workpiece and faceplate with light TS pressure. Then turn the workpiece, usually by hand.
Advantages.
Easier storage.
Doesn't "lay claim" to my faceplate.
Easier to clean off or change the PSA paper.
Can shift the plywood an inch or two one way or another to spread the wear on the sandpaper.
Can put a different grit on the backside of the plywood.
Another option is the disk that replaces the blade on the table saw; got mine at Woodcraft. It's ten inches diameter and can handle some large pieces. Con- must remove the blade and replace with the sanding disk and sandpaper. Then reverse to saw wood.
If the drum sander is making gouges, with mine anyway, mostly it is because the drive belt is slipping, and/or I am trying to take off too much thickness in one pass.
I use a drum sander with a conveyor to move the ring thru and sometimes the ring will tip up when it is almost thru.
To correct this problem be ready on the output side to hold the disk tight against the conveyor belt with either your fingers or a stick.
If the ring slips on the belt use a stick on both the input side and the output side to maintain pressure against the belt.
I use a drum sander with a conveyor to move the ring thru and sometimes the ring will tip up when it is almost thru.
To correct this problem be ready on the output side to hold the disk tight against the conveyor belt with either your fingers or a stick.
I do the exact thing on my Performax drum sander. I stand to the side to feed wood through and push down on the leading edge of every single one until it clears the drum. I'm not feeding rings but solid wood, sometimes 2-3" thick.
I do the exact thing on my Performax drum sander. I stand to the side to feed wood through and push down on the leading edge of every single one until it clears the drum. I'm not feeding rings but solid wood, sometimes 2-3" thick.
The Performax 22-44 is set up and ready to go, I have a portable planer but I'd have to go fetch it from the back room.
My planer will handle 13" across. The drum sander lets me flatten wider pieces or several pieces at once, feeding another as one clears.
The dust hood on the drum sander is connected to the cyclone dust collector which picks up everything. The port on my planer is pitiful and always makes shavings to sweep up.
When I use the drum sander to flatten things to glue up (cutting boards, etc) or blanks to turn, the sanded surface is perfect. (I use 80 or 60 grit) The smooth surface from the planer is unneeded for turning or even less desirable for gluing.
I have no problem holding down the front of a blank as small as 6" as it exits the front of the drum sander. I don't want my fingers anywhere near planer or jointer blades.
As I posted before, these are typical of the blanks I prep on the drum sander for turning:
I also sand top and bottom of bowl blanks when I give them to people or for the club auction. First, it gives the turner a nice mounting surface to start with, and second, it removes any surface discoloration from age/light/oxidation and lets the turner see the true color of the wood AND better inspect for defects.
However, when prepping rings to glue up, in my case solid not segmented as shown in message #5, earlier, I don't use the drum sander but flatten on the lathe while each layer is still mounted on the lathe - I glue 2" wide 80 and 100 grit sandpaper to a flat 2x2 hardwood square about 2' long and hold that against the wood while still held in the lathe and spinning slowly. This has always worked very well and only takes a few seconds. I learned that from Harvey Meyer long ago. Rather than turning the surfaces to glue, the big sanding stick insures they are perfectly flat for an undetectable seam.
Making the layers for the box shown in message #5 also would not work on the drum sander or any planer since the way I make them only one layer is flat on both top and bottom rings, as in the first one below. The second one has multiple thinner rings. On that one I think I used the drum sander where I could.
(If your question was meant for someone else, then "nevermind!" - channeling Gilda Radner in her Emily Litella role on SNL)
I would have to say that there is a learning curve with using a drum sander, but it is not as steep as the McNaughton.... I do a number of panels at one time, generally pushing one through and then feeding the next one in behind it with the ends touching. This does keep the speed through the drum sander steady. I recently ran 24 drawer faces through. Like John said, If I am one piece through at a time, then I keep a hand on it, pushing down slightly so that the piece stays in contact with the drive belt. I do find them to be lousy for heavy stock removal, but great for finishing up glue ups and the panels are so flat you have to rotate them 90 degrees to pick one up, other wise there is a vacuum seal between them. I do not do short pieces on them, well, shorter than about 3 or so inches. I have tried it and unless they are fed through end to end, they slip and can shoot back. I tried making a Jenga set once.... This generally leads to some drum marks. I do not use them for final finish sanding. It seems that the red aluminum oxide abrasives always have some "contamination" grits from other grits and you get some deep scratches, no matter which grit you use for your final passes. How they seem to get 80 grit into 220 is beyond me.....
one thing to add to the other comments above is, notably when trying to flatten rings or other segmented pieces , planers are designed to cut with the grain , but in segments, you're often planing across the grain which results in horrible tear out (to say nothing of stressing the glued joints - easy to break them and the whole thing could explode in the planer) Sanders on the other hand can "cut" in any direction with no difficulty.... Anyone who has tried to flatten an end grain cutting board would know just how horrible a surface even a "very light" (few thousandths of an inch) pass will leave behind - same as if you tried to plane a board with a hand plane going across the grain - you get terrible tear-out of the fibers.
I was running an end grain cutting board through my drum sander and remembered one more thing. Some times the drive belt will slip. Some times from trying to take off too much in one pass, and some times from there being dust on the rollers that drive the belt. This does leave a good sized trough in the piece you have under the drum....
I was thinking the same thing as I read through the comments... why not use the whole sanding disk rather than 1/2 or it, and why not use the lathe to align the "sander" to the ring you're sanding, rather than trying to do that by hand? Plus, once you're happy with the flatness, you can use the two large discs to clamp the first two sanded rings together and keep building with that same setup.
I was thinking the same thing as I read through the comments... why not use the whole sanding disk rather than 1/2 or it, and why not use the lathe to align the "sander" to the ring you're sanding, rather than trying to do that by hand? Plus, once you're happy with the flatness, you can use the two large discs to clamp the first two sanded rings together and keep building with that same setup.
This site uses cookies to help personalise content, tailor your experience and to keep you logged in if you register.
By continuing to use this site, you are consenting to our use of cookies.


 .
.


