• We just finished moving the forums to a new hosting server. It looks like everything is functioning correctly but if you find a problem please report it in the Forum Technical Support Forum (click here) or email us at forum_moderator AT aawforum.org. Thanks!
  • Beware of Counterfeit Woodturning Tools (click here for details)
  • Johnathan Silwones is starting a new AAW chapter, Southern Alleghenies Woodturners, in Johnstown, PA. (click here for details)
  • Congratulations to Dave Roberts for "2 Hats" being selected as Turning of the Week for April 22, 2024 (click here for details)
  • Welcome new registering member. Your username must be your real First and Last name (for example: John Doe). "Screen names" and "handles" are not allowed and your registration will be deleted if you don't use your real name. Also, do not use all caps nor all lower case.

DIY video visualizer for hollowing

Joined
Feb 26, 2024
Messages
5
Likes
11
Location
Langley, BC
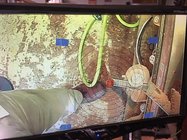
I saw the awesome video visualizer for hollowing on Trent Bosch's YouTube and because I'm cheap and a pack rat, I had everything I needed to make it for free! It was very simple to do and now... no more guessing as to how close my cutter is to the edge when hollowing .

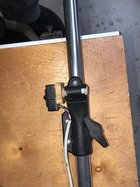
All you need is an old Webcam and a laptop computer. So I could keep my laptop further away from the lathe, I used an old monitor for the video output and a USB extension cable for the camera. Most laptops (at least the older ones anyways) will have a VGA or other port that will allow you to use a 2nd monitor or projector.
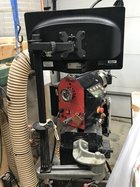
I built a platform for the monitor that goes on and off a wall bracket easily so it's not there if it's not in use.
1000003109.jpg
 
Joined
Jan 24, 2022
Messages
181
Likes
239
Location
Bainbridge Island, WA
I used the tripod to hold a tablet. Easy to adjust the monitor position for using a steady rest. Webcam has a long usb cord that runs along the wall and plugs directly into the tablet. I have a wireless mouse on the shelf near the end of the lathe to adjust the camera software settings. I've been using this setup for a couple of years and only have one issue. The cheap webcams eventually succumb to vibration and fail. For less than $30 each I can keep a spare webcam or two around. Takes 10 minutes to change one out and I have to do it once or twice a year. Have fun with your setup!

1710451283396.png
 
Joined
Jun 22, 2023
Messages
9
Likes
3
Location
Gwynn Oak, MD
I used the tripod to hold a tablet. Easy to adjust the monitor position for using a steady rest. Webcam has a long usb cord that runs along the wall and plugs directly into the tablet. I have a wireless mouse on the shelf near the end of the lathe to adjust the camera software settings. I've been using this setup for a couple of years and only have one issue. The cheap webcams eventually succumb to vibration and fail. For less than $30 each I can keep a spare webcam or two around. Takes 10 minutes to change one out and I have to do it once or twice a year. Have fun with your setup!

View attachment 61533
What camera are you using. Is it hdmi.
 
Joined
Jun 22, 2023
Messages
9
Likes
3
Location
Gwynn Oak, MD
I’m using a Jamieson boring bar. The vertical bar coming off the bottom steel bar and the horizontal bar above the steel bar are aluminum. They are connected by tight fitting plastic fittings. The bottom one is T-shaped, and the horizontal part of the T was specifically fitted before shipping. The bar is made to carry a laser and I am using a slightly heavier 4K HDMI camera and run the cables along the top horizontal bar to the monitor. I do not have any problematic vibrations. everything was purchased on Amazon. Based on my bicycling experience, aluminum is somewhat more rigid than copper so I have no real expertise.
 
Joined
Feb 26, 2019
Messages
1,825
Likes
1,423
Location
Lebanon, Missouri
I built mine "computerless" about 5 years ago. It uses a small hidden camera, ~$40 no longer available, but the specific model doesn't matter. I had an old VGA monitor, and used a BNC/VGA signal converter vs using a computer. Depending an what pieces you have, just match up the camera out and monitor in for the signal converter. I have the Jamieson system with laser support. I put together a camera mount that slips in place of the laser.

The monitor mount was easy. I have a Nova Galaxi with the outrigger, which includes the tool post that takes 1" rests. I bought a desk mount 1" dia monitar stand, and just drop it in the tool post. I use 3 cutters with the system - 3/16" hss, the tilted carbide, or a 8.9mm flat top carbide. I made circle templates printed on transparencies, a 6mm and an 8.9mm center, that are taped to the monitor. No drawing/erasing. The template circles are sized such that true size is depicted on the monitor. It depends on the camera lens and distance from the cutter what the magnification is. It's easily determined by placing a ruler under the camera and then measuring on the screen. Some use some software that can project the cutter onto the screen, but that's $'s for a computer and the software - great for demonstrators, but an individual doesn't need it.
 

Attachments

  • IMG_2176.JPG
    IMG_2176.JPG
    591 KB · Views: 30
  • IMG_3027.JPG
    IMG_3027.JPG
    424.5 KB · Views: 29
  • IMG_3028.JPG
    IMG_3028.JPG
    432.5 KB · Views: 29
Back
Top