• We just finished moving the forums to a new hosting server. It looks like everything is functioning correctly but if you find a problem please report it in the Forum Technical Support Forum (click here) or email us at forum_moderator AT aawforum.org. Thanks!
  • Beware of Counterfeit Woodturning Tools (click here for details)
  • Johnathan Silwones is starting a new AAW chapter, Southern Alleghenies Woodturners, in Johnstown, PA. (click here for details)
  • Congratulations to Dave Roberts for "2 Hats" being selected as Turning of the Week for April 22, 2024 (click here for details)
  • Welcome new registering member. Your username must be your real First and Last name (for example: John Doe). "Screen names" and "handles" are not allowed and your registration will be deleted if you don't use your real name. Also, do not use all caps nor all lower case.

Double Boring Bar- has anyone made one

Joined
Dec 29, 2022
Messages
35
Likes
22
Location
Dublin, NH
The bevel is 70 degrees. I sharpene on my 80 grit wheel and tried it, then on my 180 grit CBN wheel and tried and then I tried honing the burr off with a 600 grit CC device and then used a ceramic burnishing tool to create another burr.

I tried various angles and had to use quite a bit of pressure to get any small shavings. I viewed Peter Bloch's videos again and it seems like he hardly applies any pressure and gets a stream of long, wispy shavings. I'm going to contact him and see if he can give me any incite into this.
I
 
Joined
Feb 26, 2019
Messages
1,825
Likes
1,423
Location
Lebanon, Missouri
Can you post a photo of the last few inches of your scraper bar with teardrop cutter installed? I find it works better if the cutter plane (not the bevel) is ~ parallel to the bar vs being angled. With the cutter at a 30-45 deg angle to the shaft, the cutter angle to the wood is to acute for the burr to get a bite.

On the OD it can work since the handle can be swung away from the work, but inside there is not space to do so.

Will the cutter scrape a small curl when held by hand, like a flat work scraper? Try different angles of the cutter to the surface. If not then the edge is not properly prepared.

I have no issue getting fine wispy shavings. Its a matter of edge prep and angle of attack.
 
Joined
Dec 29, 2022
Messages
35
Likes
22
Location
Dublin, NH
Can you post a photo of the last few inches of your scraper bar with teardrop cutter installed? I find it works better if the cutter plane (not the bevel) is ~ parallel to the bar vs being angled. With the cutter at a 30-45 deg angle to the shaft, the cutter angle to the wood is to acute for the burr to get a bite.

On the OD it can work since the handle can be swung away from the work, but inside there is not space to do so.

Will the cutter scrape a small curl when held by hand, like a flat work scraper? Try different angles of the cutter to the surface. If not then the edge is not properly prepared.

I have no issue getting fine wispy shavings. Its a matter of edge prep and angle of attack.
I had a little better luck today trying different angles and varied the speed from 600 to 900 rpm getting a better cut at the higher speed but I also had so vibration and slowed back down to 600. I tried using the cutter as a hand held scrapper and got what is shown in the picture. The picture shows the neg rake carbide scrapper and a small one I got from Packard; neither working as well as the larger one I made.
 

Attachments

  • IMG_20230211_111507206.jpg
    IMG_20230211_111507206.jpg
    266.3 KB · Views: 34
  • IMG_20230211_112203142.jpg
    IMG_20230211_112203142.jpg
    169.8 KB · Views: 33
  • IMG_20230211_111242089.jpg
    IMG_20230211_111242089.jpg
    222.1 KB · Views: 32
  • IMG_20230211_111236368.jpg
    IMG_20230211_111236368.jpg
    223.4 KB · Views: 33
Joined
Feb 26, 2019
Messages
1,825
Likes
1,423
Location
Lebanon, Missouri
Not surprised the neg rake carbide doesnt work - there has to be a burr and you cant form a burr with carbide, no ductility. Flat top carbide can work ok, like hss starting to get dull.

Another thing to try - sharpen and hone as you have been, then hone the bevel a bit with the 600 hone, and check for a sharp edge, no light reflected by the edge, then burnish the edge. Hold the burnish tool at about 80-85 deg (a bit off the 70 deg bevel).

Another way to do it is to use the burnisher flat on the cutter to turn the grind burr down, and then hone the bevel, then burnish.

I had similar issues when getting started with scrapers and burnishing - at times I didnt really create a sharp edge and burnishing didnt do much.
 
Joined
Dec 29, 2022
Messages
35
Likes
22
Location
Dublin, NH
Not surprised the neg rake carbide doesnt work - there has to be a burr and you cant form a burr with carbide, no ductility. Flat top carbide can work ok, like hss starting to get dull.

Another thing to try - sharpen and hone as you have been, then hone the bevel a bit with the 600 hone, and check for a sharp edge, no light reflected by the edge, then burnish the edge. Hold the burnish tool at about 80-85 deg (a bit off the 70 deg bevel).

Another way to do it is to use the burnisher flat on the cutter to turn the grind burr down, and then hone the bevel, then burnish.

I had similar issues when getting started with scrapers and burnishing - at times I didnt really create a sharp edge and burnishing didnt do much.
Thanks...I'll give it a try.
 
Joined
Dec 29, 2022
Messages
35
Likes
22
Location
Dublin, NH
Followed your suggestions and had much better luck but still can't get the long, wispy, stringy shavings that Peter gets with his tantung cutters. He hardly uses any pressure and I have to use quite a bit to get any shavings rather than just a wet mush. Must be in creating the burr. I think I'm on the right track and will keep on trying.
 
Joined
Feb 26, 2019
Messages
1,825
Likes
1,423
Location
Lebanon, Missouri
Doesnt matter what the cutter steel is, m2 up to tantung or stellite, to get wispy shavings, except m2 is easier to sharpen/hone and dulls faster.

Are you able to get the scrapers to work on the OD? If so, its cutter edge orientation. If not, then the edge is not prepped correctly.

Try a different piece of wood. Maybe the wood is too punky. Any chunk of wood about any size will do. smooth up the OD on the lathe and make scraper test cuts. Stay at it, it will start to to work.
 
Joined
Dec 29, 2022
Messages
35
Likes
22
Location
Dublin, NH
I received an email from Peter Bloch who suggested I straighten the edge of the scrapper. The width of the shaving is determined by the contact area with the wood. He sharpens his on a 125 grit wheel and didn't mention honing.

I am in the process of drying my first shade and will post a picture when finished. It is a bit crude but I am happy with it for a first try.
 
Joined
Dec 29, 2022
Messages
35
Likes
22
Location
Dublin, NH
It is aspen and no, I never got the scrapers working the way they should. I visited Peter yesterday and observed him doing the final shaping and thinning of a bell shaped lampshade. He took a look at my scrapers and they are much larger than his. He was very forthcoming and helpful so now I plan to tackle the next one and hope to be able to scrape the way he does.
 
Joined
Dec 29, 2022
Messages
35
Likes
22
Location
Dublin, NH
Here is my boring bar captive system I made. It works really well.
 

Attachments

  • IMG_20230320_140717290.jpg
    IMG_20230320_140717290.jpg
    343 KB · Views: 30
  • IMG_20230320_140659902.jpg
    IMG_20230320_140659902.jpg
    233.2 KB · Views: 29
Joined
Dec 29, 2022
Messages
35
Likes
22
Location
Dublin, NH
Followed your suggestions and had much better luck but still can't get the long, wispy, stringy shavings that Peter gets with his tantung cutters. He hardly uses any pressure and I have to use quite a bit to get any shavings rather than just a wet mush. Must be in creating the burr. I think I'm on the right track and will keep on trying.
I finally got it! Use a cc 600 grit on the edge after sharpening on the CBN wheel and lightly stroke the edge about six times. Works great inside and outside and green or dry wood.
 
Joined
Dec 29, 2022
Messages
35
Likes
22
Location
Dublin, NH
I used and will illustrate something similar to The Steve Sinner double welded 1.25" boring bars. I have posted in the past about my boring bar journey. Please read this previous post as there may be some useful info for you.

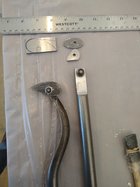
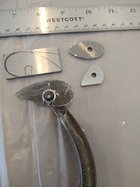
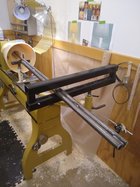
The advantage of the Sinner bar is that two bars are much stronger than 1 bar and for the same length you have increased your hollowing depth capabilities. A bonus is the double bar acts as a torque arrestor while being held in Sinner's dual bar trap. I borrowed this idea in my own home grown custom boring bar system. If you view the last photo in the post above or the first one below in this post, you will see that the 1.5" boring bars from Clark system are connected to a Jamison-like d-bar trap. (There is a 3/4" interface on all Clarks bars allowing me to connect it to the bar. Sinner's tool interface is 5/8). My D bar's sole purpose was to add stability but it was hitting the back wall from the lathe with deeper turnings and taking away from using a longer Clark 1.5" bars. (see last photo in the link above). To solve this I used Sinner's Idea but I didn't weld two bars directly together. I had a few pairs of 1.5-inch motor shaft collars welded together and I connect the bars with their set screws. Here are some photos illustrating this. I have enhanced the trap by reinforcing it with a straight bar, bigger screws, and beefer springs in the second photo below.
,View attachment 49764
View attachment 49770
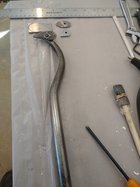
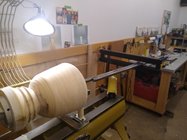
This photo shows my how my laser assembly is attached to the boring bar.

View attachment 49771
Hope this gives you some alternatives.
 
Joined
Dec 29, 2022
Messages
35
Likes
22
Location
Dublin, NH
Dennis,

Did you see the two pictures of the boring bar system that I made following some of your suggestions? 1 1/8" bars, one 5' the shorter is 4' welded together and captured in between 2 x 2" tubing with 3/8" rods welded on the contact surfaces of the square tubing. I made a nose rest with a couple of holes drilled into the top to place a short 1/2" rod to stop the chatter. I'm happy with the outcome.
 

Attachments

  • Lather boring bar #2.jpg
    Lather boring bar #2.jpg
    343 KB · Views: 25
  • Lathe boring bar #1.jpg
    Lathe boring bar #1.jpg
    233.2 KB · Views: 24
Joined
Jan 3, 2012
Messages
428
Likes
360
Location
New City, NY
Dennis,

Did you see the two pictures of the boring bar system that I made following some of your suggestions? 1 1/8" bars, one 5' the shorter is 4' welded together and captured in between 2 x 2" tubing with 3/8" rods welded on the contact surfaces of the square tubing. I made a nose rest with a couple of holes drilled into the top to place a short 1/2" rod to stop the chatter. I'm happy with the outcome.
I'm envious! Looks really solid. The nose rest comes in handy. Looks like you will get many years of use out of the system. The bar is long enough, that you can add a bed extension someday! The only question that I have is regarding the space that I see between the top of the bar and the top retaining bar of the trap. I am conflicted between the original concept of having the d handle just kissing the top of the bar and the fact that the boring bars are so heavy that it may not matter in the event of a catch. Your thoughts?

I'm glad you resolved your fine finishing dilemma. Can you please send a photo of your scraper and how it is oriented on your boring bar against the work?
 
Joined
Dec 29, 2022
Messages
35
Likes
22
Location
Dublin, NH
I'm envious! Looks really solid. The nose rest comes in handy. Looks like you will get many years of use out of the system. The bar is long enough, that you can add a bed extension someday! The only question that I have is regarding the space that I see between the top of the bar and the top retaining bar of the trap. I am conflicted between the original concept of having the d handle just kissing the top of the bar and the fact that the boring bars are so heavy that it may not matter in the event of a catch. Your thoughts?

I'm glad you resolved your fine finishing dilemma. Can you please send a photo of your scraper and how it is oriented on your boring bar against the work?
I have 3/8" rods across the top surface of the bottom bar and the lower surface of the top bar so that the contact area with the boring bars is very small. The square spacers at the ends are slightly longer than necessary (About 1/8") and that was intentional so that I can grind them down if there is too much space. So far no problem.

I have tried to find a used extension without any luck. I really don't want to spend $529 for an 18" so I am about to make one out of some steel bars, hardwood 2 x 6 and threaded rod. The heavy steel bars are 30" and I have plenty of room for them. When that is done I can use the Powermatic banjo for the nose support or for a tool rest to refine the shape I am working on.

Just finished my second lampshade. Having fun with the whole project.
 
Back
Top