Follow along with the video below to see how to install our site as a web app on your home screen.
Note: This feature may not be available in some browsers.
The forum upgrades have been completed. These were moderate security fixes from our software vendor and it looks like everything is working well. If you see any problems please post in the Forum Technical Support forum or email us at forum_moderator (at) aawforum.org. Thank you
Congratulations to Chris Lawrence for "Dragon's Grip" being selected as Turning of the Week for March 30, 2026
(click here for details)
Welcome new registering member. Your username must be your real First and Last name (for example: John Doe). "Screen names" and "handles" are not allowed and your registration will be deleted if you don't use your real name. Also, do not use all caps nor all lower case.
I want to drill eight evenly-spaced holes perpendicular to the lathe axis using the indexer. I've figured a precise way to do this with one jig for each hole size.
any ideas for a jig which would accomodate various bit sizes?
If you have a jig to evenly space a set of holes perpendicular to the axis, what difference does the bit size make? If you switch from a 1/4" bit to a 1/2" inch bit on one of the holes, the distance from the adjacent holes on either side will be reduced by 1/8" and still be evenly spaced. Maybe I'm missing something?
Are you trying to get an equal gap between holes independent of diameter, rather than equal spacing between hole centers or something?
The jig I envision would be a drill bit guide mounted in the tool rest, so I'd need a different one for each bit. The Oneway is just the thing. Thanks, guys.
If you take your square stock, use a table saw to cut it into an octagon, use the drill press to drill your holes in the center of each of the eight flats, you've accomplished your goal without a lot of messing around using indexing wheels, guides, etc.
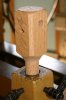
I do it with a piece of Oak. I take a square piece and turn the bottom to fit my tool rest banjo. Then I drill whatever size hole I need in the square uppper section. I usually make these with 3 holes. I don't remember the sizes but probaby 1/4 and 3/8" on one side and 1/2" on the other side. This gives me 3 different guides on one piece of wood.
Then it's just a matter of aligning the jig with the center of the work and square to it, if that's what you want. You can also mount it above or below center and at angles if that's how you need to drill the holes.
Eventually you wear out the hole but it only takes 5 minutes to make another jig.
If you need really large holes, use Forestner style bits and drill the holes in your jig to fit the shank of the drill.
If you take your square stock, use a table saw to cut it into an octagon, use the drill press to drill your holes in the center of each of the eight flats, you've accomplished your goal without a lot of messing around using indexing wheels, guides, etc.
Ifffff the octagon sides are exactly equal, and ifffff the angles are exactly 45 degrees, and iffffff it's exactly centered on the lathe. Piece of cake, right?
Couple my method of making a drill guide and then add the index wheel from www.ironfireLLC.com and you can have a lot of fun. I've made a lot of clocks and use this method to decorate lamps, ornaments and bowls and spindles.
I've got the Oneway unit and it performs as perfectly as the grain will allow. That is - very small bits will drift with the soft grain (no different that free-hand or drill press drilling the same stuff). Given a stiff bit or fine uniform grain, it works great if you've set it up carefully. I don't know which lathe you are using - I have a Oneway 1640 and have put a spring under the index stop and index locking bolt so it is a simple (read fast) matter to buzz through 360 degrees smoothly and relatively quickly.
Ifffff the octagon sides are exactly equal, and ifffff the angles are exactly 45 degrees, and iffffff it's exactly centered on the lathe. Piece of cake, right?
Thanks for the comment, Joe. You present an excellent point. I agree that it's important to fully understand your tools and how to set them up correctly to obtain fairly accurate dimensions. But, unlike metal turning or jewelry making, woodturning doesn't typically require that level of precision. Unless it's a segmented piece, a few thousandths of an inch isn't normally going to make a great deal of difference. In fact I would wager that drilling into the side of a turned piece using a jig or guide and an indexing wheel is no more accurate than centering the drill on the octagonal blank. Drilling into the side of a turned piece risks the possibility that the grain of the wood being drilled can draw the drill bit slightly off center; slippage in the guide or play in the jig can do the same. Some turners, especially those just starting out, are intimidated with the long list of specialized pieces of equipment that many of the more experienced turners use in their shops. My goal is to make them feel comfortable with simple process. There is a place for precision, but my rule of thumb remains "K.I.S.S. "
K.I.S.S. That's why I build these. I can make one in under 5 minutes. This one I believe has 1/8" 5/16, and 3/8" . all you have to do is align the jig with the center which is easily done using a drive center or tail center for alignment. If you want elongated holes you drill the wood at an angle. If you want round holes you drill perpendicular to the shaft. Since the top is square you can use a small square to align it perpendicular to your piece. I've used these for years and only after drilling many holes do they get sloppy enough to need replacing. You might use some candle wax on the drill. Sometimes they want to squeel and it hurts your ears.
My point, nuturner, was that it doesn't take much error in any of those three to significantly throw the results off - different size/shape holes at the surface, unequal spacing, etc. A prime example is the "celtic knot" cuts. Errors in squareness of the blank, miter angle, and kerf width vs infill thickness, as well as centering, can produce an almost ugly pattern in the final turning.
Joe Oh man, my mistake. I never pass up a reason to buy a new tool, unless I can make one of course. I have jigs and homemade tools all over the shop. My problem is I usually get excited about making something and then find I don't have the tool I need. I can't stand to wait a few days for it so I just build something. If I find I use that gadget or tool a lot, then I buy a good quality factory made replacement.
I've had a second thought (dangerous practice?) on those pesky small diameter bits which want to follow whatever seductive grain they meet. Has anyone else ever broken one of those bits? Why not resharpen them short (therefore stiffer) and drill a straighter hole - maybe....
Ken The advantage of my system is you can move it up very close to the piece your drilling. This way the bit doesn't flex or wander. I still use brad point bits when I can.
When I need to drill at an angle to the workpiece I will often leave a bead that has a side that is perpendicular to the angle I need to drill. This keeps the bit running true as it starts. Then after the dowel is inserted and glued I can turn away the bead. If you drill a hole at an angle to the turning the round dowel will look oval. I do this a lot for the holes on a clock face.
This site uses cookies to help personalise content, tailor your experience and to keep you logged in if you register.
By continuing to use this site, you are consenting to our use of cookies.