Anyone have a process they use when hollowing forms as far as drying then sanding. I find lumber is too wet to sand after hollowing and if I let it dry In a bag cardboard or plastic bag for a few days and a green mold will form or wood is still fairly damp. If I let it stay longer and let it slowly dry minor crack sometime appear near the opening. I try to keep the thickness roughly 3/8 inches thick throughout. Would you throw shaving inside hollow form to let it dry? I know some of you would oil the form after turning, I am really liking the tried and true products and doctors workshop oils and have also used Watco danish oil with some success. Tend to like the satin finishes, no high gloss finishes for me. I have been turning hickory, horse chestnut , hackberry, honey locustand recently. Have some black walnut coming in a few days and would like to get a process down. Any suggestions greatly appreciated.

-
It's time to cast your vote in the March 2026 Turning Challenge. (click here for details) -
Congratulations to Chris Lawrence for "Dragon's Grip" being selected as Turning of the Week for March 30, 2026 (click here for details) -
Welcome new registering member. Your username must be your real First and Last name (for example: John Doe). "Screen names" and "handles" are not allowed and your registration will be deleted if you don't use your real name. Also, do not use all caps nor all lower case.
You are using an out of date browser. It may not display this or other websites correctly.
You should upgrade or use an alternative browser.
You should upgrade or use an alternative browser.
Drying before finishing hollow forms.
- Thread starter Norm Marentette
- Start date

Another approach would be to twice-turn your hollow forms. Turn the vessel, leaving a wall thickness of 1/2" - 5/8", coat the outside with anchorseal (or equivalent) and hang to dry. Weight it and record the date and weight. After about 2 months start to weigh it every week (and record the date and weight). When the vessel stops losing weight it's ready to go back on the lathe for the outside to be re-turned, and the inside to be smoothed and brought to final wall thickness.
Thanks Ed. Will give it a try. Always just once turned so far after making a dozen or so hollow forms. Take it that I would leave the tenon on the form for mounting later on? Thanks again.
- Joined
- Apr 27, 2004
- Messages
- 9,333
- Likes
- 6,159
- Location
- Lakeland, Florida
- Website
- www.hockenberywoodturning.com
let it dry In a bag cardboard or plastic bag for a few days and a green mold will form or wood is still fairly damp. If I let it stay longer and let it slowly dry minor crack sometime appear near the opening. I try to keep the thickness roughly 3/8 inches thick throughout.
What I do is shoot for a 3/16” wall thickness - rim to bottom center. Easy to get there with a laser. Even easier with the Bosch visualizer.
I complete the form no sanding. I rinse it in the shop sink- it has one of those hand held showers. This mostlty wets the endgrain that dried during hollowing. I then Place it in a cardboard box on a small wooden orange crate to lift it off the bottom of the box and close the flaps. Next day i close one flap so half the top is open. Next day I open the top. Next day I set the form on a shelf for a few days. Then I sand off the lathe and begin applying finish. If I have nice curves the forms never crack.
I occasionally get mold on bowls drying in bags - wiping with Clorox kills the mold. With bowls I swap to dry bags every day until the bags are not damp -4-5 days usually.
Last edited:
Would you keep the tenon on the hollow form for sanding? Or just make a jam chuck and finish sanding on lathe? Against grain? What speed? Thanks for the process you use. I will give it a try. I do use the Trent Bosch system but have made up my own visualizer using an old iPhone, works great.
- Joined
- Apr 27, 2004
- Messages
- 9,333
- Likes
- 6,159
- Location
- Lakeland, Florida
- Website
- www.hockenberywoodturning.com
Leaving a tenon would likely cause cracking - it would be an uneven wall and a break in the curve.Would you keep the tenon on the hollow form for sanding? Or just make a jam chuck and finish sanding on lathe? Against grain? What speed? Thanks for the process you use. I will give it a try. I do use the Trent Bosch system but have made up my own visualizer using an old iPhone, works great.
Curves and even walls lot the wood move as it dries. If wood can’t move tension builds and cracks relieve tension.
I sand off the lathe. Sit in front of a fan. A towel on my lap to cushion the form.
Hold the form with the left hand sand with the right.
I use a 90 degree makita drill with 3” Velcro pads. (2” if needed) I shear scrape on the lathe so I have pretty good surface.
If needed I spot sand with 180, then 220 and 320 keeping the edge of the disc in line with the grain.
Then it is ready for finishing. I usually sand the first coat of finish with 400 paper hand held.
Norm, for small hollow forms about 10" or less in height I turn to about 3/8 or less wall thickness and try to be consistent throughout the piece. The areas that are prone to cracking are the neck and the base so I pay close attention to the wall thickness there, especially the bottom and the transition from the bottom up the curve to the wall of the vase. It's easy to leave way too much material in the transition curve from the bottom to the wall. I leave a very short tenon on mine since I mount to sand and finish. If I see any signs of developing cracks I put some thin or medium CA in them. I then put in a brown paper bag and check with my meter every day or so watching for cracks and put CA on them as needed. When they get to between 10% -13% MC all over, including the tenon, I move on to sanding. I may let them sit outside the bag for a couple of days to make sure they're ready.
For larger pieces I put them in cardboard boxes with a trap door cut in one end. I have some PVC tube of different lengths with small 12v computer fans on the end that draw air out of the inside and circulate it around in the box. The goal is to keep the moisture level inside the piece the same as the outside and the air moving around in the box. Without the tube and fan it can get very dry on the outside and still be very damp on the inside. I also boil large pieces which reduces the potential for cracks.
I still turn bowls these days but small and very large hollow forms have been my focus for the past year or so. Managing cracks is a big part of the process. I also twice turn a lot of pieces but pay close attention to your wall thickness to make sure you have enough material to work with.
I turn my wet vessels to a 1/8" wall and have no issues because I use a DIY camera system. The wood will get relatively dry from just spinning, but it can be dried further with an air compressor blow gun, because the water can be blown out of the cells. I then use yard waste bags to final dry my work. The bags are double thickness, so give the wood a nice slow dry. I put the work in the bag for 24 hours. Then I take it out and put the work in a dry bag. The wet bag hangs on a clothes line outside. Then repeat. That system almost never results in mold.
I do both 1 and 2 turn hf's. 2 turn are generally smaller, ~6" tall x wide. Larger items require too much material be left for the 2nd turn to maintain structural integrity, and cracking becomes a problem (end grain is much less cracking). I only do 2 turn when I want the final piece to be truly round. 1 or 2 turn, don't leave sharp edges that help cracking.
For 1 turn, wall t can be 1/8-3/8", depending on size. Within ~ 12" tall or dia, usually 1/8-1/4", aim for consistent wall t. Lasers work ok for wall t, but a camera system works much better for me. I've tried sanding wet wood and didn't like the result, so all are dried then sanded. I have done some smaller items where I used the microwave to aid in getting the surface drier and had some good results sanding before completely dry.
Process for the majority of hf's:
> finish turn the OD
> for end grain, drill out the bottom pith so the hole is open after hollowing to prevent cracks
> wet the od with water (dripping wet), cover with stretch wrap to slow drying
> hollow and leave tenon, sprits OD with water as needed while hollowing
> Keep the item wrapped in a plastic bag during breaks/overnight
> tall pieces get ~1" long tenon, it gets cut down to ~1/4" long
> allow the surface to dry for a while, could be 10 - 60 min
> double paper bag the item (thick paper bags), tape closed, record pkg wt, s/n, date on the tape
> I store mine in the house on wire shelving, pretty constant temp/humidity to create a consistent process
< no mold issues
> when wt stops reducing it is ready for sanding
> I do most all sanding with the item mounted on the lathe using the tenon. I have much more control over the sanding process mounting the piece and holding the sander vs the opposite.
> apply finish, most are minwax helmsman spar thinned 1:1, flooded on, keep wet ~30 min, wipe off, dry, buff
I have been using that method for about 30 years with great results but more recently I have dropped the anchor seal and switched to brown paper bags and wondering why I didn't switch sooner.Another approach would be to twice-turn your hollow forms. Turn the vessel, leaving a wall thickness of 1/2" - 5/8", coat the outside with anchorseal (or equivalent) and hang to dry. Weight it and record the date and weight. After about 2 months start to weigh it every week (and record the date and weight). When the vessel stops losing weight it's ready to go back on the lathe for the outside to be re-turned, and the inside to be smoothed and brought to final wall thickness.
I don't do many hollow forms, well, other than boxes. When I did, I would dunk the whole bottom and tenon into some Danish type oil, and use the stretch film around the top. I would also pour some oil into the inside. Since it is end grain, it would go all the way through. The base, being thicker, would be more prone to cracking. The rim is always a good/bad place for cracks to start. I do finish turn them. With boxes, it is kind of the same thing, but I rough turn them, then put the lid and base back to back and put some painter's tape around the 2 pieces to keep them from getting mixed up.
robo hippy
robo hippy
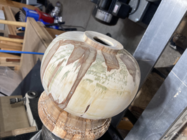
Take it that I would leave the tenon on the form for mounting later on?

@Norm Marentette: The photo shows one of my HFs after the first turning. The tenon is left on for remounting, but I remove most of the wood between the tenon/flange and bottom of the vessel. This allows for a consistent wall thickness from top to bottom. The only place where the bottom is thicker is the center area where the "drive shaft" is at. It's not unusual for cracking to occur in the tenon/flange area, which may extend into the drive shaft. If the tenon develops a crack (other than hairline) I fill it with epoxy prior to truing it before the second turning. However, I don't recall the last time there was any cracking in the bottom; all of my HFs are turned with the pith in the center of the bottom.
I agree with Richard. Garden waste bags for a few days/weeks until the outside is ready for sanding. This maple vase is 22" and has a wall thickness of about 1/2". I did the texturing and foot carving after about 2 weeks. I've never (well almost never) had any problems with either cracking or mold.
Sorry, forgot to attach this:
Great information everyone! Going to try all processes and see which works for my environment.