• May 2025 Turning Challenge: Long Neck Hollowform! (click here for details)
  • Congratulations to Phil Hamel winner of the April 2025 Turning Challenge (click here for details)
  • Congratulations to Marc Banka for "Maple Burl" being selected as Turning of the Week for 19 May, 2025 (click here for details)
  • Welcome new registering member. Your username must be your real First and Last name (for example: John Doe). "Screen names" and "handles" are not allowed and your registration will be deleted if you don't use your real name. Also, do not use all caps nor all lower case.

Drying Box

Joined
Feb 7, 2020
Messages
249
Likes
183
Location
Sykesville, Maryland
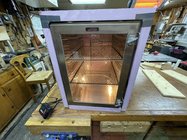
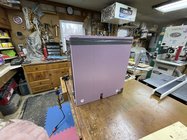
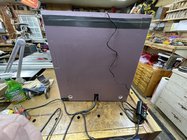
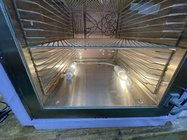
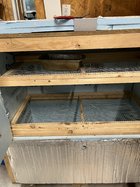
I have this stainless steel enclosure with glass back and glass door. It's about 20 x 16 x 20 deep. A scientific drying rack, I'm guessing was its originally use. No holes in it. Has 2 mesh shelves and one solid one. Plan to modify it for a dryer. Will probably hold 6 large bowls at a time. Likely pretty air tight. Those who have done it, any advice you could lend to how best to heat would be appreciated.

Should I insulate it?
Best spot for bulb?
Bulb type/wattage to use?
Fan needed? Vented or just circulate? Placement relative to bulb?


322780840_5633458530103922_2861769666477558873_n.jpg
 
Wonder how one of those terrarium heaters would work. LED bulbs the local hardware and box stores don't put out much heat.
 
Woodworker Jay Bates recently built a warming house for his cat using a ceramic heater bulb that screws into a regular light socket and emits no light. He used a 150-watt bulb, which proved to be too hot. They are available in different wattages, like the 60-watt I found on Amazon. He used an inexpensive thermostat that he found at a home center.
 
inkbird makes thermostat temp controllers that you can plug a heat source into. They have a wired probe that you put inside and set the temp plus how many degrees to go between turning on and off. I use one for my kiln and have used them for many years in my brewing hobby.
I've used one of the Inkbird controllers in the 'kiln' I use to set steam bends in oak crests and arms for Windsor chairs. I use ~140*. Does the job well.
 
You'll also want a way to control moisture / humidity - I saw an excellent kiln some canadian youtuber made (Sprague I think it was) where he had a humidistat as well to control moisture in the whole kiln (an old freezer) and I believe just a 60 watt light bulb is more than sufficient for a heat source. If I had enough room in my shop, I'd attempt to build a kiln like Sprague did (I found all the pieces on Amazon cheap enough, think they were Inkbird?)

As I understand it, You don't want too much heat , nor too much drying at the start - you want to maintain humidity while raising temperature (heat will help open the wood's pores to allow it to release bound moisture) heating too fast , the outside dries faster than the middle of the wood, leading to Case Hardening (once the inside dries, as you open it up, you find the middle wood fibers separating and cracking from the inside out) Probably why microwaving helps dry bowls more quickly (since microwave heats from inside out) Lot of us have good results with wrapping in paper bags to slow moisture loss to ambient air... a well constructed kiln could help speed that process, but the more roughed out bowls I produce, the less of a hurry I am to get them all dried, so now I am only thinking of making a Freezer kiln to dry slabs for flatwork...
 
On further inspection the case is very air tight, front door has a heavy rubber gasket. My plan right now is to use two 25W T10/T30 bulbs, one on each side in the bottom, mounted tight along the side bottom corners. The sockets I've chose each support two bulbs. So I could put 4 bulbs in there at whatever wattage is best, if needed. The box is about 2/3 this size of a dorm fridge. So, not real big.

I plan to drill 6 small (1/2 inch) holes in the bottom and 12 (3/8 in) in the top. The top holes will be 3 rows of 4 holes, back- middle - front. A temperature controller will control on/off. Not sure on fan placement. I might leave it on hooks that can hang from anywhere on the racks. If the fan gets permanently mounted, was thinking top facing down maybe??? The bottom shelf is solid stainless, and I'll have to drill several holes in it for air flow on that shelf.

The whole thing will be lined with 1/2" foil backed insulation. I'd like to use foam backed foil, but this will not be easy to install because the thing is totally seamless. There is no way to remove the rack rails. I'm not sure the foam will bend enough to push into place. I may have to use fiberglass batting held in place with foil tape, which is untidy and prone to tears.
 
It’s a dessicator cabinet. Originally used in a laboratory. Desiccant is put in a tray and samples removed from the oven are put on the shelf’s. Allows the samples to cool down to weighing temp without taking moisture back in.

I use mine to store my CA glues that are in use in the shop.
 
It’s a dessicator cabinet. Originally used in a laboratory. Desiccant is put in a tray and samples removed from the oven are put on the shelf’s. Allows the samples to cool down to weighing temp without taking moisture back in.

I use mine to store my CA glues that are in use in the shop.
Nice! I bought it for $50. Pretty good score, I think. I hate having to drill holes in the really nice stainless steel pan, but that's what I'm going to do. Anyone know the best way to drill a hundred or so holes without a lot of deburring? I'm guessing the pan is like 22 gauge thickness, but don't know for sure. All I have are twist and step drill bits.
 
Last edited:
The whole thing will be lined with 1/2" foil backed insulation. I'd like to use foam backed foil, but this will not be easy to install because the thing is totally seamless. There is no way to remove the rack rails. I'm not sure the foam will bend enough to push into place. I may have to use fiberglass batting held in place with foil tape, which is untidy and prone to tears.
I would think that if the insulation is inside the case that it would absorb moisture and grow mold. It could also be damaged by contact with the blanks rubbing it. Putting the insulation on the outside would be much simpler and probably as effective. If you were concerned, you could easily add an extra layer. It would also leave you more space on the inside.
 
I would think that if the insulation is inside the case that it would absorb moisture and grow mold. It could also be damaged by contact with the blanks rubbing it. Putting the insulation on the outside would be much simpler and probably as effective. If you were concerned, you could easily add an extra layer. It would also leave you more space on the inside.
I'm now planning to insulate on outside, 1" foiled foam board.
 
This is the kiln I built. I insulated both the inside and outside with foam board. I also had some roll foil insulation left from another project and added to the outside where practical. I have not had any mold problem with the styrofoam insulation. I have four 1” holes in the top for venting. Inside are three sockets for bulbs and a 4” fan. The fan runs continuously. I looked at some of the heat sources mentioned, but went with incandescent bulbs. Some bulbs came from the Restore store as did the 4” fan. I just dried two cherry bowls. I take a weight of the bowsl/wood at the start. This is the schedule I use. When I built this I wasn’t sure how many bulbs would be necessary for heat and have three. I could get by with two for bowl drying, but have another purpose for the kiln. It is nice to have individual switches for each bulb.
This is the cycle I use.
Fan runs continuously. It is in the bottom and angled upwards.
I place a pan of water in the kiln and no heat for two days.
1. Turn on one 40 watt bulb and set temp on to 95F and off to 100F for 7 days (water will evaporate durning this cycle)
2. Turn on two 40 watt bulbs and set on temp to 100 and off temp to 107.
3. Turn on one 40 watt and one 65 watt flood and set on temp to 107 and off temp to 115 for 7 days. Take weight and leave at this cycle for 3 more days. Take weight again and if no or very little change I consider them dry.

This is the inside showing the bulbs. The fan is also in the bottom.
IMG_0954.jpeg

This shows the controller and switches. The black box is a water heater controller that didn’t work and just left in place. The controller has a thermal probe inside. Separately I have a thermostat inside that provides me the temperature and humidity inside the kiln via bluetooth to my phone.

IMG_0955.jpeg IMG_0866.PNG

These are links to the thermostat and controller I use.


Attachments

  • IMG_0953.jpeg
    IMG_0953.jpeg
    655.4 KB · Views: 40
Last edited:
All you need is a basic set up, 15-20 watt bulb at the bottom, air vents at the top, ideally with some method of controlling the heat flow out of the box, so to maintain even temps through the seasons. You can go the whole 9 yards with a super whizz bang system, but it isn't really necessary.
 
All you need is a basic set up
I agree. I’m using a small chest freezer on its side, several 1/2” holes on one side on the top, same number on the other side bottom, and a 60 watt light bulb at the bottom. I have a reptile cage thermostat which turns the light bulb on and off around a preset temperature. I started around 100°, but am finding that 85-90 works better for me. No fan. The natural convection does fine to slowly remove moisture in about four weeks. Most important seems to be to pack it full. One or two blanks will cause drying too quickly. I’ve had a few fails, but overall it’s been quite successful when I want to get to something sooner than 6 months.
For slower drying I also use a cardboard barrel as I was told to on this site a couple of years ago, and that does a great job of giving me usable blanks in 6 months to a year, and I have several blanks of hard to dry wood (red oak, hickory, beech), at Leo’s urging in paper bags, just to add to my range of options.
 
All you need is a basic set up, 15-20 watt bulb at the bottom, air vents at the top, ideally with some method of controlling the heat flow out of the box, so to maintain even temps through the seasons. You can go the whole 9 yards with a super whizz bang system, but it isn't really necessary.
Well if you are calling my kiln “whizz bang” I’ll take it as a compliment. I’m an engineer and will surly do more than a something simple. You can just have a cardboard box with a bulb and dry wood. I’m happy with mine and get good results, that is what is important. The secondary purpose of mine is to dry bent wood for chair parts where 140F is needed. Overkill, yes, but happy.
 
Well if you are calling my kiln “whizz bang” I’ll take it as a compliment. I’m an engineer and will surly do more than a something simple. You can just have a cardboard box with a bulb and dry wood. I’m happy with mine and get good results, that is what is important. The secondary purpose of mine is to dry bent wood for chair parts where 140F is needed. Overkill, yes, but happy.
I like yours. Looks bigger than what I have planned. I don't have the space for a big one. The hardware cloth, though, did catch my eye. Now instead of messing up the sweet stainless tray by filling it with holes, I'm just going to make a shelf out of hardware cloth. $5 worth of cloth is way better than hours of cleaning up drilled holes, and I can use the tray to hold water! I now have all the parts and will build it on Saturday.
 
Well if you are calling my kiln “whizz bang” I’ll take it as a compliment. I’m an engineer and will surly do more than a something simple. You can just have a cardboard box with a bulb and dry wood. I’m happy with mine and get good results, that is what is important. The secondary purpose of mine is to dry bent wood for chair parts where 140F is needed. Overkill, yes, but happy.
William, as a retired engineer also, I have to at times tell my self to back off and stick with the 'KISS' method. :) But it boils down to whatever works for you is what counts. I have to admit you have one heck of a system and as you say it has a dual purpose, well done.
 
Completed the project today. Used 1.5" foam insulation to make a "hat" that fits around the cabinet. Cabinet just sits on the bottom insulation, and the 4-sided hat drops down tightly over the cabinet. Removes with no disassembly. I put 9 3/8" holes in the top, and 4 holes in the bottom, plus 2 for the lamp holders. I used double ended lamp holders to give me greatest flexibility. To start with 2 25W bulbs installed in opposite directions and 2 outlet adapters in the other lamp sockets. If I need a fan, I can just plug it in.

At vent holes I over sized the insulation around them to accept 1" ID PVC pipe, mainly to protect the holes in the foam without having to be too precise with alignment. I set the controller to 100 degrees. It took 4 hours to reach temperature with no load and all vents open. The temperature was around a cool 50 degrees in my shop at the start. Shop was probably 65 degrees 4 hours later. Don't know if the heat-up time is slow, fast, or just right. Pics below
 

Attachments

  • IMG_0003.JPG
    IMG_0003.JPG
    612.3 KB · Views: 17
  • IMG_0004.JPG
    IMG_0004.JPG
    549.4 KB · Views: 17
  • IMG_0005.JPG
    IMG_0005.JPG
    522.7 KB · Views: 17
  • IMG_0006.JPG
    IMG_0006.JPG
    564.6 KB · Views: 17
Back
Top