I just finished rough turning a Holly end grain hollow form. I did not seal thinking it was unnecessary. I place in a cardboard box for drying. Is this the correct action? Is final turning decision based on weight and moisture just like a bowl?

-
It's time to cast your vote in the March 2026 Turning Challenge. (click here for details) -
Congratulations to Chris Lawrence for "Dragon's Grip" being selected as Turning of the Week for March 30, 2026 (click here for details) -
Welcome new registering member. Your username must be your real First and Last name (for example: John Doe). "Screen names" and "handles" are not allowed and your registration will be deleted if you don't use your real name. Also, do not use all caps nor all lower case.
You are using an out of date browser. It may not display this or other websites correctly.
You should upgrade or use an alternative browser.
You should upgrade or use an alternative browser.
Drying Holly end grain hollow form.
- Thread starter Barry Holman
- Start date
- Joined
- Apr 27, 2004
- Messages
- 9,329
- Likes
- 6,142
- Location
- Lakeland, Florida
- Website
- www.hockenberywoodturning.com
Wall thickness is a big factor in drying
My process is to turn to a wall thickness of about 3/16” thickness.
After turning I put the form in a box with the flaps closed
2nd day I leave one flap closed so 1/2 the top is opened
3rd day I ope all top
4th day take it out of the boy set on a shelf. It’s ready to sand and finish.
The box provides a humidity chamber that keeps the faster drying areas of the form from drying too fast.
Thicker wall will require more drying time and perhaps a different approach
john lucas
AAW Forum Expert
If you leave it thick enough to re turn the extra precautions are needed. I seal all end grain areas and any sharp edges. Then put in a paper sack or box with the lid closed. I probably do more than is necessary but I would rather err on side of caution
Holly I've roughed out tends to crack a lot. I would seal it well and dry very slowly. Just setting out to dry always results in multiple cracks in my experience.
Regardless of wall thickness and species, I put mine in double kraft paper bags and put on drying shelves inside the house, with fairly constant temp and humidity. Weighing is the best way to know its dry. I close the bags with painters tape and write the date and wt on the tape. The bags are reusable many times.
You are also asking for color changes to the holly by limiting the air movement around it. If it’s put in the bag wet, you will loose the bright white color. Get a camera system, turn it really thin when wet, and that will really limit any cracking.
I just finished rough turning a Holly end grain hollow form. I did not seal thinking it was unnecessary. I place in a cardboard box for drying. Is this the correct action? Is final turning decision based on weight and moisture just like a bowl?
Pure white Holly is a beautiful thing. However, Holly will often acquire an ugly grey fungal stain if wet and warm. My best results were leaving it in a cold area to dry. (I like to cut it and other light-colored woods in the winter.)
Understand, I don't turn it green but find advantages to letting it dry before turning. But that can take a long time.
Note that if it DOES acquire a grey stain, it's been said that a 2-part wood bleach will make it white again. I haven't tried this. I have dyed some black. Love turning holly due to the fine grain.
JKJ
I turn almost all my hollow forms about 1/2" to 5/8" thick, depending on the size, boil, then put in a cardboard box with a tube fan to pull the air from the inside to the outside and circulate it within the box. Without the tube fan the damp air stays inside the piece while the outside dries. I check it every 4 or 5 days for MC. Once I get to 13% or less all over the piece I move on to the next step. I twice turn all my hollow forms so final thickness will be 1/2" or less, depending on warpage.
As others have said, holly turns a greenish blue gray if it's warm and wet. Not unattractive, but it loses its bright white color easily. I have a badly checked log that i've had for over ten years. Maybe one day I'll get around to using it.
I turn almost all my hollow forms about 1/2" to 5/8" thick, depending on the size, boil, then put in a cardboard box with a tube fan to pull the air from the inside to the outside and circulate it within the box. Without the tube fan the damp air stays inside the piece while the outside dries. I check it every 4 or 5 days for MC. Once I get to 13% or less all over the piece I move on to the next step. I twice turn all my hollow forms so final thickness will be 1/2" or less, depending on warpage.
The turning and drying is very close to the method Ted Pelfrey taught and described at his hollow form demo at the Knoxville club this week.
I do like Randy. Turn to 1/2” avoid sharp edges then place in an old refrigerator that l have taken the center out. I have drilled multiple holes in the top with a small fan pulling some of the moisture out. You can still feel the humidity when I open the door. So it’s gets no light and no air movement except tiny fan. I have very good success this way. Dries quickly.
Disclaimer, never tried drying holly.I do like Randy. Turn to 1/2” avoid sharp edges then place in an old refrigerator that l have taken the center out. I have drilled multiple holes in the top with a small fan pulling some of the moisture out. You can still feel the humidity when I open the door. So it’s gets no light and no air movement except tiny fan. I have very good success this way. Dries quickly.
If I understand you correctly, the tube fan pulls from the ID of the piece, and exhausts into the box.I turn almost all my hollow forms about 1/2" to 5/8" thick, depending on the size, boil, then put in a cardboard box with a tube fan to pull the air from the inside to the outside and circulate it within the box. Without the tube fan the damp air stays inside the piece while the outside dries. I check it every 4 or 5 days for MC. Once I get to 13% or less all over the piece I move on to the next step. I twice turn all my hollow forms so final thickness will be 1/2" or less, depending on warpage.
Do you only have one hole, used for hollowing the piece, or do you drill a hole in the opposite end?
How is the box ventilated, or is it air tight?
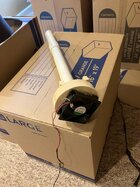
Doug, I have a collection of these (pic) thin wall PVC tube fans of different lengths that I drop down into the piece then stand them up in the box. Computer fans on the top with little wooden mounts that let air go in the top around the opening, down into the piece and then gets drawn out via the tube back into the box. Fans are easy to scavenge or pick up online for a few $. You can see the standoff gap in the pic where it's in the vase. Net, keeps air going into the piece then down into the cavity then back out into the box. I have small wood pieces in the bottom with those triangle painter stands mounted in a circle so the piece isn't just sitting flat on the cardboard box bottom. Lets air get to the end grain on the bottom. The tube should go into the piece about 2/3 down. Different short lengths of PVC and some unions and I can mix and match to get different lengths as needed.
Most pieces I have just the top hole. For some, depending on the size and stubborness of the wood, I'll flip and do the last 1/3 from the bottom. Sometimes the fight to hollow from one end on a 30" vase is not worth it. I try to avoid turning from both ends. Not due to the aesthics of the bottom, it just creates more steps once dry to create and glue in a plug in the bottom. I keep dry cutoffs handy and then find, turn and glue in one that matches as well as I can. If done right no one can really tell it was done and no one is going to flip over a 24"-33" vase to inspect the bottom.
The pic showing it in the piece has another box that goes over the top to seal it up. Hard to find boxes that fit well for large pieces so I end up making my own frankenstein ones. The box is taped together but I don't tape the top. I just close the flaps. I want it semi sealed but enough leaks that the air can slowly exchange with the outside air over time.
Attachments

Last edited: