• It's time to cast your vote in the April 2025 Turning Challenge. (click here for details)
  • Congratulations to Steve Bonny for "A Book Holds What Time Lets Go" being selected as Turning of the Week for 28 April, 2025 (click here for details)
  • Welcome new registering member. Your username must be your real First and Last name (for example: John Doe). "Screen names" and "handles" are not allowed and your registration will be deleted if you don't use your real name. Also, do not use all caps nor all lower case.

Drying platter/crotch wood

Joined
Jan 14, 2020
Messages
279
Likes
100
Location
Austin, TX
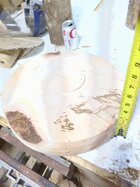
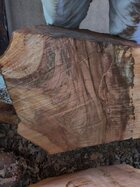
Hi, I have two big pieces of pecan crotches. So ... 4 halves. I ancorsealed the ends after I split them about a week ago but when I checked today they seem to be cracking on the face. So that's one thing. I decided I should probably cut them into rounds and either first turn them or just wax the heck out of them. I got as far as rough turning one piece. When rough turning I understand one should make it about 1" think per 12" diameter, but that probably does not hold true for a platter which would be shrinking differently.
So here are my questions
1. How should I store the logs? wax the face too? or cut them into rounds then wax the whole dang thing? or do I have to rough turn them all?
2. How thick should a rough turned platter be? The one in the picture is about 3" thick X 16 in diameter with a slight concave
3. How should I seal the rough turned platter? just coat the whole thing?
4. Should I thrice turn it?
5. Any design advice/ideas would also be greatly appreciated

Thanks,
RaifIMG_20250315_150919_HDR.jpgIMG_20250315_151004_HDR.jpgIMG_20250315_151115_HDR.jpg
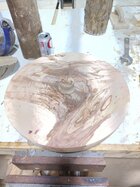
 
I cut and dry a lot of green wood.

Besides always sealing the end grain, I also seal other surfaces depending on a lot of factors: the type of wood, type and extent of figure, anything around or a short distance from the pith, around knots or baby knots, any transition between heartwood and sapwood DEPENDING on my experience with the species (dogwood and privet are bad for this), and surfaces parallel or nearly parallel to transverse rings on certain species with a high T/R ratio (a prime place for unexpected cracks. Burls and crotch flame? - always seal.

When in doubt and especially if the blank is large, seal well. Seal it all. Seal it thick! (or boil)

BTW, I use only AnchorSeal. But AnchorSeal out of the bottle/can is not thick enough and doesn't always seal well enough to suit me. Can't use two coats since the second coat (emulsified wax in water with surfactant) usually doesn't stick well to a dried sealant (since you can't coat wax with water). What I do is pour AnchorSeal an inch or so deep in a plastic coffee can and leave the lid off for a day or more until some of the water evaporates. This leaves a much thicker sealant which goes on thick and seals far better. Water will still escape through but the wax slows the drying and minimize cracking. (All this has to be done when the wood is freshly green - after it cracks it's too late for those cracks, but may minimize additional cracks.

For the most success, I think it's important to understand how wood shrinks, moves, warps, and where it is likely to deveop stresses as it dries.

EDIT: I forgot to stress - I DRY wood before turning. For several reasons, I don't turn wet wood. All of my comments are based around drying wood, although some apply to keeping wet wood from deteriorating.
 
Last edited:
I typically leave a crotch or log whole until I am ready to turn it. Seal the ends - wax, wood glue, pva drywall primer, stretch wrap - they all work. Store off the ground, out of sunlight, and best out of the rain.

When i cut a log section up, the whole section is cut into whatever blanks I want or can get, and I start turning. I keep the wet blanks in a trash bag in the shop. They will usually go over a month without blooming anything, but I try to turn the blanks within a week or so. If they start to bloom something I’ll put them in a yard bag that breathes.

Typical rule of thumb for 2 turn is 1” thick for each 10” dia, so your 16” platter blank would be 1.6”. The rule has worked pretty well for me, but not 100%. Depends on the blank. Over the past few years I tend to do more 1 turn stuff.

For 2 turn, I settled on the heavy brown kraft paper method - bags for things that fit, heavy kraft paint cover paper for large stuff. I double up the bags, and wrap the large stuff with at least double paper thickness, tape closed with 2” painters tape, that gets the piece log #( I keep a log of most everything I turn), date roughed, short description, and wt written on it.

I store the bagged work in the house on wire shelving, so it is in fairly constant temp and hum - key to developing a good process. Pieces are weighed occassionally, depends on how wet they are initially, but when the wt stops changing day to day, its ready to be turned. I do not put chips or anything with the piece - that tended to mold. I also dry most 1 turn items the same way, then sand and finish. The bags and paper are recycled until too torn up to use. Some switch bags out and other things, I dont find it necessary. I have had excellent success with the method.
 
2. How thick should a rough turned platter be? The one in the picture is about 3" thick X 16 in diameter with a slight concave
3. How should I seal the rough turned platter? just coat the whole thing?
4. Should I thrice turn it?

2. Most advice is to make the wall thickness 10% of the diameter.
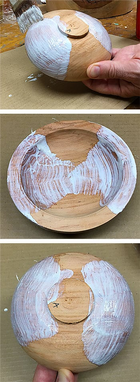
3. You'll get a lot of opinions on that question. I use the method described in this article: https://turnawoodbowl.com/drying-green-wood-bowls-6-methods-success. Here's a picture from that article. It seems to me that coating everything defeats the purpose of slowing the end grain from drying faster than the side grain. It should warp less with this method.


1742236276879.png

4. The only reason to turn it three times (that I can think of) is if you turned it too soon the second time and it was still wet. Apart from that, I can't think of a reason to turn a bowl three times.
 
My methods are almost exactly what Doug described above, so won't duplicate what he said.

One other thing I do is keep a large plastic garbage can in the shop. Things I can't get roughed right away after cutting/splitting logs, blanks that need further processing before drying, or misc pieces all get thrown in the plastic can with a lid. I've had great success leaving stuff in the can for over a year. My shop is unheated. If you have very fresh (green cut during growing season) or get high temps, you will have to watch for mold growth and heavy condensation, but leaving the lid off for a few hours during the day takes care of it. If you are dealing with a bunch of maple or other wood that develops mold quickly you might have to watch it closely, but I've had mine full of walnut, cherry, black and honey locust with no problems.
 
Back
Top