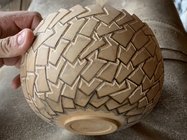
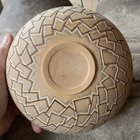
• Beware of Counterfeit Woodturning Tools (click here for details)
  • Johnathan Silwones is starting a new AAW chapter, Southern Alleghenies Woodturners, in Johnstown, PA. (click here for details)
  • Congratulations to Jim Hills for "Journey II" being selected as Turning of the Week for May 6th, 2024 (click here for details)
  • Welcome new registering member. Your username must be your real First and Last name (for example: John Doe). "Screen names" and "handles" are not allowed and your registration will be deleted if you don't use your real name. Also, do not use all caps nor all lower case.

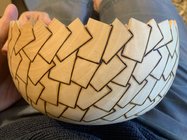
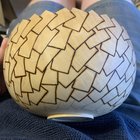
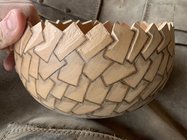
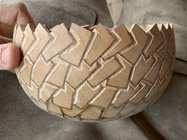
Embellished Bradford Pear Calabash

Michael Anderson

Super Moderator
Staff member
TOTW Team
Joined
Aug 22, 2022
Messages
1,385
Likes
4,009
Location
Chattanooga, TN
Following the lead of @Russ Braun and @Vincent Vogel, I am going to document the process of making an embellished calabash. Specifically, a Bill Luce style calabash, where 1) there is no recurve near the rim and 2) the bottom is a little bit more prominently rounded than a purely traditional form. Note: this is my interpretation/observation and not a strict by-the-rules analysis of calabash form. I am also aware that Bill was not the originator of this design; however, it was his obsession for a long time, and he is a big influence of mine. Thus I find giving him credit appropriate for this thread.

This project involves a twice-turned bowl, and will include carving/sawing/filing, power carving, pyrography, and acrylic paints. I will also include the thoughts behind my design process.
 

Michael Anderson

Super Moderator
Staff member
TOTW Team
Joined
Aug 22, 2022
Messages
1,385
Likes
4,009
Location
Chattanooga, TN
This bowl began with a log, of course. A late-summer storm damaged my neighbor’s large Bradford Pear, and they subsequently removed a few quite girthy branches. How convenient!

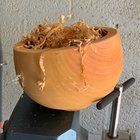
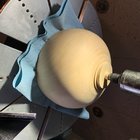
I rough-turned this bowl on 20 September, 2023. It was sopping wet. I’ve found that Bradford Pear dries fairly quickly, so the turn around time between rough-turning and finish turning can be fairly quick. Especially when the bowl is on the small-ish side, and you encourage drying (more on that later). The roughout was about 7.75” diameter and 5” tall including the tenon-shoulder. I neglected to record an initial weight. After roughing, I threw the bowl into a paper bag with some shavings. Over the next several days, I changed the bag/shavings once per day. Following this, I placed the rough out and some shavings in a cardboard box with a bunch of other roughed out bowls, all calabashes. I think I have a problem. Here is a photo of the roughout.

24C48EB5-5263-4FDA-AF54-7F1FFEDF000D.jpeg

Despite its reputation as an annoying/dangerous tree (and problematic invasive species), Bradford Pear is an incredibly nice wood to turn and carve. It takes surface treatments nicely, and finishes quite well. I’ve done a fair amount of carving with Bradford Pear, and its tight grain is conducive to getting minimal tearout/burrs. This makes it an ideal wood for a project like this. The exterior of the bowl will be completely carved/burned/painted, but I will leave the interior natural. The contrast is attractive, in my opinion.
 

Michael Anderson

Super Moderator
Staff member
TOTW Team
Joined
Aug 22, 2022
Messages
1,385
Likes
4,009
Location
Chattanooga, TN
Despite not recording an initial weight, I did weigh the bowl two and a half weeks after it was turned. On 7 October 2023 it weighed 853g. I imagine it lost around 150g (big -ISH) water weight between initial turning and then. Yesterday morning (17 November, 2023), I pulled the bowl out of the box and weighed it again. It weighed 757g, and felt like it was dry(ish). The bowl was out of round, and seemed like it was pretty close to being stable. So I decided to accelerate the drying process via microwaving.

Microwaving can be pretty harsh, but Bradford Pear handles it well (if the parameters are reasonable). I microwaved the bowl for 1 minute at a time, and let it rest between intervals until cool to the touch. Before each microwave session I recorded the bowl’s weight. Once the bowl stopped losing weight, I determined it was dry. Before I went to bed the bowl was 727g. I microwaved one more time, set the bowl on the counter. When I weighed it early this morning it was 733g (up 6g). I weighed it an hour afterward and nothing changed. Good enough for me. This bowl only took 9 microwave sessions total. Here is a weight record:

77994E68-B896-4460-876E-92B93D03C876.jpeg
 

Michael Anderson

Super Moderator
Staff member
TOTW Team
Joined
Aug 22, 2022
Messages
1,385
Likes
4,009
Location
Chattanooga, TN
I woke up this morning before everyone else, made my coffee, and went to the shop for a bit. The first step for returning any bowl (for me) is to true up the tenon. There are a variety of ways to do so. Here I used a jam chuck, and re-turned the tenon and shoulder. I find having a should extremely helpful with round-bottomed bowls, as it gives you a bit of security when finishing the bottom. It also keeps the flush surface intact when making your curve. This was my starting point. The sun was just starting to rise, and my shop light situation could be better. Kind of a dark photo, but you get the point.

A7CD4ABE-4341-43A4-BD1A-935A115A38F6.jpeg
 

Michael Anderson

Super Moderator
Staff member
TOTW Team
Joined
Aug 22, 2022
Messages
1,385
Likes
4,009
Location
Chattanooga, TN
After truing the tenon and shaping the bottom portion of the bowl I mounted it in the chuck. With a bowl like this I like to include some tailstock support. To do so, I reversed a cone attachment for my live center, and put a drawer liner and ship tail in eternity that and the bowl. This may be unnecessary, but not seems like it cuts down on vibration when returning the lip. If nothing else it’s good for false confidence. Ha! The sun had risen enough and lit up the room a bit more.

654ECF8E-73ED-40E9-A316-FFF88B88CB97.jpeg

I tend to shape the bowl quickly, but spend a lot of time refining the curve. Some of this is because I shear cut, stand back and study the profile, rinse and repeat. When everything looks how I want, I will usually close my eyes and palpate the surface. The fingers often “see” what the eyes can’t. This is the profile I ended up:

AB1256AB-2259-48F9-9C16-11600387E90F.jpeg

I will refine the bottom at the end, so ignore the slight bump. The tool marks are very faint and easily sanded away. At this point, my youngest boy woke up, so shop time ended until tonight. I will start sanding at 150g and probably go 220g and 320g. Even though the entire surface will be modified, I still want the form to be perfect before I start the embellishment work (or as close to perfect as possible). Next step is to turn the interior. That’s the task for tonight.
 
Last edited:
Joined
Feb 28, 2021
Messages
1,237
Likes
1,096
Location
Roulette, PA
Website
www.reallyruralwoodworks.com
I tend to shape the bowl quickly, but spend a lot of time refining the curve. Some of this is because I shear cut, stand back and study the profile, rinse and repeat. When everything looks how I want, I will usually close my eyes and palpate the surface. The fingers often “see” what the fingers can’t.
Think what you mean to say is fingers can often "see" what the eye cannot. I rely on my sense of touch far more than most turners, because my fingers/hands are also how I "hear", such as when a crack starts to form in a bowl, I can actually feel a difference in the cut as it passes over the crack, even if the crack is not visible.
 

Michael Anderson

Super Moderator
Staff member
TOTW Team
Joined
Aug 22, 2022
Messages
1,385
Likes
4,009
Location
Chattanooga, TN
Think what you mean to say is fingers can often "see" what the eye cannot. I rely on my sense of touch far more than most turners, because my fingers/hands are also how I "hear", such as when a crack starts to form in a bowl, I can actually feel a difference in the cut as it passes over the crack, even if the crack is not visible.
Ha, yes that’s what I meant! Typing on a phone. For some reason I neglect proofreading… Thanks—fixed now.

Touch is so important. I really on it quite a bit as well. Sometimes this gets me in trouble with metal stains if I’m not careful…

Oh, referring to your post above, I hope you do a follow-along at some point. All of these photos are from my phone. The writing takes a while though, but hey word vomit flows. Lol.
 

Michael Anderson

Super Moderator
Staff member
TOTW Team
Joined
Aug 22, 2022
Messages
1,385
Likes
4,009
Location
Chattanooga, TN
I guess these follow-alongs require complete transparency, good and bad. Tonight was one of those nights. Sheesh. As I was working the interior and getting close to final thickness, I had a minor catch at the rim and had to shave off about 2mm height. Not a substantial amount as far as proportions go, but it does take a bit away from how much the bowl comes in. The profile is still okay, but not quite as nice as it was. EDIT: I’m still pleased with the shape, don’t get me wrong. It’s still “worthy” of the time and effort to embellish.

4D01836B-8F29-4F01-8C25-B5C62756857E.jpeg

I also had to make the bowl slightly thinner than I wanted. I don’t particularly mind that though. It is 3/16” at the rim, and very gradually thickens toward the bottom where it should be around 3/8” when all said and done. With round-bottomed bowls it is nice to have a bit of heft at bottom to keep everything stable. There are some minor tearout spots in the interior, so I coated it with 1 lb shellac and let dry.

95064EBC-B02D-4F1B-AEB0-A14B819284FE.jpeg

I did a bit of preliminary sanding, but after some more clumsy non-lathe moments decided to call it a night. I’ll finish sanding it tomorrow, finish the bottom, and begin laying out the design.
 
Last edited:

Michael Anderson

Super Moderator
Staff member
TOTW Team
Joined
Aug 22, 2022
Messages
1,385
Likes
4,009
Location
Chattanooga, TN
I tried to make it another early morning; however, my 11 month old had the same idea. And shortly after my 2.5 year old did as well. So it goes. All good though, I can steal a couple of minutes here and there and sand in short bursts. I focused on a couple of spots of minor tearout, and am working through the grits slowly. I will likely take the interior to 600g to provide a really nice contrast with the exterior. I cut this blank adjacent to a big branch, so there is some nice curl at the bottom of the bowl. It will be a welcome feature. Here is the current state of things:

E4C73062-2C5B-435B-8155-83DE81699311.jpeg
 
Joined
Aug 16, 2022
Messages
281
Likes
638
Location
Butler, PA
Me either - I'd considered doing that a couple times, but I have no patience for it, and only my Cell phone for photos... I still might one of these days, but too many things going on right now.
I have only used my cell phone for all the photos I have posted on this forum so don't worry about that. I've learned from this project that when I'm turning it I have to stop and remember to take pictures and do the explanation in the correct order. Sometimes I forget and have to backtrack. It would be interesting to see what everyone else is working on and maybe learn something from others.
 

Michael Anderson

Super Moderator
Staff member
TOTW Team
Joined
Aug 22, 2022
Messages
1,385
Likes
4,009
Location
Chattanooga, TN
Finished sanding the bowl and turning the bottom. I sanded the interior to 600g and then rubbed with a scotchbrite pad. You can see the curl a bit in the following photo:

F5B006E7-10F2-423C-B7EE-167D42D55862.jpeg

I decided to keep a small foot. I think the form and embellishment will benefit from the slight lift. I am going to pyro the center of the foot, but I will keep the surrounding band natural. I like the contrast this provides, and it is also a nice place to sign the bowl.

315DA909-0D3C-4300-B845-6D1F706FD33A.jpeg
36200D90-DD0D-43E6-8C8A-3AAB666E9EC3.jpeg
E39BBEA9-C223-4757-A54A-3DCEC5860E37.jpeg
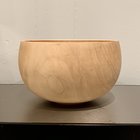
I like the form, and think it stands on its own. Next step is to lay out a pattern on the exterior.
 
Last edited:

Michael Anderson

Super Moderator
Staff member
TOTW Team
Joined
Aug 22, 2022
Messages
1,385
Likes
4,009
Location
Chattanooga, TN
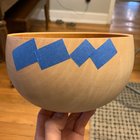
I decided to do a geometric design with a golden ratio rectangle (1.618). It benefits you to slow down and think about the size of the shapes. Too large and it undersizes your vessel and diminishes the effect of overlapping shapes. Too small and the shapes will seem too crowded. Just like the golden ratio, your size should be “just right”. Of course, there is certainly a bit of subjectivity here, but that’s okay.

1D861320-F42B-4E5A-8920-3C10D32617BA.jpeg

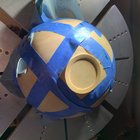
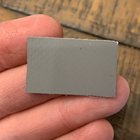
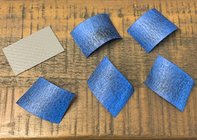
I’m using a piece of flexible vinyl I cut as a template. My working template will be blue painter’s tape, but the vinyl will allow me to cut more pieces of tape as needed. For example, if the corners get bent, or the tape gets ripped, etc… I cut multiple sizes, and ultimately decided on a rectangle that is 18mm x 29.1mm (or as close as possible). In the image below, this is the far right piece of tape. I like painter’s tape for the working template as it doesn’t really leave a residue behind, is reusable, and is easy to manipulate.

C4A82FFA-F9AF-4630-A482-4A88034F85C3.jpeg
 
Last edited:
Joined
Jun 30, 2008
Messages
172
Likes
212
Location
Chatham, Ont.
I decided to do a geometric design with a golden ratio rectangle (1.618). It benefits you to slow down and think about the size of the shapes. Too large and it undersizes your vessel and diminishes the effect of overlapping shapes. Too small and the shapes will seem too crowded. Just like the golden ratio, your size should be “just right”. Of course, there is certainly a bit of subjectivity here, but that’s okay.

View attachment 57608

I’m using a piece of flexible vinyl I cut as a template. My working template will be blue painter’s tape, but the vinyl will allow me to cut more pieces of tape as needed. For example, if the corners get bent, or the tape gets ripped, etc… I cut multiple sizes, and ultimately decided on a rectangle that is 18mm x 29.1mm (or as close as possible). In the image below, this is the far right piece of tape. I like painter’s tape for the working template as it doesn’t really leave a residue behind, is reusable, and is easy to manipulate.

View attachment 57609
The size is just (proportion) right, thats why people like credit cards. Now you can explore positioning.:cool:
 

Michael Anderson

Super Moderator
Staff member
TOTW Team
Joined
Aug 22, 2022
Messages
1,385
Likes
4,009
Location
Chattanooga, TN
You’re right, Bernie! It’s funny to think about how pleasant that proportion is. I guess part of it comes from familiarity, but even that originates via nature. I got a chuckle with credit cards. “I couldn’t help but charge it to my card—I needed to see the shape!” I have a solid excuse now :p

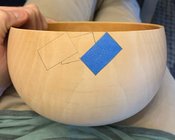
Positioning is super important here, I agree. I try to approach this in a way that is random yet ordered. The rectangles are built in layers, and organized such that every one is overlapped by another. I also try to tilt each adjacent one differently, sometimes subtly and sometimes dramatically. Sometimes there is a “falling domino” pattern that is abruptly broken. The difference in position creates a lot of tension and movement. The carving/burning/painting that will come later only serve to enhance this effect. Just like the form of the vessel is important for the overall look, the positioning of the shapes is important for the overall effect.

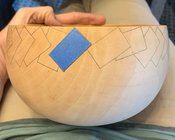
That said this takes a long time. It’s a bit of type 2 fun. Not so pleasant in real time, but very satisfying at the end. Here are some shots of building the first layer:

D427DA03-6BF8-42BC-B19D-71189B837958.jpeg
F3AF5E0F-6265-4EC0-AA48-46C2A334201C.jpeg
7F79DA8A-429B-4CBC-AA4D-7B4C7D25F300.jpeg
106E235D-844F-49D7-A274-2D549118572C.jpeg

I use a pencil to trace the rectangles, and I move from left to right. When tracing, make sure the pencil is pushing down the edge of the tape. Otherwise, the pencil has a tendency to slip under the tape and the rectangles will be sloppy. The specific angle is a judgement call, but you want some sort of difference. That said, you also want to ensure that everything is somewhat single-file. In total I will six rows of overlapping rectangles. When you get the end of a row, position/trace the rectangle as usual. Then, erase the left border of the first rectangle you drew. This ensures a continuous overlap.
 

Michael Anderson

Super Moderator
Staff member
TOTW Team
Joined
Aug 22, 2022
Messages
1,385
Likes
4,009
Location
Chattanooga, TN
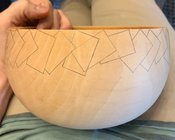
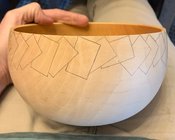
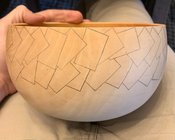
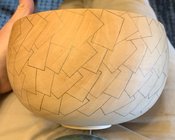
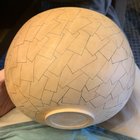
Just finished laying out all of the rectangles. Six rows got me near the foot of the vessel. They should appear to fade into darkness if you’re looking at the bowl from above or head on. I went through five different pieces of tape--they gradually get gummy and dirty from skin oil and graphite picked up from the surface pencil. You can see in the photo below the benefit of having a master template to create the working templates from. It’s all about consistency and repeatability.

229A903A-7722-4637-BB38-B755B46AD2CD.jpeg

Here are some photos showing progress in the layout. The next step is to saw the rim.

AC48386D-DD0A-4CA2-91FA-A02D21EFA98B.jpeg
63B07EF6-89DE-4BBD-9E5B-F3A4C1F9F584.jpeg
B5B935B3-833D-4C31-867B-710FC2A1AE29.jpeg
 

Michael Anderson

Super Moderator
Staff member
TOTW Team
Joined
Aug 22, 2022
Messages
1,385
Likes
4,009
Location
Chattanooga, TN
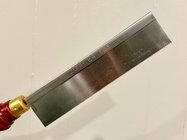
I just finished roughing out the rim of the vessel. The tool of choice is a thin kerf razor saw. This one is by Zona, and the blade is 0.01” wide. I bought it for super cheap, and absolutely love it.

731FA8AF-004B-406E-9164-A752F38CB7D3.jpeg

I tend to work assembly line style with this. First, I make tiny start cuts around the entire vessel. These are at the corners of the rectangles. Then, cut down the left side of every rectangle. Then down the right side of each rectangle. It’s easier to get into a flow this way, rather than completing one rectangle at a time. The trick with the cuts is to stay just outside of the line. You also want your cuts to be perpendicular to the tangent of the bowl. Here are a few progress photos:

A384E8E5-4442-45CF-AA11-819C67D73F2C.jpeg
99C0B119-E760-434D-BE01-6BC7DA38B517.jpeg

The next step is to refine the borders of the rectangles with a carving knife and chisel, and then use riffler files to finish it off.
 
Joined
Sep 19, 2023
Messages
423
Likes
694
Location
Columbia, TN
Despite not recording an initial weight, I did weigh the bowl two and a half weeks after it was turned. On 7 October 2023 it weighed 853g. I imagine it lost around 150g (big -ISH) water weight between initial turning and then. Yesterday morning (17 November, 2023), I pulled the bowl out of the box and weighed it again. It weighed 757g, and felt like it was dry(ish). The bowl was out of round, and seemed like it was pretty close to being stable. So I decided to accelerate the drying process via microwaving.

Microwaving can be pretty harsh, but Bradford Pear handles it well (if the parameters are reasonable). I microwaved the bowl for 1 minute at a time, and let it rest between intervals until cool to the touch. Before each microwave session I recorded the bowl’s weight. Once the bowl stopped losing weight, I determined it was dry. Before I went to bed the bowl was 727g. I microwaved one more time, set the bowl on the counter. When I weighed it early this morning it was 733g (up 6g). I weighed it an hour afterward and nothing changed. Good enough for me. This bowl only took 9 microwave sessions total. Here is a weight record:

View attachment 57570

I read about microwaving on the defrost setting. I microwave on defrost between 1:30 and 3:00 (depends on wood and wall thickness). I'll microwave it once, then turn it over and microwave again for the same amount of time. Then, like you, I set it aside until it is cool and then hit it again. I'm not sure whether the lower power setting is better or not, as I haven't used full power.
 
Joined
Sep 19, 2023
Messages
423
Likes
694
Location
Columbia, TN
I placed the rough out and some shavings in a cardboard box with a bunch of other roughed out bowls, all calabashes. I think I have a problem. Here is a photo of the roughout.

View attachment 57562

Despite its reputation as an annoying/dangerous tree (and problematic invasive species), Bradford Pear is an incredibly nice wood to turn and carve. It takes surface treatments nicely, and finishes quite well. I’ve done a fair amount of carving with Bradford Pear, and its tight grain is conducive to getting minimal tearout/burrs. This makes it an ideal wood for a project like this. The exterior of the bowl will be completely carved/burned/painted, but I will leave the interior natural. The contrast is attractive, in my opinion.

Echoes of Jeff Foxworthy in my head: If all your bowls turn out as calabash... you might have a problem.
 

Michael Anderson

Super Moderator
Staff member
TOTW Team
Joined
Aug 22, 2022
Messages
1,385
Likes
4,009
Location
Chattanooga, TN
I read about microwaving on the defrost setting. I microwave on defrost between 1:30 and 3:00 (depends on wood and wall thickness). I'll microwave it once, then turn it over and microwave again for the same amount of time. Then, like you, I set it aside until it is cool and then hit it again. I'm not sure whether the lower power setting is better or not, as I haven't used full power.
Ah cool, that might be something worth looking into. I haven’t really had any issues with full power though, but the max I’ve done is 1:30 for something pretty thin and warpable. Defrost is a good idea.

That Jeff Foxworthy joke cracked me up ha. :p
 

Michael Anderson

Super Moderator
Staff member
TOTW Team
Joined
Aug 22, 2022
Messages
1,385
Likes
4,009
Location
Chattanooga, TN
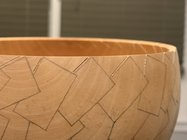
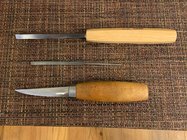
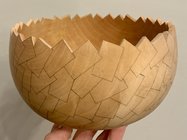
Done refining the rim. This is (part of) where the magic happens. The carving knife does the bulk of the work, which is getting you to the borders of the rectangles. A flat riffler file and a thin carving chisel clean up the knife marks and refine the angles.

43A77188-0832-4BDB-8003-ABD6907B228C.jpeg

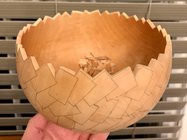
When carving, the difficulty is in keeping a consistent angle. Closed form bowls generally benefit from a downward sloping rim; likewise, the borders of the rectangles should be appropriately downturned. It is challenging to get everything just right with the knife alone. That’s where the riffler file comes in. It allows you to take away enough “dust” so that everything looks consistent. This takes time, a lot of time. But it is time well spent. If the border looks sloppy (or if the rectangles have funky angles), the whole vessel will look sloppy. That said, the reality is that the rim will not be absolutely perfect; however, that is okay. In any case, minor inconsistencies can be fixed with the later pyrography. The carving chisel is critical for cleaning the borders between rectangles. Here is a photo of the cleaned up rim. Note, the wide angle cell phone camera somewhat distorts the image.

8CABD6F5-8712-481C-BA27-A4B13B1FE832.jpeg
 
Last edited:
Joined
Jun 5, 2023
Messages
123
Likes
697
Location
Portage, MI
Nice so far Michael...sort of like segmenting in reverse. I think the masses on this forum don't understand the complexities of a well thought out segmented piece. @Russ Braun had recently posted a fantastic follow along project. He is several levels above me in this regard so I a glad he put the time in.

Edit: Please show how you secure the bowl when carving those rectangles...ok...pretty please :cool:
 

Michael Anderson

Super Moderator
Staff member
TOTW Team
Joined
Aug 22, 2022
Messages
1,385
Likes
4,009
Location
Chattanooga, TN
Nice so far Michael...sort of like segmenting in reverse. I think the masses on this forum don't understand the complexities of a well thought out segmented piece. @Russ Braun had recently posted a fantastic follow along project. He is several levels above me in this regard so I a glad he put the time in.

Edit: Please show how you secure the bowl when carving those rectangles...ok...pretty please :cool:
Thank you Paul! Oh yeah, Russ' project was wild to follow along. Far beyond my skill level, but I still learned a lot. I think that's the benefit of these follow alongs--even if it's a project that you (general "you", not you you) won't make, there are still plenty of things to learn and apply to your own work. And if nothing else, sometimes it is nice to see how the sausage is made.

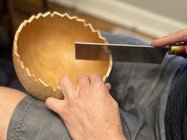
I'm glad you asked about the carving. For the border, I just used my body as a stabilizer. Here is each tool in action (after the fact, and a big thanks to my wife for taking these photos a few minutes ago). For the saw, I lightly squeezed the bowl between my legs, and used my thumb and forefinger to stabilize the rim near the saw. I tried to position the bowl so that my cuts were always straight-down, as this kept my shoulder wrist and finger in alignment. Easier said than done.
IMG_4620.jpg

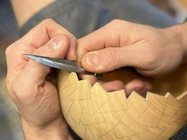
For the knife, it was mostly my fingers/wrist that stabilized everything. Small, controlled slices. I am right-handed, and although I've worked a being ambidextrous in my turning, hand-carving I have not. That said, most of cuts involved pulling the blade with my right hand, and simultaneously pushing the blade with my left thumb and forefinger. Part of the difficulty of this is that a lot of the cuts go against the grain. Like most things, a super sharp blade is critical. The bowl itself is stabilized by pressing on one of my thighs.
IMG_4621.jpg

With the riffler file, most of the motion comes from the wrist and/or the shoulder, so it's important to stabilize the file. and keep it at a specific angle. I find it helpful to clamp the very end of the file between my pinkie and ring finger, secure the base of the cutting surface with my thumb and middle finger, and then press down on the file with my forefinger. This keeps the file flat on the wood, and really eliminates the chatter you can get with a light tool like this. My left wrist/palm/middle finger keep the bowl stable.

IMG_4622.jpg

With the carving chisel, my approach angle is quite steeper. I press down on the rim of the bowl with my right wrist and use my left handle to oppose the pressure from my leg and other hand. I mainly use my right middle finger to stabilize the blade, and thumb and forefinger to grip and press down. My left pointer finger is also important as a stabilizer. The cutting power comes from fine wrist movements, and I keep my elbow/shoulder steady to add control.
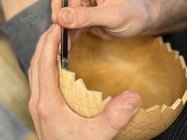
IMG_4623.jpg

@Paul May that's probably a long answer for a short question, but it's fun (to me) to think about these things critically. I'm not sure I've ever put these movements in text before. Thanks again for asking--great question.
 

Michael Anderson

Super Moderator
Staff member
TOTW Team
Joined
Aug 22, 2022
Messages
1,385
Likes
4,009
Location
Chattanooga, TN
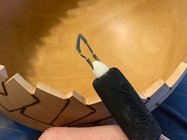
Now that the rim is finished, I can start the pyrography. This first round involves burning the pencil lines. It is, by a wide margin, the most stressful part of the process. You can’t really erase mistakes, so it takes intense focus and a steady hand/wrist. The pinkie of the tool hand is a very helpful stabilizer. I’m using a detail master Excalibre (bought used on this forum a while ago) on medium heat and a Razertip large round skew.

92010573-1869-48C4-BCFE-B6CB60914E7E.jpeg
81E59A10-CCDF-403E-B601-E7224BA8855E.jpeg

Here is a photo of the completed first row:

0E511174-836B-4002-98F3-836683A24541.jpeg
 
Last edited:

Michael Anderson

Super Moderator
Staff member
TOTW Team
Joined
Aug 22, 2022
Messages
1,385
Likes
4,009
Location
Chattanooga, TN
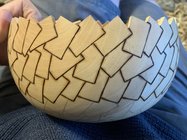
Finished with the first round of pyrography. Here are some progress shots.

IMG_6823.JPG
IMG_6824.JPG
IMG_6825.JPG
IMG_6826.JPG

The first few rows take the longest, and then gradually the others take less and less time as you near the foot. There will be quite a bit more pyro work in the future, but the next step is to begin doing some relief carving. It may be a day or two before my next update. My wife and I (and kids) are traveling to see some family this evening. I'm bringing my carving/burning gear with me, but will definitely prioritize the visitation. I'll work during the down times though and post when possible. :)
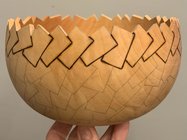
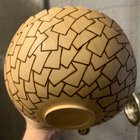
 

Michael Anderson

Super Moderator
Staff member
TOTW Team
Joined
Aug 22, 2022
Messages
1,385
Likes
4,009
Location
Chattanooga, TN
Managed to do a little bit of bowl work last night. I started to carve some of the rectangles, and then got paranoid about messing up. So, I took a step back and used a pencil to (roughly) shade in the areas that I need to focus on first. Originally, I was going to begin with carving chisels/gouges, but I think I will start the relief carving with a rotary tool. Then I’ll use hand tools to refine everything. Then I’ll finish with files and sandpaper to smooth the curves.

92147961-15A3-4FC1-8BEF-012B0FEC1C73.jpeg
 
Last edited:
Joined
Jun 5, 2023
Messages
123
Likes
697
Location
Portage, MI
Managed to do a little bit of bowl work last night. I started to carve some of the rectangles, and then got paranoid about messing up. So, I took a step back and used a pencil to (roughly) shade in the areas that I need to focus on first. Originally, I was going to begin with carving chisels/gouges, but I think I will start the relief carving with a rotary tool. Then I’ll use hand tools to refine everything. Then I’ll finish with files and sandpaper to smooth the curves.

View attachment 57687
Yes this point of the project I understand the nerves are beginning to show. You have come this far...don't F- it up! Courage young Padawan.......
 

Michael Anderson

Super Moderator
Staff member
TOTW Team
Joined
Aug 22, 2022
Messages
1,385
Likes
4,009
Location
Chattanooga, TN
Yes this point of the project I understand the nerves are beginning to show. You have come this far...don't F- it up! Courage young Padawan.......
Haha, thanks Paul. I have to try and go against my nature and not F it up. Kidding, sort of... This is actually the first time I've relief carved one of these geometric bowls. Why not do it in public display? Lol
 

Michael Anderson

Super Moderator
Staff member
TOTW Team
Joined
Aug 22, 2022
Messages
1,385
Likes
4,009
Location
Chattanooga, TN
I worked in some carving time while my children were napping. Initially, I began rough carving individual rectangles, but decided again on an assembly line approach.

IMG_6829.JPG

I used a rotary burr to relieve the overlapped border of each rectangle. This was tedious, but a bit less stressful than the previous pyrography. On an aside, I was carving outside and I think the temperature dropped 10 degrees. Chilly! The next step will be to work on refining the border/depth between each rectangle, and then I will carve away more material and blend the contours. This will take a while. Some more type 2 fun, but wildly satisfying.

IMG_6830.JPG
IMG_6832.JPG
IMG_6834.JPG
 
Back
Top