
-
Congratulations to Chris Lawrence for "Dragon's Grip" being selected as Turning of the Week for March 30, 2026 (click here for details) -
Welcome new registering member. Your username must be your real First and Last name (for example: John Doe). "Screen names" and "handles" are not allowed and your registration will be deleted if you don't use your real name. Also, do not use all caps nor all lower case.
You are using an out of date browser. It may not display this or other websites correctly.
You should upgrade or use an alternative browser.
You should upgrade or use an alternative browser.
End grain? help.
- Thread starter Rachel Aberle
- Start date
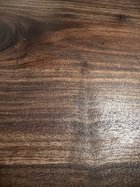
I don’t see any tear out in the pic, but if I blow it up very large do see what appear to be some sanding scratches. Not sure how obvious they are or just an artifact of the magnification.
I find walnut to be one of the worst for finding sanding scratches, even after 600-800 grit. End grain sands more slowly than face grain, I’d recommend not skipping grits and be careful so that the adjacent face grain doesn’t get sanded down more that the end grain resulting in a wavy feel as you rub your hand over it.
I find walnut to be one of the worst for finding sanding scratches, even after 600-800 grit. End grain sands more slowly than face grain, I’d recommend not skipping grits and be careful so that the adjacent face grain doesn’t get sanded down more that the end grain resulting in a wavy feel as you rub your hand over it.
- Joined
- Feb 28, 2021
- Messages
- 1,812
- Likes
- 1,625
- Location
- Roulette, PA
- Website
- www.reallyruralwoodworks.com
Looks like curl in the wood. With Walnut, I find that often enough in flatwork as well as some turned pieces - some of it, I think, is just artifacts from old branches that never finished growing out, other is just a curl in the wood grain I often find this sort of grain nearby to other larger knots - like as in your photo above. - wood fibers are reversing, and can be difficult to cut cleanly- sand one way, one half of it gets smooth but the other half gets rougher, and vice-versa (imagine trying to sand the peak off a thatched roof, for example) I suspect a sanding sealer such as dewaxed shellac , or perhaps a bit of wood hardener might help, but then the finish would be uneven and not penetrate as deeply. Perhaps if you get it as smooth as possible, apply finish and let it cure (or just wet sand) and then sand down and re-finish, you might get a nice smooth surface there. I dunno - for me, I count it as an attractive feature in the wood.The fibers are raised and not smooth here. I was turning a platter. Is this tear out on this walnut or not sanding well the end grain? You can see the line of darker fibers.
Just my opinion based on the limited area in the photo to look at....
Thank you I love how beautiful walnut is but I have not perfected a way to sand it.I don’t see any tear out in the pic, but if I blow it up very large do see what appear to be some sanding scratches. Not sure how obvious they are or just an artifact of the magnification.
I find walnut to be one of the worst for finding sanding scratches, even after 600-800 grit. End grain sands more slowly than face grain, I’d recommend not skipping grits and be careful so that the adjacent face grain doesn’t get sanded down more that the end grain resulting in a wavy feel as you rub your hand over it.
This i
Thank you. This is interesting insight and I will take a closer look at the whole surface. I’m glad it adds uniqueness. It really feels like once you’re sanding one way, the part next to it roughs up.Looks like curl in the wood. With Walnut, I find that often enough in flatwork as well as some turned pieces - some of it, I think, is just artifacts from old branches that never finished growing out, other is just a curl in the wood grain I often find this sort of grain nearby to other larger knots - like as in your photo above. - wood fibers are reversing, and can be difficult to cut cleanly- sand one way, one half of it gets smooth but the other half gets rougher, and vice-versa (imagine trying to sand the peak off a thatched roof, for example) I suspect a sanding sealer such as dewaxed shellac , or perhaps a bit of wood hardener might help, but then the finish would be uneven and not penetrate as deeply. Perhaps if you get it as smooth as possible, apply finish and let it cure (or just wet sand) and then sand down and re-finish, you might get a nice smooth surface there. I dunno - for me, I count it as an attractive feature in the wood.
Just my opinion based on the limited area in the photo to look at....
What grit are you using? I can't say I've ever roughed up wood while sanding.This i
Thank you. This is interesting insight and I will take a closer look at the whole surface. I’m glad it adds uniqueness. It really feels like once you’re sanding one way, the part next to it roughs up.
Is using a random orbital sander a feasible option?
It is very light tear out, and common with curly grain. For flat work a very sharp steep bevel smoother, and varying the cut angle, mostly takes care of it. For turning, if its that slight, sand it out. Depending on the finish applied in the pic there are various ways to deal with it.
On this particular piece 120/240What grit are you using? I can't say I've ever roughed up wood while sanding.
It is!Is using a random orbital sander a feasible option?
Thank you will try this. I’m new to doing flat work. Mostly bowls and some spindle turning so far.It is very light tear out, and common with curly grain. For flat work a very sharp steep bevel smoother, and varying the cut angle, mostly takes care of it. For turning, if it’s that slight, sand it out. Depending on the finish applied in the pic there are various ways to deal with it.
Dave Landers
Beta Tester
I sand most everything to 400 usually. For most things, that's something between enough and overkill. But with walnut I usually have to go to 600 or 800 because I can still see the scratches from the 400.On this particular piece 120/240
Rachel, that flaw will become striking once you’ve fixed the surface.
As has been mentioned, Walnut is one of the more difficult woods to get a flawless finish.
Here‘s what I do.
Start with 120 paper. Stick with that til all of the damaged fibers have been cleaned up. Don’t worry about sanding against the grain. It’ll work out fine. You can’t tear fibers with sandpaper.
First sand handholding paper. When you think it’s clear use a disk sander, same 120. Stop and check that there are zero in-line scratches left from the hand held.
Then, switch to 180 paper and repeat the same operation. This time use the hand held paper until zero disk scratches remain.
Repeat for 220, 320. Wet the surface with water, let dry and move on to 400, 600, 800, 1000 and 2000. Finally buff with a white, non-abrasive non-woven pad.
Now, I know this method might seem like overkill to some, but you will find that you spend less time on these final steps. Making that area feel smooth enough is the very least that one can ‘get away with’. You, I assume would rather the wood sings, once finished. That area, if handled well, will have lovely chatoyance, and you might see other nice surprises.
Removing the visible (to the unaided eye) and making the surface smooth to the touch is the beginning, only. It’s the smaller, maybe not seen scratches that make the difference between mat, and gloss surface.
The time savings is in the ease of applying the protective finish of your choosing. Because your surface will be perfect, you can apply the finish, buff it off with a soft rag and be done.
I hope this helps
Thank you will sand higher for sure now on walnutI sand most everything to 400 usually. For most things, that's something between enough and overkill. But with walnut I usually have to go to 600 or 800 because I can still see the scratches from the 400.
Thank you for detailing this out. I do want the surface to feel wonderful to the touch. You all have given such wonderful advice and I’m going g to go back and try these suggestions. Sanding is something that is still such a thing to keep learning and growing on.Rachel, that flaw will become striking once you’ve fixed the surface.
As has been mentioned, Walnut is one of the more difficult woods to get a flawless finish.
Here‘s what I do.
Start with 120 paper. Stick with that til all of the damaged fibers have been cleaned up. Don’t worry about sanding against the grain. It’ll work out fine. You can’t tear fibers with sandpaper.
First sand handholding paper. When you think it’s clear use a disk sander, same 120. Stop and check that there are zero in-line scratches left from the hand held.
Then, switch to 180 paper and repeat the same operation. This time use the hand held paper until zero disk scratches remain.
Repeat for 220, 320. Wet the surface with water, let dry and move on to 400, 600, 800, 1000 and 2000. Finally buff with a white, non-abrasive non-woven pad.
Now, I know this method might seem like overkill to some, but you will find that you spend less time on these final steps. Making that area feel smooth enough is the very least that one can ‘get away with’. You, I assume would rather the wood sings, once finished. That area, if handled well, will have lovely chatoyance, and you might see other nice surprises.
Removing the visible (to the unaided eye) and making the surface smooth to the touch is the beginning, only. It’s the smaller, maybe not seen scratches that make the difference between mat, and gloss surface.
The time savings is in the ease of applying the protective finish of your choosing. Because your surface will be perfect, you can apply the finish, buff it off with a soft rag and be done.
I hope this helps
I wish I could tell you what caused that little cone shaped blip in that piece of walnut. It almost looks like a burl cone, where the burl is the top of the ice cream cone, and the cone goes down into the wood. As always, best to get as much of it out with tools as possible before you sand. For me, I prefer a shear scrape to a NRS (negative rake scraper). A scraper still pulls at the fiber more than a gouge or a shear scrape, and with some woods it works great, and with others, it doesn't work at all well. Some times spritzing a little water on the wood, minute or so pause, then take VERY LIGHT cuts to remove the wet wood helps a lot. If nothing else, you have to resort to the 80 grit gouge. I did do one video just on shear scraping.
robo hippy
robo hippy
What is your finish schedule? What schedule steps have been completed?
There’s correcting a finish schedule that has been started, then there’s a raw wood schedule - can be totally different.
Finish schedule is simply all steps to be completed through to the fully cured finish, which can take a while depending in the finish used and desired outcome. There is no set schedule. It starts with the desired outcome and one works backward to develop the steps. Different finishes, desired outcome, wood type and condition, and available tools/methods all come into play.
As an example, for flatwork, I start surface prep with a smoothing hand plane and possible scrapers/scraper plane. No ros used. Usually a pass with 320 by hand with the grain is the only sanding, no sanding at all if I want a “hand tooled” outcome.
I’ve been trying to get better at using a cabinet scraper on flats. When I get the bur good and my technique okay, it’s far better than sanding…and quicker. Maybe something to try on another day.
Great feedback. Thank you for the help. I’ve never done the water trick while cutting wood but will definitely give it a try.I wish I could tell you what caused that little cone shaped blip in that piece of walnut. It almost looks like a burl cone, where the burl is the top of the ice cream cone, and the cone goes down into the wood. As always, best to get as much of it out with tools as possible before you sand. For me, I prefer a shear scrape to a NRS (negative rake scraper). A scraper still pulls at the fiber more than a gouge or a shear scrape, and with some woods it works great, and with others, it doesn't work at all well. Some times spritzing a little water on the wood, minute or so pause, then take VERY LIGHT cuts to remove the wet wood helps a lot. If nothing else, you have to resort to the 80 grit gouge. I did do one video just on shear scraping.
robo hippy
Ah sounds like something to try!I’ve been trying to get better at using a cabinet scraper on flats. When I get the bur good and my technique okay, it’s far better than sanding…and quicker. Maybe something to try on another day.
Yeah, another rabbit hole…but not a real deep one. Acquaintance of mine also uses cabinet scrapers on turned platters and shallow bowls— I’ve not experimented with that yet.Ah sounds like something to try!
- Joined
- Feb 28, 2021
- Messages
- 1,812
- Likes
- 1,625
- Location
- Roulette, PA
- Website
- www.reallyruralwoodworks.com
Yes, Cabinet Scrapers when properly sharpened and burrs drawn can be beautiful tools to work with especially on difficult grain - indeed, with some practice it is possible to get a nice finish on any piece of wood that does not even need sanding (smoother than 400 grit would get it) Now if I could teach myself to sharpen & draw a burr on a scraper that fits the inside profile of a bowl (or if I could turn a bowl with consistent profiles to fit the curved scraper I do have!) I'd probably be quite happy to eliminate sanding entirely. If it was not such a tedious task on large flatwork pieces, I'd probably use my cabinet scrapers on everything in lieu of sanding, but then it would take me two or three times as long to complete a project.
If I have any tear out I will wet it a little and let it dry. Then sand again and that will usually get rid of it.