• May 2025 Turning Challenge: Long Neck Hollowform! (click here for details)
  • Congratulations to Phil Hamel winner of the April 2025 Turning Challenge (click here for details)
  • Congratulations to Paul Hedman and Donna Banfield for "Fire and Ice" being selected as Turning of the Week for 5 May, 2025 (click here for details)
  • Welcome new registering member. Your username must be your real First and Last name (for example: John Doe). "Screen names" and "handles" are not allowed and your registration will be deleted if you don't use your real name. Also, do not use all caps nor all lower case.

Epoxy fillings - pressure, vacuum or putty?

Joined
Jun 25, 2024
Messages
1
Likes
0
Location
Redding, California
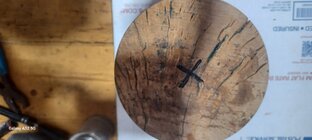
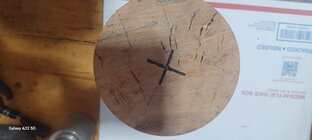
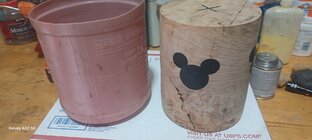
Hello, all. I am new to epoxy and looking for pointers. This pencil holder project started with a 6" cube of maple(?) burl. I made 7/8" & 1-1-1/2" ebony dowels 1-1/4" long: 7/8" drilled and glued first, followed by the larger 1-1/2", before turning to the 5-1/4" cylinder in the pictures.

Now I need to decide how/when to deal with the non-structural cracks/fissures in the wood. I can blow air thru some of them, others not. The largest, on the side, is less than 1/4" wide, with most of them in the 1/16" or less range, on sides and top/bottom.

I have a pressure pot, compressor and vacuum pump, and have found a suitable 6" cylindrical mold. I think that I want to force epoxy into the voids now, before turning to final shape, but unsure whether to use vacuum or pressure?

Or, should I turn to rough shape and then "putty" some 5 minute epoxy and/or CA sawdust into whatever shows up then, and turn/sand to final?

What type of epoxy should I use? I have some table top, but don't think that's right.

How is epoxy typically finished?

Thank you!
20241017_114957.jpg20241017_115023.jpg20241017_115015.jpg
 
Or, should I turn to rough shape and then "putty" some 5 minute epoxy and/or CA sawdust into whatever shows up then, and turn/sand to final?

1. The simplest solution if the wood is structural sound.
2. Riskiest solution if the wood is prone to come apart.

If the wood is structurally sound, consider turning then filling before sanding.
I have used JB weld. It’s a two part dough like epoxy mixed by kneading the amount you want to use.
I color it adding a few drops of black dye as I mix it. Then I fill the crack using a popsicle stick like a putty knife.
I Wait about 5 minutes then sand to level the epoxy in the crack and remove any residue on the surrounding surface.

I only turn wood I deem to be structurally sound
 
I think that I want to force epoxy into the voids now, before turning to final shape, but unsure whether to use vacuum or pressure?

Hello John,

I haven't done this with wood, but my experience: Decades ago I used a lot of expxy when I ran a (one man) metallography lab at a nuclear facility. My primary task was cut from batches of test reactor element plates and pot them in epoxy so I could grind flat, polish, etch, and examine under the microscope. (In case anyone is interested, these plates were made by hot rolling an aluminum/powdered uranium compound "sandwich". We had to insure proper grain growth across the aluminum/aluminum boundaries so the plates couldn't de-laminate in use and contaminate the reactor coolant.)

After some experimentation, what worked best was a vacuum system. The samples were small, embedded in small plastic cylindrical forms maybe 2" in diameter. I filled the forms with epoxy and put them in a (strong) hemispherical plastic chamber sealed against a flat surface. I evacuated the air for a moderate vacuum and left the vacuum on until the epoxy set. It didn't need high vacuum pressure. This did an excellent job of both removing embedded air as bubbles and forcing the epoxy deep beetween and into the (somewhat porous) powdered uranium samples. (Any remaining bubbles or voids in my situation could hold particles of the grinding and coarser polishing compounds and make getting the mirror finish needed for the examination difficult or impossible.)

I have no idea if this would work for the your wood project. It seems to me that either vacuum or positive air pressure would work with liquid epoxy, but it might be both less practical and possibly even dangerous to immerse the entire blank in epoxy (I say "dangerous" since if the volume of the epoxy is too great, since epoxy curing is an exothermic process, in certain conditions there is the possibility of "thermal runaway" which can make the the mass smokin' hot. Don't know if it could start a fire but this sure smoked and cracked a couple of my samples.) Some things to help prevent a thermal problem: minimize the volume of the epoxy, decrease the ambient room temperature, use a long-setting epoxy to spread out the reaction (I think quick-cure epoxy generates heat faster), mix in smaller containers - mixing a large quantity can start the reaction sooner. If it were me, I'd call West Systems for advice - they've were very helpful to me in the past.

Oh, for non-porous things I think vacuum worked better since it pulled the air out of the samples - you could watch the bubbles come to the surface. I'm imagining that positive air pressure migh compress the air instead of pulling it out - maybe this wouldn't be a problem with wood since most is at least somwhat porous.

I'm guessing if forcing epoxy putty into the cracks it would be difficult to it get deep into the interior and may have to be reapplied as turning the wood revealed deeper parts of the voids.

Another thing about safety - where I worked others were doing things with both high vacuum and high positive pressure. Both required strong vessels to contain the forces. Neither a vacuum implosion nor a pressure explosion is a pretty sight. (We did our pressure testing in a pit in the concrete floor, covered with a strong steel plate!) Low pressure is far safer.

But if I had to do what you want, I would first ask some friends who have a lot of experience filling voids in turning blanks with resin. There are some in our club. Most of what I've seen has been with small blanks, maybe because the resin is expensive and the apparatus for a large blank might be horribly expensive!

JKJ
 
Or, should I turn to rough shape and then "putty" some 5 minute epoxy and/or CA sawdust into whatever shows up then, and turn/sand to final?

What type of epoxy should I use?

How is epoxy typically finished?

Typically, what I do is press epoxy mixed with sanding dust into the cracks using finger pressure. The fills are then sealed with cloth hockey tape overnight.....thus preventing oozing out of the cracks. Note the hockey tape doesn't stick to the epoxy, and peels away after the epoxy is dry. I use standard epoxy that cures in 24hrs to give me plenty of working time to do the fills. The epoxy/sanding dust fills are finished just the same as always....no special attention to them in the usual sanding/finishing/buffing steps.

=o=
 
I have done epoxy several ways and I choose the method based on the piece of wood. If the cracks are small and shallow I just use pressure. If they may be deep with some "punky" areas I will use vacuum to try and get the epoxy deeper in the wood, and then put it in a pressure pot to cure. I like using Liquid Diamonds Epoxy for these methods as it is thin like water so it will get in the small cracks.
 
The two replies about thin epoxy and then thicker type with hockey tape will both work great. Also the jb weld. I'm wondering with the jb weld if they used the wood type jb weld? Or which specific type?
If I were you I would go to Walmart and just get the alumilite regular casting epoxy resin. It's a little thick so after mixing I throw it in the microwave for no longer than 5 seconds. It thins it up really nicely and you can quickly pour it into whatever void you're filling. But I think you're immersing the whole piece in epoxy but I still think you won't go thicker than 3/8 of an inch which is the max depth according the alumilite, although I've gone deeper and not had any issues. But if you're immersing I've found that pressure works best. It really pushes it into all the little cracks and all of the bubbles you normally will have after cure will be too small for the human eye to see.
I would encourage you to watch some videos on YouTube. Some of the highest quality turners remove the air bubbles with pressure in the first hr and then let cure in the pressure pot. But they also use deep pour which takes days to cure as opposed to the casting resins which start heating up 30 min after mixing.
 
Back
Top