• December 2025 Turning Challenge: Single Tree! (click here for details)
  • Congratulations to Bob Henrickson, People's Choice in the November 2025 Turning Challenge (click here for details)
  • Congratulations to Guillaume Fontaine for "Old Tea Pot" being selected as Turning of the Week for December 15, 2025 (click here for details)
  • Welcome new registering member. Your username must be your real First and Last name (for example: John Doe). "Screen names" and "handles" are not allowed and your registration will be deleted if you don't use your real name. Also, do not use all caps nor all lower case.

Epoxy inlay

Joined
Jan 14, 2021
Messages
3
Likes
1
Location
Paradise Valley, AZ
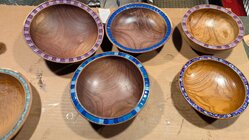
I am experimenting with epoxy with different materials, other than stone, to serve as filler and add color or texture. I would like natural material that can be turned with traditional tools. The rings in this bowl are filled with coffee grounds. 2021-07-06 13.23.19.jpg
What are other suitible materials? Thanks.
Keith
 
Pewter is a material that can be poured into a groove when heated to a liquid. It can be turned easily with turning tools
Pewter doesn’t bond to wood so the grooves need to be dovetailed to keep the ring it.

Natural? It’s about as natural as epoxy.

Pewter melts around 450f will not scorch wood but plenty hot enough to give a nasty burn.


Nice looking rim!
 
I use 15 minute epoxy and mix powdered metal into it to make a paste. Once the groove is filled, I wait 45 min - 1 hour and then remove the excess with a neg rake scraper. The epoxy is firm enough for the scraper to easily remove it, and does not get pulled out.
 
I pick up oyster shells off the beach and crush them. They then go through screens to sort into vials of large, medium and very small grain. Makes for inlays that resemble crushed stone. My tools cut the stuff just fine.
 
I pick up oyster shells off the beach and crush them. They then go through screens to sort into vials of large, medium and very small grain. Makes for inlays that resemble crushed stone. My tools cut the stuff just fine.
I've been waiting for the local river to go down around here to pick up some clam shells. It's called Spoon River and one of the fall festivals coming up in October is the Spoon River Scenic Drive so I thought some locally sourced inlay might sell well. (probably not)
 
I played around with some egg shells. I saved them when cooking and rinsed them out and let them dry. Then I crushed them to smaller pieces and put them in some cups with some different TransTint dyes. I read that adding a little white vinegar makes more brilliant colors, so it was about a 1/4 cup of water, a teaspoon of vinegar, and about 10 drops of dye.

Egg shells are plenty soft, so no effect on tools. It also makes some cool looking white accents when you cut thru them. (bottom right in photo)
 

Attachments

  • PXL_20251128_125503431.MP.jpg
    PXL_20251128_125503431.MP.jpg
    432.9 KB · Views: 35
I played around with some egg shells. I saved them when cooking and rinsed them out and let them dry. Then I crushed them to smaller pieces and put them in some cups with some different TransTint dyes. I read that adding a little white vinegar makes more brilliant colors, so it was about a 1/4 cup of water, a teaspoon of vinegar, and about 10 drops of dye.

Egg shells are plenty soft, so no effect on tools. It also makes some cool looking white accents when you cut thru them. (bottom right in photo)
Clever thinking, and that rim is nice looking too.
 
I did flame colored copper. Copper takes on a different color when passing thru increasing temperatures. Note iyou run torch back over a piece it is like an eraser=no color. I did cut a dovetail and cut the copper to fit groove . The epoxy is then pored over the copper . Oh you will want to apply finish to object before doing the copper.
IMG_6592.JPG
 
Back
Top