john lucas
AAW Forum Expert
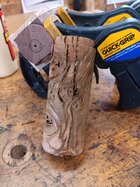
a friend gave me this piece of wood along with a lot of other great wood. I want to make an ornament out of it. I'm thinking of filling all tge voids with epoxy. I'm not an epoxy guy. I've filled a lot of cracks but usually on flat wood. I don't have a pressure pot. can I fill all these voids without one. I will be using West system 195 with their 205 clear hardener. it's pretty thin and very slow drying. all tips and suggestions welcome.