• We just finished moving the forums to a new hosting server. It looks like everything is functioning correctly but if you find a problem please report it in the Forum Technical Support Forum (click here) or email us at forum_moderator AT aawforum.org. Thanks!
  • Beware of Counterfeit Woodturning Tools (click here for details)
  • Johnathan Silwones is starting a new AAW chapter, Southern Alleghenies Woodturners, in Johnstown, PA. (click here for details)
  • Congratulations to Peter Jacobson for "Red Winged Burl Bowl" being selected as Turning of the Week for April 29, 2024 (click here for details)
  • Welcome new registering member. Your username must be your real First and Last name (for example: John Doe). "Screen names" and "handles" are not allowed and your registration will be deleted if you don't use your real name. Also, do not use all caps nor all lower case.

Evaluating my own work, in effort to give newbies some perspective...

odie

TOTW Team
Joined
Dec 22, 2006
Messages
7,117
Likes
9,858
Location
Panning for Montana gold, with Betsy, the mule!
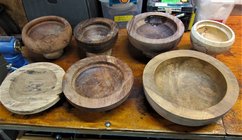
I feel it's not good manners to critique other's turnings, unless they specifically ask for it. I realized after offering some freebie roughed bowls in the "for sale" section, that this would give me a good opportunity to tell newbie turners what to look for in their own roughed bowls.....by self-evaluating my own roughed bowls.

Even in the roughing stage, it's to your best advantage to have as little tearout as possible.....because tearout disrupts wood fibers beneath the surface. In the second turn, if your initial roughed bowls have an excessive amount of tearout, it could, and often does effect how well of a cut is possible in any later stage of the turning. Any tearout needs to be removed completely, which includes any disrupted wood fibers below the surface. This doesn't mean you can sand your way to a good surface......because any disrupted fibers left after sanding will show up in what otherwise looked like an acceptable surface prior to sanding.....at that point, your eyes are deceiving you! Most often, these disrupted fibers will show up in the form of a seemingly blurred wood grain, and not a crisp cleanly revealed wood grain. This condition is not easily recognized by the new turner with an untrained eye, but is more apparent to those who understand what they are looking for.

OK......now here are some of my roughed bowls. They were roughed in the usual manner I normally do, so they weren't done for the purposes of display to make a point. You can inspect these roughed bowls by clicking twice for a closer look. Certainly, they aren't devoid of tearout, but there is a minimum of it here......most noticeably in the bottom left and right bowls. This is generally what you want to see in your roughing work. (Zero tearout would be better!) We've all seen roughed bowls in these forums with lots of tearout.....that is exactly what you don't want. :(

During the roughing stage, it is my practice to bring a bowl to round with scrapers, and then seek a more refined surface with gouges. (I understand others may rough differently than I do, and we'll probably hear from them in this thread. The point being made here, is to end up with a surface with as little tearout in the roughing stage as possible.) If there is a lot of tearout after the roughing stage is done, then you need to evaluate your technique, tool choice, and the level of sharpness you are working with.

-----odie-----
IMG_0578 (2).JPGIMG_0579_LI.jpg
 

odie

TOTW Team
Joined
Dec 22, 2006
Messages
7,117
Likes
9,858
Location
Panning for Montana gold, with Betsy, the mule!
I rough out with gouges and refine with scrapers....... to each his own!

Yep, Dave......I knew there would be others who rough out their bowls differently than I do. There are actually quite a few things that I do differently than others do. Sometimes, I feel I'm the only one who does what I do, the way I do it! :)

.....and, that's OK.......Because the only thing that really matters, is results.....am I right?

-----odie-----
 
Last edited:
Joined
Nov 15, 2020
Messages
450
Likes
309
Location
Huntington, VT
Odie, I have a few questions. Are the glue blocks used for initial turning with a screw chuck or added afterward? Do you use the same glue block for initial and second turning and if so ?do you have any issues with the glue bond loosening? Do you you screw the glue blocks to a face plate for final turning?
 
Last edited:
Joined
Aug 14, 2007
Messages
5,493
Likes
2,843
Location
Eugene, OR
One reason I don't sand my bowls beyond 400 is that some times going up to 2000 or so, you will find tear out that you don't see at 400 grit. The light does reflect or refract, don't know which, off of tear out.

I do all of my roughing with scrapers, finish cuts with gouges, and shear scrape for final cuts.

robo hippy
 

Dave Landers

Beta Tester
Joined
Dec 1, 2014
Messages
811
Likes
2,510
Location
Estes Park, CO
Website
dlwoodturning.com
One reason I don't sand my bowls beyond 400 is that some times going up to 2000 or so, you will find tear out that you don't see at 400 grit. The light does reflect or refract, don't know which, off of tear out.
Oh I do hate that - get all the way to my last grit and it brings out something I couldn't see till the rest of the wood got smooth enough to do whatever it does with the light...

I do all of my roughing with scrapers, finish cuts with gouges, and shear scrape for final cuts.
And I rough with a gouge and finish with a gouge
 
Joined
Dec 5, 2015
Messages
751
Likes
364
Location
Seattle, WA
Interesting topic Odie. So what causes tearout in otherwise solid wood? (The left most bowl appears to be spalted, tearout might be expected there.)

The same issues that cause chatter in metal turning may cause tearout in wood. Those would be lack of rigidity in either the workpiece or the tool and sometimes too much depth or width of cut. Conventional wisdom usually is metal working machines don't do well in wood because of lack of spindle rpm or rotating tool rpm. Actually, they do very well because of their inherent rigidity. That's one reason why most high end, mass produced stringed musical instruments are made on metal working machinery.

Ornamental turners usually don't have tearout problems. They use tools with a very small contact area with the wood and the neither the wood or tool is hand held.

IMO it comes down to the hand held tool being the main tearout cause. First, I suggest using triangular or diamond shaped, razor sharp carbide inserts with less than an 1/8" wide contact with the wood. A problem though with those type inserts is they cut so freely they're likely to dig in or self feed into the wood if not carefully controlled during exterior or interior contouring of a bowl. Ornamental turning prevent their razor sharp tools from digging by following a pattern. Hand turners can too. Make a pattern following jig like John Lucas did for his bowl fluting jig (pattern following jigs are age old in woodturning).

Once you get into pattern following you have to pre-design your turning. Some turners prefer to stick a chuck of wood in the lathe and let the wood and/or their skills determine the outcome. That would be turning with risk as opposed to turning with certainty. For me design is the most important thing in turning. I don't want to be frustrated by lack of technique or wrong grind to produce my designs.
 

odie

TOTW Team
Joined
Dec 22, 2006
Messages
7,117
Likes
9,858
Location
Panning for Montana gold, with Betsy, the mule!
Hi there, Doug..... :)

It appears you lack some perspective in your belief that machine controlled cuts are better suited to the act of woodturning. You discount the "human element", when it's exactly the human element that makes it possible to obtain a perfect cut. Admittedly so, a machine can be precise in getting a perfectly executed shape, but there is no sensitivity in a machine. Because of this, there is no sensual connection to the degree of perfection the cutting action is achieving. This sensual connection is exactly why a human can do what a machine can't do with the most difficult of woods.

Machines that do woodworking while excluding the human connection, generally choose woods that respond to machining, and direction of the cut for an advantage. The great majority of it isn't turning cross-grained bowls.....which btw, this thread addresses. Those machines that do bowl turning, are concentrated on production turning where laminations eliminate end grain, and/or rely on power sanding to clean up the inevitable endgrain tearout.

Now, just assuming your theory were correct, then why isn't the traditional art of bowl turning made obsolete by eliminating the human element, and replacing it with a machine controlling the cutting process? As far as I can see, that hasn't happened.

-----odie-----
 
Last edited:
Joined
Jan 8, 2021
Messages
322
Likes
421
Location
Wrentham, MA
Odie - thought provoking on many levels, thanks! As a new turner, I'm just now getting to the point where I'm doing the second turning on bowls I roughed a year ago. This has provided an really nice look at the changes in my technique and form, as fortunately a lot has changed in that year.

I've been too rigid towards staying true to the guideline of 10% wall thickness, which obviously (now) limits some of the ability to decorate and make features such as wider rims etc. At my clubs last meeting we discussed planning ahead - with one thing being allowing material for embellishments while roughing. While this made a lot of sense, the pictures shown where wall thickness varies and the potential for adding embellishments is clearly visible and clarified the concept for me.

my .02 on the machine vs. man is that in most cases, I prefer the less rigid result when man creates, vs. the almost unnatural perfection from a machine. Perhaps the best example is in flat work, and dovetails. Machine dovetails look too perfect with tails and pins equally spaced, and I much prefer the look of hand done, whether due to much smaller pins, or simply the varying size of tails across the boards.
 

odie

TOTW Team
Joined
Dec 22, 2006
Messages
7,117
Likes
9,858
Location
Panning for Montana gold, with Betsy, the mule!
I've been too rigid towards staying true to the guideline of 10% wall thickness, which obviously (now) limits some of the ability to decorate and make features such as wider rims etc.

The 10% rule is only a suggestion, and not a rigid rule. New turners need a starting place for how thick to turn a roughed bowl.....and, it's a pretty good rule to get them started in the right direction. I generally go a little thicker, but not because I want extra room for any future creativity. It's because I have a personal belief that the slower the seasoning process, the better the overall results will be. There will be less warping and cracking, but it won't eliminate the possibility of those things happening. This, at the expense of adding more time to stabilize the MC.

-----odie-----
 
Joined
Aug 14, 2007
Messages
5,493
Likes
2,843
Location
Eugene, OR
Doug, in side grain/bowl turning, for 1/4 of the turn you are going up hill against the grain, then 1/4 with/down hill, then the pattern repeats. Going against the grain is what causes most tear out. Dull tools contribute, and so does the particular wood. We try to reduce the tear out by many methods, but we still have to sand.

robo hippy
 

hockenbery

Forum MVP
Beta Tester
TOTW Team
Joined
Apr 27, 2004
Messages
8,642
Likes
4,985
Location
Lakeland, Florida
Website
www.hockenberywoodturning.com
So what causes tearout in otherwise solid wood? (
Adding to what @robo hippy said.
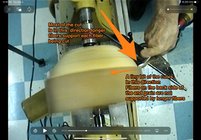
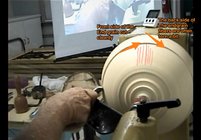
Almost all tearout occurs when fibers can be bent before being cut.
If you whack the narrow edge of a broom with a machete - the straws will be cut cleanly about 3/4 the way across because fibers behind them hold them in place. The last 1/4 of the fibers bend and a torn instead of being cut cleanly.

When cutting wood the fibers with longer fibers behind them can’t bend and get cut cleanly.
So cutting foot to rim on the outside of a bowl with the cutting direction toward the headstock the fibers are supported and cut cleanly.
Unfortunately for us a tiny bit of the cut is perpendicular to the lathe and the back side of the endgrain the fibers are not supported.
High shear angle cuts more toward the headstock thus cleaner cut with the pull cut.
D264979A-452E-4DFA-A4BD-E681815B8DE9.jpeg364E754A-1D0F-4A87-ADFE-5E3C1FC22E33.jpeg
 
Last edited:

odie

TOTW Team
Joined
Dec 22, 2006
Messages
7,117
Likes
9,858
Location
Panning for Montana gold, with Betsy, the mule!
Both Robo and Al are certainly correct......but, there's more!

The best rpm comes into play, too....and, this is as much a critical factor, as a sharp tool! The relationship of your spinning piece of wood in accordance with the ability of your lathe to absorb the forces it creates, results in the "harmonic" vibration. This harmonic vibration needs to be reduced to the least amount possible. If your tool is solidly on the tool rest (as it should be), and the wood is spinning at an rpm where it, or the lathe can't overcome the opposing forces, the result of this will be a condition where the cutting edge of the tool will not cut as cleanly as it could otherwise.....even if everything else is perfect. It simply can't, unless the cutting edge and the wood are both influenced in the least possible way.

Still yet.....there is more! There is what I consider "spiritual turning". This involves a coordination of three of the five senses......sight, feel, and hearing......and then instinctively knowing how to overcome any faults detected by that coordination. Turners who intend to get maximum results, must fine tune their senses in this effort. This may involve things like tipping the tool on it's fulcrum, rotating the tool on it's axis, reducing the aggressiveness of the cutting action, and in the case of direct opposing endgrain, alternating the direction of the cut, etc......and, all of this with an added sense of timing as the cut progresses!

-----odie-----
 
Last edited:

Emiliano Achaval

Administrator
Staff member
Beta Tester
TOTW Team
Joined
Dec 14, 2015
Messages
3,318
Likes
4,271
Location
Maui, Hawaii
Website
hawaiiankoaturner.com
It might be considered bad manners to give advice, but also if you dare try to help anyone that posted on social media, you will get attacked, yelled, called names and more. People post on social media to feel good, they want a “what a nice piece” Not any C&C. And then they wonder why the Danish Oil soaks differently on the end grain! I have been mulling the idea of a sub-forum where you can post solely to receive C&C. We have to try and sell the idea… On a facebook group, a person posted a YouTube video, he started by saying, I’m a beginner, and I do not have all the tools, but I hope that you like my video!! It was absolutely 100% wrong in everything he did. To the point of unsafe. Another one is a lot people do not really care about getting better. They are genuinely happy with what they are doing, so proud in fact that they post their work on Facebook and Instagram, LOL Point is, you are right, unwelcome help is not polite because they do not want it.
 

hockenbery

Forum MVP
Beta Tester
TOTW Team
Joined
Apr 27, 2004
Messages
8,642
Likes
4,985
Location
Lakeland, Florida
Website
www.hockenberywoodturning.com
Another one is a lot people do not really care about getting better. They are genuinely happy with what they are doing, so proud in fact
There are more than a few of those in every club. AAW used to wonder why they did not want to join AAW which is all about learning. Fortunately most everyone on this forum is interested in learning and getting better.
 
Joined
Feb 28, 2021
Messages
1,227
Likes
1,077
Location
Roulette, PA
Website
www.reallyruralwoodworks.com
I have been mulling the idea of a sub-forum where you can post solely to receive C&C. We have to try and sell the idea…
if that happens, I, for one, will most certainly be using it. I have posted a time or two before looking for C&C but they tend to get lost in the clutter...
 
Joined
Jan 8, 2021
Messages
322
Likes
421
Location
Wrentham, MA
if that happens, I, for one, will most certainly be using it. I have posted a time or two before looking for C&C but they tend to get lost in the clutter...

Same here. I'd find it quite helpful, even if sometimes some things are better done in person. I've found a few of these threads in various searches, and have always come away with some additional learnings.
 
Joined
Feb 26, 2019
Messages
1,825
Likes
1,423
Location
Lebanon, Missouri
I have been mulling the idea of a sub-forum where you can post solely to receive C&C.
I think it’s an excellent idea. Folks on this forum tend to be very courteous and respectful with feedback/opinion/recommendations.

An introductory “Rules” message can set the tone and outline proper behavior/remarks for both presenters and critiques. It should include recommendations to presenters for writing a project description for proper context. IMO it would be very educational.
 
Joined
Jan 13, 2022
Messages
177
Likes
123
Location
Middletown, PA
Website
www.timsworkshop.com
I realize this is a bit older of a thread, but I would love to see a C&C section. Sometimes, you are trying a new (to you) technique or skill, and need feedback on how you are progressing. Other times you might just want a second opinion on a particular design or shape. Sometimes, you just want to show off what you have done. The latter would not belong in a C&C forum, but the others certainly would.
 
Joined
Sep 2, 2022
Messages
301
Likes
231
Location
Victoria, BC
I realize this is a bit older of a thread, but I would love to see a C&C section. Sometimes, you are trying a new (to you) technique or skill, and need feedback on how you are progressing. Other times you might just want a second opinion on a particular design or shape. Sometimes, you just want to show off what you have done. The latter would not belong in a C&C forum, but the others certainly would.
As a beginner I'd love to see a C&C section.
 
Joined
Dec 29, 2022
Messages
835
Likes
814
Location
West Central, IL
I feel it's not good manners to critique other's turnings, unless they specifically ask for it. I realized after offering some freebie roughed bowls in the "for sale" section, that this would give me a good opportunity to tell newbie turners what to look for in their own roughed bowls.....by self-evaluating my own roughed bowls.

Even in the roughing stage, it's to your best advantage to have as little tearout as possible.....because tearout disrupts wood fibers beneath the surface. In the second turn, if your initial roughed bowls have an excessive amount of tearout, it could, and often does effect how well of a cut is possible in any later stage of the turning. Any tearout needs to be removed completely, which includes any disrupted wood fibers below the surface. This doesn't mean you can sand your way to a good surface......because any disrupted fibers left after sanding will show up in what otherwise looked like an acceptable surface prior to sanding.....at that point, your eyes are deceiving you! Most often, these disrupted fibers will show up in the form of a seemingly blurred wood grain, and not a crisp cleanly revealed wood grain. This condition is not easily recognized by the new turner with an untrained eye, but is more apparent to those who understand what they are looking for.

OK......now here are some of my roughed bowls. They were roughed in the usual manner I normally do, so they weren't done for the purposes of display to make a point. You can inspect these roughed bowls by clicking twice for a closer look. Certainly, they aren't devoid of tearout, but there is a minimum of it here......most noticeably in the bottom left and right bowls. This is generally what you want to see in your roughing work. (Zero tearout would be better!) We've all seen roughed bowls in these forums with lots of tearout.....that is exactly what you don't want. :(

During the roughing stage, it is my practice to bring a bowl to round with scrapers, and then seek a more refined surface with gouges. (I understand others may rough differently than I do, and we'll probably hear from them in this thread. The point being made here, is to end up with a surface with as little tearout in the roughing stage as possible.) If there is a lot of tearout after the roughing stage is done, then you need to evaluate your technique, tool choice, and the level of sharpness you are working with.

-----odie-----
View attachment 44404View attachment 44407
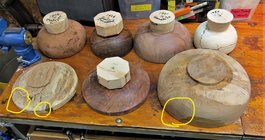
Newbie questions, Can you walk me through the process of your twice turned? When do you decide glue block instead of a tenon? I see in the second pic some are tenon and others are glue block. What's holding the glue block on? (I know, glue) Hot glue, super glue, wood glue, double sided tape?

I've been experimenting with just turning wet and letting it do it's own thing as it dries but I'm not happy with the way that's turning out so time to try something else.

Maybe you have a thread with this already and I just haven't found it?

Thanks in advance
Sam
 

odie

TOTW Team
Joined
Dec 22, 2006
Messages
7,117
Likes
9,858
Location
Panning for Montana gold, with Betsy, the mule!
I have been mulling the idea of a sub-forum where you can post solely to receive C&C. We have to try and sell the idea…

Hi Emiliano..... :)

This subject of a special sub-forum for critiques has come up several times.....and, I believe it's a very good idea.

How come it hasn't come to pass yet?

-----odie-----
 

odie

TOTW Team
Joined
Dec 22, 2006
Messages
7,117
Likes
9,858
Location
Panning for Montana gold, with Betsy, the mule!
Newbie questions, Can you walk me through the process of your twice turned? When do you decide glue block instead of a tenon? I see in the second pic some are tenon and others are glue block. What's holding the glue block on? (I know, glue) Hot glue, super glue, wood glue, double sided tape?

I've been experimenting with just turning wet and letting it do it's own thing as it dries but I'm not happy with the way that's turning out so time to try something else.

Maybe you have a thread with this already and I just haven't found it?

Thanks in advance
Sam

Howdy Sam.....

In recent times I've been seasoning all my bowls, no matter how much moisture content there is to start with. I've found that even kiln dried wood will often lose some weight during the roughing/seasoning process. Roughed bowls with >14% MC are usually anchorsealed. In the seasoning process, time is your best friend.....and, that's the reason for using anchorseal.....it slows down the moisture release, which is exactly what you want. The slower it is, the more able your wood can adjust to the internal stresses incurred by the roughing/seasoning process. (This doesn't mean that some blocks of wood can't be seasoned faster without having cracking or major warping, but it's a general rule that more time is better as a percentage.)

All of my bowls are finish turned using a waste block, and those you see in the first post just haven't gotten to the point where the waste block was installed yet. The roughing stage is always done with a chuck and tenon.

I have a total of 12 screw center faceplates, and my intent is to leave it installed until the entire bowl, except the foot is completed and the application of Danish oil have been done to the interior and exterior. The waste block is then removed, the foot turned, and the Danish oil is applied on the foot at that time.

-----odie-----
 
Joined
Dec 29, 2022
Messages
835
Likes
814
Location
West Central, IL
Thanks for your reply.

So, it's probably too late for the bowl I have on my lathe at the moment because I turned it thin like always because of my impatience.

On my next one I should rough turn it with a tenon like I usually do unless it's dry wood then I will do a mortise and leave it on the bowl when finished.

Your 12 screw center faceplates are the glue blocks correct? Does species of wood matter on them? Will pine suffice or should it be a hard wood? I've never done the glue blocks before. I see some where people just use hot glue around the edges. I'm guessing yours are a little stronger?

Regular wood glue will stick to the high moisture roughed blank?

Sam
 

odie

TOTW Team
Joined
Dec 22, 2006
Messages
7,117
Likes
9,858
Location
Panning for Montana gold, with Betsy, the mule!
Thanks for your reply.

So, it's probably too late for the bowl I have on my lathe at the moment because I turned it thin like always because of my impatience.

On my next one I should rough turn it with a tenon like I usually do unless it's dry wood then I will do a mortise and leave it on the bowl when finished.

Your 12 screw center faceplates are the glue blocks correct? Does species of wood matter on them? Will pine suffice or should it be a hard wood? I've never done the glue blocks before. I see some where people just use hot glue around the edges. I'm guessing yours are a little stronger?

Regular wood glue will stick to the high moisture roughed blank?

Sam

The general rule is to rough a bowl to about 1/10th the diameter.....IOW: A ten inch diameter bowl will have about 1" wall thickness.....Personally, I tend to increase that for many bowls to around 15%, even though this will increase the seasoning time.

Yes, after roughing, leave that tenon on there. After the seasoning process, most roughed bowl tenons will need to be flattened, so that the waste block will adhere properly between two flat surfaces. I use Titebond III for this, but Titebond I, and Titebond II will work equally as well. I'm using a 12" disc for flattening the tenons.

The waste blocks are made from clear 2x4 and 2x6 studs available from the local lumber yard. Pine.....Fir.....any of the common woods used for construction is ok for use in waste blocks. I never use hardwood for waste blocks, but I suppose that could be done, if that is what you have available.

No, I do not use waste blocks on unseasoned roughed bowls. They are exclusively held with chuck and tenon....until after the seasoning process is completed. At that point the MC is low and there is no problem for Titebond to adhere between seasoned roughed bowls and the waste block.

-----odie-----
 
Joined
Dec 29, 2022
Messages
835
Likes
814
Location
West Central, IL
Great, I have the order of things now. Plenty of 2x around here and I have a big disc sander now if I can find where they sell patience I'll be all set!

I know a lot of people turn after drying just wasn't finding info on the specifics. I thought a lot just put the tenon back in the chuck and went at it. The glue blocks make a whole lot more sense especially after truing the tenon up on a sander.

Thanks

Sam
 
Joined
Jul 26, 2016
Messages
2,326
Likes
1,105
Location
Nebraska
The glue blocks also maximize the depth of the bowl you can get from each blank. I have a box of glue block rounds that can quickly be glued onto and flat surface and mount onto a bowl chuck.
 
Joined
Aug 14, 2007
Messages
5,493
Likes
2,843
Location
Eugene, OR
Sam, Odie does tend to turn a lot of exotic woods, and with the prices they charge for that stuff, I would probably use waste blocks as well. I turn green to final thickness and let them warp. Down side is that you need very slow speeds on your lathe to be able to sand them. Anything over about 15 rpm and you can't keep abrasives on the wood as it spins. Poplar is a good waste block material. The CA glues will stick to wet woods, but I think if I was going to twice turn a piece, I would remove the waste block before drying the blank. The blank will move, but the waste block will not move as much, which might result is stress cracks.

robo hippy
 
Joined
Dec 29, 2022
Messages
835
Likes
814
Location
West Central, IL
Sam, Odie does tend to turn a lot of exotic woods, and with the prices they charge for that stuff, I would probably use waste blocks as well. I turn green to final thickness and let them warp. Down side is that you need very slow speeds on your lathe to be able to sand them. Anything over about 15 rpm and you can't keep abrasives on the wood as it spins. Poplar is a good waste block material. The CA glues will stick to wet woods, but I think if I was going to twice turn a piece, I would remove the waste block before drying the blank. The blank will move, but the waste block will not move as much, which might result is stress cracks.

robo hippy
I think 100 rpm's is as low as I can go. My practice piece I was working on last night I experienced the ups and downs of sanding on warping drying wood.
 
Joined
Aug 14, 2007
Messages
5,493
Likes
2,843
Location
Eugene, OR
One video I did was an articulated arm rest that I use for sanding. The arm rest holds your arm and the drill so all you have to do is squeeze the trigger. This means that you can spin the bowl with one hand and squeeze the trigger with the other. Perhaps another solution would be to hook up a rotisserie motor to the lathe for sanding warped bowls.

robo hippy
 
Joined
May 4, 2010
Messages
2,449
Likes
1,877
Location
Bozeman, MT
Sam,
Keep in mind that Odie has a very specific process that he uses and with which he gets spectacular results. You could do far worse than copying Odie, but:
In order to get the detail he wants, he uses purchased and often exotic woods, which may be different that what you have available.​
He uses glue blocks nearly all the time, while the rest of us use them rarely, generally only for a specific piece of wood.​
Glue blocks add steps to the process and move the wood away from the headstock, both undesirable results.​

I sense that you are inclined to make things more complicated than they need to be, which is an infliction shared by many of us on the board. As I've advised before, as a beginner, you will have an easier time if you start with simple processes. Once you're comfortable with simple, then you can make it as complicated as you like. And you will. ;)

Simple twice turned bowl:
  1. Mount blank on face plate (or between centers)
  2. Rough shape outside and make tenon, slightly bigger than best size for your chuck
  3. Reverse blank, mount in chuck
  4. Turn inside with wall thickness 10% of bowl diameter
  5. Dry for 5-12 months
  6. Remount and re-turn tenon
  7. Finish turn bowl to your satisfaction
A once turned bowl has fewer steps, but you have to move quickly to get it done before it dries and warps too much to turn. Most beginners can't turn quickly enough to be successful at this. Once turned bowls are more likely to crack and have to be turned thin (<5/16"), and beginners may not be comfortable turning thin enough. Sanding them is also a challenge.
 

hockenbery

Forum MVP
Beta Tester
TOTW Team
Joined
Apr 27, 2004
Messages
8,642
Likes
4,985
Location
Lakeland, Florida
Website
www.hockenberywoodturning.com
How are you doing #6? Jam chuck?
I use the same steps as @Dean Center.
When I mount a dried bowl I put it over a chuck with the jaws open a bit and friction drive it with tailstock support

You may be interested in the working with green wood thread. It is a demo I do for clubs.
slides about wood, demo of roughing a bowl for drying, and demo of returning a dried bowl.

You can see how I do it. My methods are similar to many other turners.
If you connect with a local club they will have demos, maybe mentors, maybe classes where you can see up close or be taught methods that work as well as safe methods.
 
Last edited:
Joined
May 4, 2010
Messages
2,449
Likes
1,877
Location
Bozeman, MT
There are numerous ways to remount the dried rough blank. I use a vacuum chuck, which I really like. You can use a jam chuck, or use your scroll chuck as a jam chuck, or do Glenn Lucas' very clever 2 parallel boards jam chuck. Rim chucks and cole jaw/Longworth type chucks aren't feasible since the rim has warped. It's a low stress step, since all you're doing is turning down the tenon to make it round again, and the tenon is small diameter with the pressure from the gouge directed toward the headstock.
 
Joined
Feb 16, 2021
Messages
1,029
Likes
1,405
Location
Parkersburg, West Virginia
Great write up Odie. I am with you on this. I always Sharpen my gouge and go for a finish pass to get minimal tear out before I put the sealer on.
 

odie

TOTW Team
Joined
Dec 22, 2006
Messages
7,117
Likes
9,858
Location
Panning for Montana gold, with Betsy, the mule!
Thanks for the info! I'll keep this in mind going forward.

You bet there Charlie.....:)

I was just observing some of the turnings in the "member's gallery", and it seems very apparent that traditional turning isn't much in vogue. This "traditional turning" is what my focus has always been, and it involves very little, or zero embellishments. Not that there isn't some mighty fine embellishments done off the lathe.....but, it's a stark realization that traditional turning, it seems, is very seldom the main focus of the current lathe turners.

Oh well......just an observation.

-----odie-----
 
Back
Top