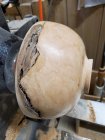
I'm a relative beginner at turning and don't know much about finishes for turned pieces other than friction polish applied on the lathe or clear finish like polyurethane applied after the piece is done and off the lathe. Someone gave me a beautiful piece of burl (don't know what variety) that I have half finished. The burl pattern is beautiful, but there are also a number of "imperfections" of discontinuities in the piece (ie. spots where there is not solid wood--not sure what they are called--so much so that I'm not sure how it is going to turn out). I am looking for advice for what finish to use. I hope this is enough information. I have attached a photo. Any suggestions? Thanks.

-
Congratulations to David Bartell, People's Choice in the March 2026 Turning Challenge (click here for details) -
Congratulations to Chris Lawrence for "Dragon's Grip" being selected as Turning of the Week for March 30, 2026 (click here for details) -
Welcome new registering member. Your username must be your real First and Last name (for example: John Doe). "Screen names" and "handles" are not allowed and your registration will be deleted if you don't use your real name. Also, do not use all caps nor all lower case.
You are using an out of date browser. It may not display this or other websites correctly.
You should upgrade or use an alternative browser.
You should upgrade or use an alternative browser.
Finish for a Burl Bowl
- Thread starter Steve Streck
- Start date
I would saturate the bark edge with epoxy. After it polymerizes, it will basically be plastic, but the bark and "punky" wood will be stabilized. If you want to get fancy, add a colored dye or a powdered crushed stone, etc.
When you reverse that thing, it will be ripe for explosion. Once the end gets thin, chunks will be be flying. Be very careful and protect yourself!
- Joined
- Apr 27, 2004
- Messages
- 9,334
- Likes
- 6,159
- Location
- Lakeland, Florida
- Website
- www.hockenberywoodturning.com
Ditto what @Richard Coers said.
That bark inclusion means that air is holding the rim on
As soon as you hollow the wall to thickness that reaches the bark inclusion you will have some very pointy objects flying off. If one hits you It will stab you maybe seriously.
That bark inclusion means that air is holding the rim on
As soon as you hollow the wall to thickness that reaches the bark inclusion you will have some very pointy objects flying off. If one hits you It will stab you maybe seriously.
Aesthetics are 100% personal, but in our neck of the woods, bark left on is considered to look best if you DON'T apply finish to it. It's a challenge to apply finish to the sound wood and not the bark, but it's worth it. The epoxy option mentioned above would have the advantage of helping keep the bark on. Otherwise, poly would be a good finish choice on that piece, IMO.
And +2 on "bark is likely to go flying."
And +2 on "bark is likely to go flying."
With that large inclusion I would fill it with epoxy before hollowing. I would finish it with poly thinned 1:1 with a bit of dye to enhance the grain.
Thanks. I've had enough things go flying off the lathe to know the likelihood of this piece doing the same thing. But I have one more question. The only epoxy I am aware of is the two part epoxy that comes in tubes separating the parts. Is that the epoxy you mean? It seems like that will only remain on the surface and not be absorbed like thin CA glue.
Dilute the epoxy with a small amount of acetone after mixing the catylist. It can be applied with a brush and will permeate the wood.
Tom Gall
TOTW Team
Since your post was about finishing.....for me, nothing brings out the figure of a burl like an oil finish. My current favorite for burls, walnut and cherry is "Velvit Oil" (sometimes difficult to source). Wipe or brush on and wipe off. Works like "Waterlox" (Original Sealer) but doesn't gel up like Waterlox. I have some cans that were opened more than ten years ago and are still usable....albeit a little darker and a little thicker.
If you're going to fill with epoxy, you're probably going to need a fair amount, so epoxy that comes in 2 plastic bottles would make more sense. (like 2-4 ounces of each part per bottle)
Based on experience as a rod builder, epoxy is not really designed to be diluted, but it's easily thinned by heating, and heating won't adversely affect future use. The trick is either mugs of hot water, or heat the bottles in the microwave for 10-20 SECONDS. I forget which part, but one heats up much faster than the other, so 10-12 seconds for one and 18-20 seconds for the other. The warmer they get, the thinner, but I shoot for warm and not hot. When warm, mix the two parts equally in a solo cup or a homemade aluminum foil 'cup' and it'll be about as thin as real maple syrup. Or medium CA. The kids in our high school turning club really like to make goblets for some reason and we have coated a number of them with epoxy thinned in this manner. It flows and works well.
Based on experience as a rod builder, epoxy is not really designed to be diluted, but it's easily thinned by heating, and heating won't adversely affect future use. The trick is either mugs of hot water, or heat the bottles in the microwave for 10-20 SECONDS. I forget which part, but one heats up much faster than the other, so 10-12 seconds for one and 18-20 seconds for the other. The warmer they get, the thinner, but I shoot for warm and not hot. When warm, mix the two parts equally in a solo cup or a homemade aluminum foil 'cup' and it'll be about as thin as real maple syrup. Or medium CA. The kids in our high school turning club really like to make goblets for some reason and we have coated a number of them with epoxy thinned in this manner. It flows and works well.
Last edited:
For filling void/insect tunnels and reinforcing bark inclusions, I use the tabletop/bartop epoxy you can find in most big box stores. Usually a 1:1 ratio, with much slower set times and lower viscosity. On the backside of voids, I use foil tape. The epoxy will heat up during curing and will cause most masking or painting tapes to let go and spill the epoxy. On the top of the pour, I use hot glue to make a dam. I usually tint the epoxy with some TransTint dye.