• It's time to cast your vote in the October 2025 Turning Challenge. (click here for details)
  • Congratulations to Curt Fuller for "Bell Ornaments" being selected as Turning of the Week for October 27, 2025 (click here for details)
  • Welcome new registering member. Your username must be your real First and Last name (for example: John Doe). "Screen names" and "handles" are not allowed and your registration will be deleted if you don't use your real name. Also, do not use all caps nor all lower case.

Finishing question

Joined
Mar 28, 2025
Messages
18
Likes
180
Location
Uvalda, GA
I have had this same problem with water-based spray polyurethane, and now with oil-based polyurethane in a quart sized can. I get a nice glossy finish, but with a spot that just seems to suck in whatever I put on it and still end up dull. This bowl is an example of that. The whole outside looks good, and much of the inside, except for that "dry" spot. It's a piece of pecan, spalted, but not punky.
I've read that this is caused by not mixing the polyurethane enough, but for the same area to show up dry after several coats, I'm thinking there's another issue. I had assumed that the first coat would seal the wood and stop it from absorbing more of the finish, so that the second coat would be uniform. Nope. Not the third, or the fourth either.
Obviously, finishing chemistry and technique is not my strong suit. I was simply applying Minwax pastewax to my pieces, but I wanted a little more shine. I've used polyurethane for other projects in the past, and I've never seen this before.
Help?
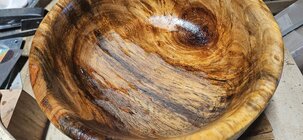
20251030_165317.jpg
 
Is it that knot? If so, knots often have different grain orientation, and they may expose a lot of endgrain, which will soak up a lot more finish, often for quite some time. If you don't like the notion of wet sanding, you could try to seal that off with a sanding sealer first, something compatible with your finish, then finish. You likely will still see some finish still soaking in, but it should stop a lot faster as well.
 
Try wet sanding the first coat at 320 grit. this can help seal even large pores.
Wet sanding seals pores? That's a new one for me.

I often wet sand with the finish before applying the final finish coat(s), especially with wood that's somewhat porous. I often finish with "danish" oil. (I rarely turn red oak but even cherry, walnut, and ERC can soak up a LOT of oil in some spots on the early coats.) Wet sanding can remove tiny wood particles, mix them with the oil, and force them into the pores where they can dry and fill the pores. Might take more than one application so repeat as needed.

Since I often use oil as a finish I'll sand, apply a coat of oil (as much as it will take). If it soaks in in places I continue to apply oil until I can see no more dull spons. Wipe the surface oil off after 30 minutes, and let it dry over night. If some spots have soaked up too much oil, repeat with more oil and wet sand, with 600 grit. I back the sandpaper up with a soft rubber eraser and sand by hand. For oil I usually apply at least 6 coats over as many days. (Not a finish for those in a hurry!)

I don't wet sand as part of my "normal" finishing routine, only if I see it's needed.

Some pieces benefit from a coat or two of sanding sealer before any finish coat, oil, poly, etc. Apply, let dry, and sand. Repeat if necessary. Can even wet sand problem areas with the sealer. I typically use shellac-based sanding sealer since it's more-or-less a universal undercoat. I'll do this under spray lacquer, oil, poly, etc. Sometimes I use 0000 steel wool instead of 600 grit sandpaper.

Long ago John Lucas taught me another wet sanding trick that can even fill small voids or invisibly repair a small spot chip-out - sand with medium CA glue with a coarse paper like 220 or 320. (Put the CA on the sandpaper, NOT the wood!- applying it to the wood can cause an ugly CA stain.) Sanding the spot with the CA-dampened coarse sandpaper then picks up wood of the same color from around the defect, coats it with CA, and forces it into the defect. I've used this several times with success.

Another thing gunstock makers sometimes use is pad the surface with pumice, especially on walnut. This will fill the walnut pores and smooth the surface at the same time. Repeat with rottenstone before applying finish. This method can leave an incredible feel to the stock. I bought pumice and rotten stone once when helping a friend finish a gunstock he made from scratch.

JKJ
 
out a few coast on with it mixed 50/50 with whatever is a thinner for it. Then try a full strength coat.
The dry spot is from that portion of the wood taking in extra finish. I would normally put several coats on
 
I'd never heard of rotten stone before... had to look that up. Makes sense to fill the porous woods, though. Thanks.
Pumice comes in several fine grits but Rottenstone is finer than pumice. .
Both are used by "padding": wrap a cloth around a wad of cotton ball, tie with string, use something to lubricate, sprinkle on the abrasive powder (or press into a little on a flat surface, rub the wood, repeat. For more, ask Sir Google for "how to use pumice on wood by padding", a old method used by traditional fine furniture makers, musical instrument makers.

JKJ
 
Last edited:
Agree that it's a penetration issue and needing to seal the grain. For pieces I know will have finish issues (usually transition in grain), I've had success with Yorkshire Grit as the 'last sand' and then a sanding sealer. I can then move on to finish of choice. Not 100% for the issues but a good success rate.
 
Why cut the finish? You are just making more work for yourself.

The reason I sometimes cut the finish is to allow the first coat or two to soak deeper into "somewhat" porous wood such as cedar, let it dry/harden to seal a bit below the surface, then either repeat or apply the uncut finish finish. Wet sanding with some types of diluted finish can also help seal the wood. But again, shellac-based sanding sealer, thined or not as needed, is my preferred undercoat.
 
The reason I sometimes cut the finish is to allow the first coat or two to soak deeper into "somewhat" porous wood such as cedar, let it dry/harden to seal a bit below the surface, then either repeat or apply the uncut finish finish. Wet sanding with some types of diluted finish can also help seal the wood. But again, shellac-based sanding sealer, thined or not as needed, is my preferred undercoat.
Just how much deeper do you really think the thinned finish goes? I believe that is an old folk tale. It just seems to go deeper because of the solvent, but in reality it just flashes off faster and gives the illusion that it is soaking in deeper. It would take some experimentation to confirm one way or the other. WATCO Oil lived by that old theory, saying it hardened the wood because it soaked in. In my opinion they stretched the science a little too far in making that claim.
 
Just how much deeper do you really think the thinned finish goes? I believe that is an old folk tale.
I've never cut a piece in half to try to determine how deep any finish goes. When you do, let us know what you discover. Tip: an analytical aid might be a trace of fluorescent dye mixed with the finish so the crosssection could be analyzed under UV light (perhaps more accurate than visual examination and easier than chemical tests for most people). This aid, of course, might not be effective with naturally fluorsecent wood such as locust or redheart.

I am interested only in surface results. I'm one of those old folk and that's my old folk tale.

From my own experiments with applying "danish" oil (basically BLO+poly+solvant, Watco or home-brew) to many pieces from many species over the years, that one thinned coat can help in some uncooperative cases, depending on the species and, of course, that particular piece, or section of the piece of wood - since wood properties, by nature, can be highly variable. (Some areas can soak up a LOT of oil, thinned or not.) I don't buy the "hardening" claim as much as my "sealing" claim based on actual experience, not a thought experiment.

Note that repeated applications of uncut "danish" oil during the initial application will also saturate the wood (the advice is to continue applying oil until the wood will accept no more) but it can take an extended time (several hours) of applying, waiting, and reapplying until reaching stable surface saturation. In the times I've done that I allow more drying/curing time before the second coat. Note that for saturation for a consistent surface on the first coat some people actually immerse the wood in "danish" oil for a time (sometimes in a plastic bag to minimize the volume used). But I don't.

I typically apply 6-10 coats over that many or more days, letting each dry/cure for at least a day before the next coat, sometimes wet "sanding" with fine grit and/or 0000 steel wool before the next coat if I feel like it. Note that after the wood is visibly saturated, every trace of surface oil must be removed with paper towels before starting the drying/curing "clock" for that cycle. (Safety reminder: be aware of the safe handling requirements of flamable materials saturated with any polymerizing finish.) The "danish" oil finish is not for the impatient or those under a time crunch. And in my case, all this is in a climate controled shop - colder or hotter, high or low humidity could be another variable. And once again, MUCH depends on the wood, both the species and the specific piece of wood. This is the way I've worked for years and so far the results have satisfied me and others.

Your mileage of course, may vary.

JKJ
 
Back
Top