-
December 2025 Turning Challenge: Single Tree! (click here for details) -
Congratulations to Bob Henrickson, People's Choice in the November 2025 Turning Challenge (click here for details) -
Congratulations to Guillaume Fontaine for "Old Tea Pot" being selected as Turning of the Week for December 15, 2025 (click here for details) -
Welcome new registering member. Your username must be your real First and Last name (for example: John Doe). "Screen names" and "handles" are not allowed and your registration will be deleted if you don't use your real name. Also, do not use all caps nor all lower case.
You are using an out of date browser. It may not display this or other websites correctly.
You should upgrade or use an alternative browser.
You should upgrade or use an alternative browser.
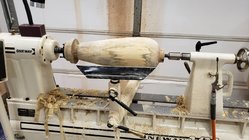
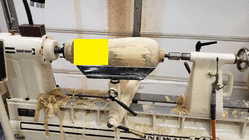
First Larger Hollow Form
- Thread starter Steve Chaplin
- Start date
Once turn it. Do you have a spindle steady with your hollowing system? That is a necessity.
Yes, I have a large steady.
I take it wall thickness should be no more than 3/8"?
I take it wall thickness should be no more than 3/8"?
maybe practice with an open form to get the feel of the new system first . . .
Seems to be a dichotomous question for hollow forms. Some say once turned reduces cracking and some say twice turned does.
- Joined
- Apr 27, 2004
- Messages
- 9,306
- Likes
- 6,061
- Location
- Lakeland, Florida
- Website
- www.hockenberywoodturning.com
Even wall thickness and flowing curves reduces ( virtually eliminates) cracking.Seems to be a dichotomous question for hollow forms. Some say once turned reduces cracking and some say twice turned does.
those who achieve even wall thickness of 3/16” thickness including the base Will rarely have a crack develop.
those who turn an even wall 3/4”+ thick including the base and dry it rarely have a crack. The advangage here is that the final form doesn’t need even walls. You can have a weighty base for stability. Some return only the outside.
I turn once. One of the great attractions for me with HFs is: turn, 3 days to dry, sand, begin finishing. Done in a 4-10 days.
Last edited:
Once turned vs twice turned - part of the decision making process includes what you want the end product to be. If having a piece that is distorted after drying, as part of the design element, then a once turned HF may be the way to go. However, the amount of distortion will vary depending on whether you turn the piece in an end grain orientation, vs a face grain orientation. End grain forms do not distort very much. If your plan is to do some type of surface embellishment on the piece and you want symmetry, then twice turning is the way to go.
Face grain, on the other hand, will distort significantly (like a bowl). Thus, you would need to leave a fairly thick wall if you plan on twice turning it. Face grain is more prone to cracking as there are two piths in the piece.
With respect to the steady rest, I would recommend having a raised area of wood where the wheels are going to support the piece. Without the raised area, there will most likely be a line where the wheels were riding (from compressing the wood fibers). Once the piece is hollowed, and you can provide tailstock support, you can then go back to remove the raised area and blend that area into the contour of the wall.
Wall thickness - the majority of my HFs are end grain, turned twice. I leave a wall thickness of 1/2" after the first turning. For the second turning, I smooth out the inside to get a final wall thickness of 3/16" to 1/4", depending on how tall the vessel is (1/4" for taller vessels).
I would recommend trying each methodology (once vs twice turned) with each grain orientation, with wood that you won't mind sacrificing. In the end, there's no need to restrict yourself to only turning in one type of grain orientation, or only doing once turned or twice turned HFs.
Steve, I've done quite a few large (20"-30") hollow forms over the past year and for pieces that size I boil and twice turn them. It depends on the outcome you're looking for. Single turn there will likely be some warping and twisting, the neck opening will get out of shape, dents and bulges at knots, etc. Can be unpredictable but may be OK for the look you're after. I single turn most smaller hollow forms (9"-15") and if enough material available I'll true up the neck opening a bit. For larger floor vase style hollow forms I want it true and round since I'll be putting a clear coat finish on it and need a flat smooth surface.
Good information, digesting all of this. I am mainly doing end grain pieces.
I am leaning towards more twice turned, at least for the pieces getting film finishes.
Randy, I am planning on following in your footsteps and doing some very large pieces.
I am leaning towards more twice turned, at least for the pieces getting film finishes.
Randy, I am planning on following in your footsteps and doing some very large pieces.
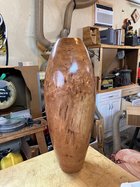
Steve, I moved into hollow forms and then large ones a little over a year ago. It's been a lot of fun, challenging and now it's my primary focus. Still do smaller forms, natural edge bowls, etc for local markets and online sales but not near the volume as I once turned. The primary challenge with large hollow forms, 20" to 30" I would say, is that there aren't very many people that even do pieces that size (one of the reasons I like doing them) and the methods and tools can be a challenge to work through. Very different set of requirements, tools and steps in turning a 30" hollow form than a 15" hollow form. First, the log can weigh 150-200 lbs so moving it around, getting it mounted, can your lathe spin it, shaping it, the list goes on. Happy to share my learnings and experience with you as you move along. Most all of what I know and the steps I follow I got from John Tisdale. Without his help I would have likely given up early on. Here's a 26" black cherry I just finished over the weekend. I have another 35" raw log standing here by me in the shop ready to start the journey. Just need to get my mojo going for the heavy up front work.
Attachments
I appreciate your assistance Randy. I have a hollowing system capable of going over 30", right now doing a 17" and will work up.
Very nice work on the vase, like the figure in the wood. What finish did you use?
I'm not sure how I am going to get large logs on the lathe, was thinking hydraulic table.
Very nice work on the vase, like the figure in the wood. What finish did you use?
I'm not sure how I am going to get large logs on the lathe, was thinking hydraulic table.
@Randy Anderson what hollowing system are you using for the 30” ones? What shape/size is the bar?
Doug, for the deepest hollowing I use the 1 1/4" Clark Hollowing bar setup. He builds to order so I had him put the guide bearing groove the entire length of the bar so I can use most all of it. I like the ability to put put any 3/4" cutter holder in the end so can fab or use just about any I want. I've pretty much settled on cupped carbide cutters for almost all my hollowing. I actually take multiple steps. I start with a typical size articulated hollowing rig to do the opening and down the first 6-7 inches or so. That needs to be really clean and done well. I then switch to the Clark big tool and finish it off. Even with the large bar and the additional support fulcrum setup the last 5 inches or so can be a challenge depending on the wood. Once done I use a Roly Munro bar with a shielded cupped cutter to go all along the inside to clean up rides or spots I missed. I don't twice turn the inside so want to get it reasonably clean on the initial pass. I also use his large steady rest. The next really big one I do I plan to hollow from both ends and see how that works out.
Steve, the finish is automotive clear coat. It's quite a process with basecoats, sealer coats, then clear coat but produces a deep looking gloss finish that's hard to appreciate until you walk up on it. I bought a hoist at harbor freight and mounted it on a beam above my lathe. Makes it possible to lift them into place and then bump the control on the hoist up or down a bit while I center it on the lathe. I thought about a lift table but even then, once you roll it onto the bed of the lathe you have to lift one end and the other to mount it on center. Maybe there's a table with an extension that can extend out over your bed? It's still a lot of work of course to gather them in the field, load them up, move them around my barn, up to the shop, etc. I end up just rolling them around to where I want them most of the time.
Steve, the finish is automotive clear coat. It's quite a process with basecoats, sealer coats, then clear coat but produces a deep looking gloss finish that's hard to appreciate until you walk up on it. I bought a hoist at harbor freight and mounted it on a beam above my lathe. Makes it possible to lift them into place and then bump the control on the hoist up or down a bit while I center it on the lathe. I thought about a lift table but even then, once you roll it onto the bed of the lathe you have to lift one end and the other to mount it on center. Maybe there's a table with an extension that can extend out over your bed? It's still a lot of work of course to gather them in the field, load them up, move them around my barn, up to the shop, etc. I end up just rolling them around to where I want them most of the time.
Last edited:
Randy, I also have the Clark system, just got it last week. I have the standard 1 1/4" bar plus the 1 3/4" ultra bar. Will let you know how the ultra bar works when I get to something larger.
I have never sprayed automotive clear coat, have been using pre-cat lacquer and some other water based products. I'm interested in the products and process you are using. Any info or links would be appreciated. The finish looks great.
I guess I could put up a beam, my joists are not designed for that type of load. I only have an 8 foot ceiling in my shop : (
As far as hydraulic tables go my thought was get it level with the bed and roll the log over. Then use the Hockenbery inner tube trick to raise it. My guess is that process is way to sketchy. I may have to do a beam.
In medicine we move patients using Hoyer lifts. Could something like that be adapted?I may have to do a beam.
Proactive Protekt® Onyx Hydraulic Patient Lift
Looking for a simple, convenient way to transfer patients of up to 450lbs? Durable and easy to assemble, this hydraulic lift won't break the bank or your back.
Steve, my next door neighbor and good friend owns a steel fabrication business so he brought home a small I beam that I bolded to my ceiling joists perpendicular to my lathe. Can slide it over the bed and then adjust between centers. I'm no engineer and no idea what kind of joist structure you have but, 150lbs spread out over a few ceiling joists is not much load. A 50 gallon water heater sits in the attic on just a couple of them in most houses and it weighs much much more than that. I walk on them all the time and I'm over 150lbs. I think you can get tracks for them and then screw it into all the joists it crosses. Will be interested to see how well the bigger bar works. It took a bit of practice but I can work the 1 1/4" bar along the inside and follow the laser dot to get a fairly clean inside surface. I don't stand out at the end. I stand beside it and work the far end with my right hand and the bar near the opening with my left.
The clear coat I'm using is from Southern Polyurethanes. Very nice and easy to work with folks. Great for advice on using, gun settings, etc. The base coat and sealer are not typical consumer products. From a company called ICA. I'll drop you a message with more details on those. Again, all of the what and how are what I've learned from John. No experience outside of his coaching.
Another thing to think on is the "where" are you going to spray. It's not lung friendly work. I bought a blow up spray booth on Amazon that works great. My shop is not big enough to dedicate space for spraying large pieces.
My joists are perpendicular to my lathe so that is an issue. I guess I could put a couple 4x4s across the joists to mount the beam.
My "spray booth" is hang plastic and use a fan, not very good. I may do the blow up spray booth route. It seems like a lot of work to put it up and take it down.
What are you using to initially drill out the hollow form?
My "spray booth" is hang plastic and use a fan, not very good. I may do the blow up spray booth route. It seems like a lot of work to put it up and take it down.
What are you using to initially drill out the hollow form?
The blow up spray booth actually works well. Takes about 15 minutes to set it up outside my shop in the driveway and when done just roll it up and stow it away. Limitations that you have to pay attention to of course are windy days and when the temps drop too low. If it's a sunny day it gets warmer inside than outside so I can spray even when the outside temp is below ideal. Not expensive online and for me has been a great solution vs building a space or trying to rig up curtains and airflow in my shop.
For the pilot hole I start with a 1/2 bit to get a good center start then move to a long 1/2 boring drill bit that gets me to about 10 inches. From there I switch to Milwaukee Switchblade bits with extensions. You can get them online or at Home Depot. I bought one and then a set online. They're made for contractors punching holes in wood framing in housing builds but work great for boring big holes. The blades are replaceable and not expensive. I take a diamond hone to them 5-6 times before I swap out for a new one. When the switchblade bit gets to the bottom of the 1/2 pilot hole I drill further with the 1/2 and an extension. It helps give the center of the switchblade bit a guide hole to follow. A real challenge with the pilot hole is when you get way out with extensions the end of the bit can start to wobble and if not careful you can end up with your pilot hole being way off center at the bottom of the form. Trying to hollow against a large out of round pilot bore at the bottom of the form can be brutal until you get it back to round.
For the pilot hole I start with a 1/2 bit to get a good center start then move to a long 1/2 boring drill bit that gets me to about 10 inches. From there I switch to Milwaukee Switchblade bits with extensions. You can get them online or at Home Depot. I bought one and then a set online. They're made for contractors punching holes in wood framing in housing builds but work great for boring big holes. The blades are replaceable and not expensive. I take a diamond hone to them 5-6 times before I swap out for a new one. When the switchblade bit gets to the bottom of the 1/2 pilot hole I drill further with the 1/2 and an extension. It helps give the center of the switchblade bit a guide hole to follow. A real challenge with the pilot hole is when you get way out with extensions the end of the bit can start to wobble and if not careful you can end up with your pilot hole being way off center at the bottom of the form. Trying to hollow against a large out of round pilot bore at the bottom of the form can be brutal until you get it back to round.
Last edited:
What size booth did you get?
Drilled a 16" deep 2 1/8" hole with a Forstner bit on my current project and it did get off center. Took out a lot of wood but did not stay straight.
Drilled a 16" deep 2 1/8" hole with a Forstner bit on my current project and it did get off center. Took out a lot of wood but did not stay straight.
I got a 10x8x8, plenty big enough. Link below. People link them together and paint cars in them. I'm still working on a good order of steps to keep the hole as centered as possible. When you put all the bit extensions on to go that deep there's enough flex in the steel for wobble to develop. Keeping a 1/2 hole ahead of your larger dia boring does help but it can also still be tricky. Soft spot in the wood, the center wants to track the pith, etc. Just have to take it in steps and keep it to a minimum best you can. The life span of a forstner bit was not working for me and I'm not great at sharpening them so the switchblade setup was a big help. They have heavier steel quick release extensions of various lengths that really help.
Last edited:
Wouldn't a greater thickness make a piece more likely to crack? (more trapped moisture and less flexibility)
I haven't twice-turned any hollow forms, but some (maybe a majority) of my thicker pieces have splits. Very few of my thinner pieces have ever split, but some of them are quite distorted.
I really like the shape of that and I'm looking forward to seeing it finished.
I haven't twice-turned any hollow forms, but some (maybe a majority) of my thicker pieces have splits. Very few of my thinner pieces have ever split, but some of them are quite distorted.
I really like the shape of that and I'm looking forward to seeing it finished.
If the plan is to twice turn then there's a balance between thin enough to reduce potential for cracks and thick enough to have enough material to work with if it warps, and it will. I shoot for about 1/2" or a little less and seems to work most times. That said, I did throw out two large black willow hollow forms yesterday that were beyond getting round. They warped and twisted so much there was no way to get there - it happens. I cut the bottom off of one and made it into a nice small trash can. When you have that much wood real estate in play the potential for cracks goes up. I boil my large pieces which does reduce the potential. I also dry them with tube fans inserted inside to keep the air inside the vessel moving within the drying box.
Walt, I suppose someone with much more experience or an eye for shape plan could hollow then finish the outside but I know I couldn't. I spend a LOT of time on the outside shape and curve flow to get it just right. It's amazing how little it takes to get it wrong vs right. If I hollowed the inside first near the bottom, a critical spot for the curve and bottom dia to get out of balance, I know I'd have a mess to try and fix. Just me. I don't think wood vibration near the bottom, where it's in the chuck, causes issues. It's just the reality of having a steel bar sticking out 28" over a tool rest trying to cut wood - it's tough.
Walt, I suppose someone with much more experience or an eye for shape plan could hollow then finish the outside but I know I couldn't. I spend a LOT of time on the outside shape and curve flow to get it just right. It's amazing how little it takes to get it wrong vs right. If I hollowed the inside first near the bottom, a critical spot for the curve and bottom dia to get out of balance, I know I'd have a mess to try and fix. Just me. I don't think wood vibration near the bottom, where it's in the chuck, causes issues. It's just the reality of having a steel bar sticking out 28" over a tool rest trying to cut wood - it's tough.
I recently watched Brian McEvoy’s boring bar DVD. In it he demoed turning a deep vase. He tackled it a few inches at a time. First he would turn the exterior, and then would hollow out as much as he had worked on the exterior. Then, he would turn a few more inches on the outside, and then hollow the inside. Rinse and repeat until the vessel was done. Once-turned and very thin. I imagine it is the best way to eliminate vibration, but the potential downside (like Randy said) is that you don’t leave much room to mess up the form.
How are you dealing with the center nub at the bottom? It seems tricky to get rid of.
If you're drilling your pilot hole all the way to the bottom you shouldn't really have one. If anything you'll have a dimple from the tip of the drill bit or the switchblade bit (which I grind down to a shorter length). Remember, it's a tall hollow form. No one is going to be shining a flashlight down inside inspecting the smoothness of the bottom inside. I try to make the walls reasonably smooth, no big ridges or tool cut valleys but I don't fret over it. I use the Roly Munro tool to work the sides with a lighted tool rest inside the opening to see places to clean up a bit. I sand and finish about 4-5 inches inside of a wide mouth flare top piece and on a piece like yours with a closed form top I only worry about the distance my fingers can reach in around the opening for sanding and some finish work.
From someone who sells pieces like this for a lot more money than I've ever sold a piece for told me, it's the inside. The fact that it shows it's handmade and carved out of a single log adds to the uniqueness.
From someone who sells pieces like this for a lot more money than I've ever sold a piece for told me, it's the inside. The fact that it shows it's handmade and carved out of a single log adds to the uniqueness.
Last edited:
Thanks, that make a lot of sense.
I have an led light that is magnetic that I can put on my tool rest, but it isn't inside.
Can you give me a link for the lighted tool rest your using?
I have an led light that is magnetic that I can put on my tool rest, but it isn't inside.
Can you give me a link for the lighted tool rest your using?
The tool rest is a custom made steel platform that extends into the piece with some LED strip lights around the bottom and a pivot that's really only useful for the Roly Munro tool. What I've done for the boring bar when needed, and the opening is big enough, is tape a skinny penlight to the bar. That said, using the boring bar while trying to peer into the piece and see where the light is shining is an awkward maneuver unless you have a really good sized opening. I assume you're using the laser setup for the Clark. I sent you a msg with my phone number if you want to talk live and cover things in a bit more detail.
The nub at the bottom of the vase is left on. McEvoy finishes the vase outside/ inside, turns it around and jam chucks it and cuts a recess into the bottom and then chisels out the 3/8" nub. I got the video for Christmas, and it is very informative. Unfortunately, I loaned it out and can't wait to get it back and watch it again for the details.
- Joined
- Feb 6, 2010
- Messages
- 3,459
- Likes
- 2,526
- Location
- Brandon, MS
- Website
- threeringswoodshop.square.site
As to lights I got a flex neck flashlight and it is very effective for checking inside a hollowform. It would be very easy to tape it to a tool rest to get light inside.
Streamlight Flex neck
Streamlight Flex neck
Thanks for shedding some light on this!As to lights I got a flex neck flashlight and it is very effective for checking inside a hollowform. It would be very easy to tape it to a tool rest to get light inside.
Streamlight Flex neck
- Joined
- Apr 27, 2004
- Messages
- 9,306
- Likes
- 6,061
- Location
- Lakeland, Florida
- Website
- www.hockenberywoodturning.com
Those work great. We have several with small & bright LEDs on a flex shaft.As to lights I got a flex neck flashlight and it is very effective for checking inside a hollowform.
I hade a McEvoy system replicated and just today I finally got the light to work. I started with a 120 v light and encased it in resin. TOO HOT melted the resin. Got a LED light from Walmart, $4.50 and a wiring harness from NAPA, alligator clips from Ace and wire I had around home and came up with a light to attach to the end of the deep boring bar. Haven't tried it yet to test the thickness of the vessel I'm turning, but stay tuned! Hopefully tomorrow I will get a chance.
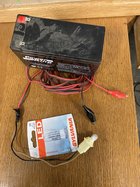

Anybody ever try using a camera inside the hollow form?
I have one of these, cheap and the quality is pretty good. Would have to use a light too of course.
Amazon Borescope
I have one of these, cheap and the quality is pretty good. Would have to use a light too of course.
Amazon Borescope
Ditto regarding John. I've spent a lot of time taking notes on the phone with John.Steve, I moved into hollow forms and then large ones a little over a year ago. It's been a lot of fun, challenging and now it's my primary focus. Still do smaller forms, natural edge bowls, etc for local markets and online sales but not near the volume as I once turned. The primary challenge with large hollow forms, 20" to 30" I would say, is that there aren't very many people that even do pieces that size (one of the reasons I like doing them) and the methods and tools can be a challenge to work through. Very different set of requirements, tools and steps in turning a 30" hollow form than a 15" hollow form. First, the log can weigh 150-200 lbs so moving it around, getting it mounted, can your lathe spin it, shaping it, the list goes on. Happy to share my learnings and experience with you as you move along. Most all of what I know and the steps I follow I got from John Tisdale. Without his help I would have likely given up early on. Here's a 26" black cherry I just finished over the weekend. I have another 35" raw log standing here by me in the shop ready to start the journey. Just need to get my mojo going for the heavy up front work.
I hade a McEvoy system replicated and just today I finally got the light to work. I started with a 120 v light and encased it in resin. TOO HOT melted the resin. Got a LED light from Walmart, $4.50 and a wiring harness from NAPA, alligator clips from Ace and wire I had around home and came up with a light to attach to the end of the deep boring bar. Haven't tried it yet to test the thickness of the vessel I'm turning, but stay tuned! Hopefully tomorrow I will get a chance.
I ordered a pack of 10 small (5/8" x 1") LED arrays on Amazon. I have a bunch of old cordless phone charge cords that should power them, and with some tiny magnets on the back, they can stick to a tool rest or boring bar, or wherever I need some extra light.

Very nice. Please share the plugs, connectors you come up with the gang the led and connect to power.I ordered a pack of 10 small (5/8" x 1") LED arrays on Amazon. I have a bunch of old cordless phone charge cords that should power them, and with some tiny magnets on the back, they can stick to a tool rest or boring bar, or wherever I need some extra light.
View attachment 61255

