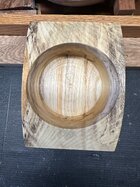
I really have not turned much spalted wood. I received two blanks of hackberry a while back and yesterday cut out a chunk to play with. It turned very easy but I am not sure about the look of the spalting. My first impression was it looked more “dirty” than attractive. Observations or advice welcomed.

-
Congratulations to Phil Hamel winner of the April 2025 Turning Challenge (click here for details) -
Congratulations to Paul Hedman and Donna Banfield for "Fire and Ice" being selected as Turning of the Week for 5 May, 2025 (click here for details) -
Welcome new registering member. Your username must be your real First and Last name (for example: John Doe). "Screen names" and "handles" are not allowed and your registration will be deleted if you don't use your real name. Also, do not use all caps nor all lower case.
You are using an out of date browser. It may not display this or other websites correctly.
You should upgrade or use an alternative browser.
You should upgrade or use an alternative browser.
First turn of heavily spalted wood
- Thread starter Ed Brekke
- Start date
- Joined
- Apr 27, 2004
- Messages
- 9,171
- Likes
- 5,782
- Location
- Lakeland, Florida
- Website
- www.hockenberywoodturning.com
When I’m not pleased with the natural color I change it.
Bleaching might give a more pleasing look - no guarantee.
Bleaching usually leaves the black spalt lines black and whitens the background.
Dyes and stains after bleaching or before bleaching can give an improved look.
You can color the whole piece
Or dye it black. Just about every well turned piece wil look good dyed black.
I sandblasted this ball with resist and didn’t care for the color
So I dyed it black with Fiebings black leather dye
I really have not turned much spalted wood. I received two blanks of hackberry a while back and yesterday cut out a chunk to play with. It turned very easy but I am not sure about the look of the spalting. My first impression was it looked more “dirty” than attractive. Observations or advice welcomed.
I have literally tons of sugarberry here, which is a cousin to hackberry. The two woods are virtually indistinguishable. There are basically two types of spalting: zone lines and white/gray rot. I'm sure there are more, but that's a starting point. To my semi-experienced eye what you have there is very little zone lines and a lot of gray rot. Here are some pictures of sugarberry for comparison. You can see both white rot and zone lines in the 3rd picture.
.jpg")
.jpg")


Hackberry is a bit weird with the dirtiness of some pieces. I have noticed there are these very fine zig-zaggy grain lines that you sometimes don't really notice until you've sanded and finished. From what I can see in the photo, it looks like those are responsible for the dirtiness you describe and not a result of spalting. What to do about it depends mostly on what the turner prefers. I like to see the personality of different wood species, but there are times I want the emphasis to be more on the form. Of course, you don't really know what you want until you see it, and once you dye it, there is not much chance of going back. So maybe your decision is really about gaining experience with assuming more or less control over the outcome of the piece. You can play it safe and see how the wood and form interact to define the piece, or try dying it a uniform color to emphasize form more. Of course you can get really crazy and try to layer colors and maybe begin developing skills using color to enhance future pieces. I think sometimes we get too emotionally attached to individual pieces and don't take the risk of 'ruining' the piece by trying a new technique.
Other book junkies like me may be interested in Dr Seri Robinson’s book on spalting. The variety of colors in spalting is incredible, as are the fungi that cause them. She shows how the color from spalted wood was used centuries ago to add color to furniture and such. She points out that the black zone lines are defense lines created by competing strains of fungi to protect their “territories” while eating there way through the wood..There are basically two types of spalting: zone lines and white/gray rot. I'm sure there are more, but that's a starting point.
The best spalting I’ve ever had I “created” by accident. I put a wet bowl blank in a plastic bag to keep it wet until I turned it. Forgot about it until a few years later! It had an incredible growth of fungus on the outside and inside was some wonderful color. All the wood from that bowl blank was solid with no sign of rot.
I have some more blocks of wood in bags now trying do duplicate that mistake!
This photo doesn’t do justice to the color, but you can see a hint of some of the red and the intense green. (I should take photos from other angles some day.

I’ve also had some beautiful spalting form Hackberry, not much color but some incredible detailed black lines. I like to give such blanks to people who make lidded boxes and Christmas ornaments.
(I thought these were Elm but the other John Jordan, the famous one, told me the wood was Hackberry. Had a bunch of it at one time. I put oil on the smaller one.

JKJ
Other book junkies like me may be interested in Dr Seri Robinson’s book on spalting. The variety of colors in spalting is incredible, as are the fungi that cause them. She shows how the color from spalted wood was used centuries ago to add color to furniture and such. She points out that the black zone lines are defense lines created by competing strains of fungi to protect their “territories” while eating there way through the wood..
The best spalting I’ve ever had I “created” by accident. I put a wet bowl blank in a plastic bag to keep it wet until I turned it. Forgot about it until a few years later! It had an incredible growth of fungus on the outside and inside was some wonderful color. All the wood from that bowl blank was solid with no sign of rot.
I have some more blocks of wood in bags now trying do duplicate that mistake!
This photo doesn’t do justice to the color, but you can see a hint of some of the red and the intense green. (I should take photos from other angles some day.
View attachment 73949
I’ve also had some beautiful spalting form Hackberry, not much color but some incredible detailed black lines. I like to give such blanks to people who make lidded boxes and Christmas ornaments.
(I thought these were Elm but the other John Jordan, the famous one, told me the wood was Hackberry. Had a bunch of it at one time. I put oil on the smaller one.
View attachment 73950
JKJ
I have heard of that book. I should pick it up. I am going to try your method with some persimmon.
I just read that hackberry is in the hemp family. Some of my sugarberry (hackberry's cousin).


That's a lot of blanks there and it appears there is not any sealant on them. Are you not concerned they will split?I have heard of that book. I should pick it up. I am going to try your method with some persimmon.
I just read that hackberry is in the hemp family. Some of my sugarberry (hackberry's cousin).
View attachment 73956
View attachment 73957
Not these. The tree was dead when I harvested it and was fairly dry. They sat on the ground for a year after. The second part of the answer is those were some of the first I processed and didn't think to seal them. I've been sealing all my blanks since. The wood pile is another story. I don't seal logs but rather just cut off any checked ends.
I started 'playing' with transtint dye on a piece of spalted maple. It was a littel scary at first. But I learned that with a little sanding you could remove much of the color change that the dye imparted. I also learned that the wood when sanded to a higher or lower grit accepted the dye at a different rate.Hackberry is a bit weird with the dirtiness of some pieces. I have noticed there are these very fine zig-zaggy grain lines that you sometimes don't really notice until you've sanded and finished. From what I can see in the photo, it looks like those are responsible for the dirtiness you describe and not a result of spalting. What to do about it depends mostly on what the turner prefers. I like to see the personality of different wood species, but there are times I want the emphasis to be more on the form. Of course, you don't really know what you want until you see it, and once you dye it, there is not much chance of going back. So maybe your decision is really about gaining experience with assuming more or less control over the outcome of the piece. You can play it safe and see how the wood and form interact to define the piece, or try dying it a uniform color to emphasize form more. Of course you can get really crazy and try to layer colors and maybe begin developing skills using color to enhance future pieces. I think sometimes we get too emotionally attached to individual pieces and don't take the risk of 'ruining' the piece by trying a new technique.
I 'quoted' Brian's comments to further encourage the idea of taking the 'risk'.
Dan