• June 2025 Turning Challenge: Turn a Wand! (click here for details)
  • Sign up for the 2025 AAW Forum Box Swap by Monday, June 30th (click here for details)
  • Congratulations to Carl Ford for "Rings of Raindrops in Living Color" being selected as Turning of the Week for June 16, 2025 (click here for details)
  • Welcome new registering member. Your username must be your real First and Last name (for example: John Doe). "Screen names" and "handles" are not allowed and your registration will be deleted if you don't use your real name. Also, do not use all caps nor all lower case.

Fix the Crack(s)

Joined
Aug 10, 2021
Messages
194
Likes
138
Location
Benton, AR
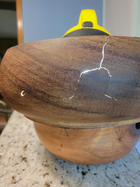
This bowl is 12 inches in diameter. The interior depth is 3 inches. The bowl originated in Nigeria, Africa. It is more than 30 years old. The wood is reported to be mahogany. The cracking has recently appeared due to extreme change in the environment.
While not responsible for the damage, I have agreed to attempt repairs. Any and all suggestions are greatly appreciated.

1662585124234.png
 
My approach to cracks, knots, etc is to hide, leave as character or highlight them as a feature with some sort of epoxy fill. In that order. Leaving this one as character doesn't seem an option. If I attempt to hide it then it needs to go away or not be something your eye is drawn to. Not sure how much movement you have available to pull it back together and clamping on bowls is always a challenge if not impossible. If it were on my bench, stable and I couldn't get the gaps to close then I would fill it with a colored epoxy and highlight it as part of the look. If I could get them to close and fit well then some clear wood glue and creative clamping might be an option. A colored fill would also allow you to address the bullet hole to the left. Will still show but that's inevitable. Would greatly depend on the owner's preference.
 
Hmm as Randy has pointed out you have a few options. For me I dont try and hide cracks as I have never been successful and it always looks repaired. So I take the Japanese view and make it a feature. Kintsugi, they fill it with gold and it looks just fine.
But much depends on what the owner wants , you could pull the rim together and glue it then fill the rest, including the bullet hole. Pewas would do it but in this case I think they have to be very well done if not superbly so as not to detract from the form. Daniel you certainly have a challenge on your hands.

3dc9bf074d89a347f58b79e5ecbcdc3d.jpg
 
A repair is always going to look like a repair and simply trying to glue it back together will always look just like that. You will not be able to restore it to the original state.

What you can do is stabilize the bowl and hopefully enhance the appearance at the same time

My inclination, without being able to see or handle the bowl, would be to fill the crack with epoxy and a color/filler of the owners choice.
 
I use epoxy and mica powder for color. Hilite the crack vs trying to blend. Not a lot of fun and time consuming feathering the inside and outside without it mounted on a lathe. Cabinet scrapers, straight and curved, will help.
 
Pewa would be a choice, but if you've not done it, this is probably not the piece to practice on. So probably a fill would be the right approach.

In any case, I'd suggest stopping the cracks with huini pegs. Drill a clean hole at the end of the crack and glue a peg (small dowel) in there. The round hole will relieve stress at the end of the crack and help prevent it from continuing.
 
In a word, Daniel, Celebrate!. As a dry-wood, end-grain turner, I routinely violate Msr. Jordan's motto. My mottoes are 1: "It's amazing what comes out of trees" and 2: "It's better the be clearly wrong than unclearly maybe."

I'm still working through the remains of a diseased red maple that I had to fell to build my new shop. The tree was full of internal cracks along the annular growth surfaces so the majority of the milled boards went to the firewood pile, but the turning sections have yielded treasure so long as you don't mind cracks and epoxy.

RedMapl-4.jpg

You do need to inspect and fill the "defects"

Red-Map.jpg

Then get it round to see what you've got to work with (here 18"x9"). Then go to work, being mindful to watch for micro-checks you might have missed, and hopefully you come out with something like this

RedM-3.jpg

I recently did a double urn for a friend's parent's cremains. It was turned from wet roadside cherry that had a single crack. The piece had to be 400 cubic inches in volume. When finished it was presented to my friends. They looked first at the "clear side and expressed their thanks and appreciation, but when I turned to show the crack they got really excited and pleased.

Mandell, Jerri's M&D.jpg
 
Many have suggested filling the cracks on this bowl with epoxy. How would one do this? Or for that matter how would one install pewas?

Since the bowl was completed long ago, and has experienced some wood movement it would presumably be very difficult to remount on a lathe accurately? Even if you tape seal the outside of the cracks, I can't see how you would fill the cracks from the inside without substantially overflowing (and creating a lake)? How would you level and smooth the epoxy (or pewa)?
 
When I fill cracks that go through to the other side I use painters tape to seal off one side then fill from the other. I use colored mica powders (it only takes a very small dab to color a lot of epoxy) and JB Weld two part epoxy. Get the bottles, not the syringe thing. I can never make them work right. Mix up enough to fill from one side. Be quick, it says 5 minutes but I seldom get that much time. Mix a little, add the powder, mix until blended and then with a popsicle stick or smaller flat wood stick fill in the crack. Pay attention to keeping the crack area horizontal, tilt a bit, watch where settles and work in some more to fill, work it into the crack, etc. I overfill just slightly so that when I sand the epoxy is flush to the wood surface. It may take a few times on each side to get a good complete fill. Once that side is set enough that it doesn't flow you can do the same on the other side. I don't worry too much about the epoxy being on the surface around the crack area. It really doesn't soak into the wood and sands off easy enough. A heat gun on low can help it flow better into the crack and make air bubbles rise to the surface. If you color the epoxy small air bubbles are not really a big issue.

You could put a glue block on the bottom to mount to sand.

As for pewas - I've never done any but aspire to try. Dave is the expert on those.
 
Many have suggested filling the cracks on this bowl with epoxy. How would one do this?
I’ve not tried this, but I’d be tempted to try to blow up a balloon inside the piece, tie it off and fill the cracks for the outside with thickened epoxy. Perhaps spray the side of the balloon facing the cracks with wax? Pam? Some kind of mold release. Just a thought.
 
BTDT Lou. 2 coats of Johnsons paste wax does ok. Issue is how to wax the ballon when its inflated. For a bowl it's easy. Not so for a jar. Not perfect but ok if you wax the ballon before you put it the jar.. If you want more release, Polyvinyl alcohol used to be pretty standard for a release agent. I don't bother using a dam. I thicken the epoxy with microballons (spheres) and let the interior be what it will be. For a bowl where the inside surface is seen and in use it's doable with a vacuum chuck.
 
Many have suggested filling the cracks on this bowl with epoxy. How would one do this? Or for that matter how would one install pewas?
For filling cracks in round things, I usually use painters tape to (attempt to) prevent leaking to the inside of the bowl. Tape and/or hot glue and/or modeling clay etc on the outside to make dams. Or maybe vice-versa and work from the inside of the bowl. I then prop up the bowl on the bench using things that happen to be laying around on the bench. Then it's several successive fills, depending on how things level out. Big challenge for me is remembering what I did for color on the last fill and matching that (because it's usually so many seconds or inches of epoxy squeeze mixed with how many half-drops of color - and I don't always think ahead "I'm going to need to remember this later").

For pewa, I use plenty of hot glue and wedges to hold the router template in place. Larger pieces (less curvature) are easier than small pieces (tight curves).


Since the bowl was completed long ago, and has experienced some wood movement it would presumably be very difficult to remount on a lathe accurately?
Yeah, I wouldn't even take this to the lathe - do everything on the bench.
 
So you'd remove the excess epoxy, and such, by hand sanding?
Yep. Well, I might use the lathe as a holding device, because I have more ways to hold something round on my lathe than at the bench. But I doubt I'd try to turn it - even a piece I turned immediately before filling a crack is rarely still round enough after the epoxy is cured. And Murphy's Law says the epoxy is going to be in the low spot and your tools won't even hit it :)

Either hand sanding with a firm sanding block or power sand. Have to be careful power sanding as it's real easy to over do it and end up with flat spots. Soft sanding pads are not good, need a firm backing to the sandpaper (for control of where exactly you are sanding).
I usually start with 80 grit if there's a big chunk to remove (sometimes 120 or even 180 if there's not a lot of excess). Be careful to only sand down the excess epoxy. When it gets closer to the wood I switch to finer grits to slow down the process. I watch for sanding scratches on the wood, and watch the edges of the epoxy.
 
My approach to cracks, knots, etc is to hide, leave as character or highlight them as a feature with some sort of epoxy fill. In that order. Leaving this one as character doesn't seem an option. If I attempt to hide it then it needs to go away or not be something your eye is drawn to. Not sure how much movement you have available to pull it back together and clamping on bowls is always a challenge if not impossible. If it were on my bench, stable and I couldn't get the gaps to close then I would fill it with a colored epoxy and highlight it as part of the look. If I could get them to close and fit well then some clear wood glue and creative clamping might be an option. A colored fill would also allow you to address the bullet hole to the left. Will still show but that's inevitable. Would greatly depend on the owner's preference.
How to fix it would depend on what look the client wants but if you want to hide the crack and never have it crack again, but can't physically or mechanically pull the crack together, then try this. First make sure there is nothing in the crack to keep it from closing shut. I blow the crack and examine it carefully. next put the whole bowl in a bucket of water. On the first soaking, try it for just a minute or so. Then put it on the table upside down. This makes sure you don't have water pooling in the bottom of the bowl and it slows the drying rate of the rim. If the whole bowl takes on water at the same rate and looses water at the same rate, the bowl will not crack. After ten minutes you can turn the bowl over but watch it. You are hoping that the wood cells swell up and the crack closes up so tight you can't even see where the crack even was. It may require a longer soaking than just a minute or so. The time will depend on the wood, how thick the wall is and how much finish is in the wood. Once the crack closes up you now have the problem of trying to get a glue to get in the crack and more important, stick to wet wood. So we need to let the bowl dry out a bit but not so much the crack opens up again. I glue when the crack just begins to open but I can still physically pull the crack back tight. Try to use a clear epoxy because this will give us some time to wrap the bowl with that stretchy plastic wrap they use in shipping. Every wrap pulls the crack tighter. Once the bowl is glued and dry (dry it slowly) and you don't want the bowl to ever crack again you can glue a thin ring of a different wood a crossed the top. Make sure you have or can still get the rim of the bowl flat so it will glue nicely to the flat ring. The tail stock and a flat board can clamp the two together. The ring should wide so it will compensate for any warping of the bowl. The overlap of the ring must be ground away and then sanded to match the bowl. You will blow up your bowl if you attempt to cut or turn the ring because the rim of the bowl is now weak and will flex if you try to turn the ring away. For strength the ring's grain direction is glued ninety degrees to the bowl's grain. Good luck201.JPGBowles08 038.jpg
 
I agree with the guys who advocate colored epoxy and more so with Henry Ford: "You can have any color you want as long as it's black".
- Black is the color of shadows - its presence recedes.
- To attempt to obscure with a color might look like you're trying to hide a flaw.
I use WEST G-Flex 655 with black pigment from System-3 - it's thick and would be great for the wider portion - make your spatula out of a piece of bandsaw blade or a feeler-gauge - even a strip of razor-blade can be a great tool if inserted in the end of a chop-stick.
Where the crack is too narrow, AeroMarine-300 is ideal - you can color with the same System-3 black pigment and shoot it with a #23 syringe.

Of course, the above assumes this piece is of some value and worth the time. And who knows: the real gain might be a new capability.
 
Hmm as Randy has pointed out you have a few options. For me I dont try and hide cracks as I have never been successful and it always looks repaired. So I take the Japanese view and make it a feature. Kintsugi, they fill it with gold and it looks just fine.
But much depends on what the owner wants , you could pull the rim together and glue it then fill the rest, including the bullet hole. Pewas would do it but in this case I think they have to be very well done if not superbly so as not to detract from the form. Daniel you certainly have a challenge on your hands.

View attachment 46594
How do you get that gold Hughie? Gold mica powder?
 
I've used gold mica powder with epoxy and it can really look sharp on the right wood. The varying marble like look can be a nice touch. Turquoise seems to be the default color for most folks so I try something different from time to time but, turquoise is hard to beat. I struggle sometimes with the right color for the wood so mix a little, let it set and then hold up to the piece. Hard to get a good feel with just the powder. You can get a box of 15 different colors on Amazon. I've had very good luck with them and like I said, a tiny little bit goes a long way. If you mix up multiple batches the color match is great even if your mica powder ratio is not precise.

Link to what I use.

 
Normally I don't have splits, but sometimes the wood does come with splits in it and is such that I will keep it and turn anyway.

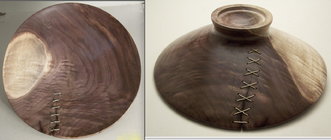
Like this Black Walnut I got and had a split in it, seeing that it had some nice curl I decided to keep and turn it, drilled holes on both sides of the split and then got some brass wire and stitched this, did this in 2006.
stitch the split.jpg
Another one I got from a friend that forgot to bring it along and had it left in the back of his truck, well by the time I got it there were several splits in it, as it was a graft from an Apple tree, I could see it still as a nice project, so hollowed it out and it was a difficult piece to keep from destroying itself, as it wanted to open up I used a hose clamp and wen done I replace that with brass wire, wrapped several times around the neck, LOML liked it enough to confiscate it :).

Split Apple graft.jpg

Best thing is to prevent splitting from happening, not always easily done with some wood pieces that will normally just have to split, but I have had good success with staples hammered into the wood where I would expect the piece to split open.
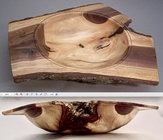
Like this smaller Walnut crotch, it has a small knot in it that did split and I filled that with coffee ground and CA but the crotch I kept from opening up by making a hard SS wire into a staple and hammered that into and across the crotch after drilling small holes, you can see the piece dried and bowed, but it never split, done a few more with good result.
splitting prevention.jpg
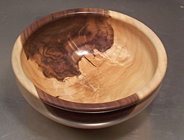
Here is a piece where I filled a short split, I do not like the result but the wood is nice enough to overcome the small defect IMO.
black Walnut bowl.JPG
 
it is no longer in firewood condition. Should anyone have any opinions on the repair, please offer, don't hesitate.
The bowl has a nice shape.
To me visible cracks should look natural or intentional.

What is important is how you view the piece.

I have set aside pieces that I liked but were not up to my standards to offer as gifts or for sale.
Years later some of these became canvases for Carving and texturing.

Years ago a I gave a friend who was helping with a class my barrel of scrap wood from the bandsaw to use in a bon fire.
A couple weeks later he showed me a small hollow form with carving and pyrography. He said “bet you like this form”
I said “yes”. He said “it’s yours It was in the scraps and I couldn’t burn it”.
It was a piece I had done in club demo and decided to toss it rather than finish it.
Glad to see it got remade into something really nice.
 
I wanted to show the final result. Thanks to all those who replied and responded. While certainly not "back" to its original condition, it is no longer in firewood condition. Should anyone have any opinions on the repair, please offer, don't hesitate.

View attachment 47152
What repair method did you end up using? How did you repair the finish?
 
What repair method did you end up using? How did you repair the finish?
The repair method: after much thought, deliberation, and consultation I visited with a woodturner with a significant resume'. His opinion convinced me to use CA glue because the bowl was primarily for display. I chose Starbond "thick". I enlisted the aide of another pair of hands because clamping would be difficult at best. Before actually starting the repair, I asked for Divine guidance. The process was done in three (3) phases. The last phase was the cracking at the rim. After the cracks were completely repair I filled the bullet hole with brown dyed epoxy. All the CA glue was applied from the inside of the bowl. The epoxy was applied from the outside with duct tape as a backing on the inside. I applied blue tape in small pieces around the edge of the hole.
The finish: I believe there was a finish of sort on the bowl initially. In places the finish was complete gone but still visible in other places. It appeared this was the the result of side grain/end grain. I thought I had sanded "good enough". I applied two (2) coats of shellac wash. Then I applied a coat of Water Lox non-yellowing Urethane. The Urethane acted correctly in places but remained tacky in others. That's when I realized the original finish along with the grain orientation was interfering with the new finish. After sanding a second and third time and applying finish a second and third time I decided the project was done. There were zero problems when repairing the finish on the exterior bottom and the interior of the bowl.
I have sent photos to the client and they seem quite happy.
I will probably be entirely too busy to accept another repair project.
 
Back
Top