• May 2025 Turning Challenge: Long Neck Hollowform! (click here for details)
  • Congratulations to Phil Hamel winner of the April 2025 Turning Challenge (click here for details)
  • Congratulations to Dion Wisniewski for "Basketweave" being selected as Turning of the Week for 12 May, 2025 (click here for details)
  • Welcome new registering member. Your username must be your real First and Last name (for example: John Doe). "Screen names" and "handles" are not allowed and your registration will be deleted if you don't use your real name. Also, do not use all caps nor all lower case.

Getting a nice, smooth, glossy finish

Joined
Jul 30, 2021
Messages
591
Likes
190
Location
Aurora, CO
I started another finish based thread a minute ago, and this thought came into my head while writing it. I have tried, and struggled with, achieving a nice glossy finish on my pieces. Maybe to qualify this even more...I am not jsut talking "shiny"...which is achievable to a degree with many finishes, and a lot easier. More specifically, I am thinking GLASSY GLOSS, where the piece is VERY glossy, maybe even mirror finish glossy. I've seen a lot of pieces like this and they often look quite appealing, and at least on some things, I wish I could achieve the same kind of finish on my own pieces. I do like a good satin sheen on most things, but I'd like to expand my skills to include the ability to create a good glassy gloss when a piece warrants it (or when a customer might explicitly want it.)

I tried a lot in the spring last year, particularly with polyurethane and spar urethane, but also oil. With the urethanes, the challenge I always seem to have is streaking or dripping. With oil, by the time I seem to get enough oil on a piece for it to even start getting glossy, it looks like "it has too much oil!" I spent a lot of time trying a variety of different techniques to apply poly and spar, from brushing on with bristle brushes, then foam brushes, then thinning and brushing, then using a foam brush to apply in a very specific manner while the piece was turning at about 50rpm...

I did learn a few really good lessons.

FIRST: Make sure you sand the surface of the wood so its very smooth and clean. Any defects in the wood surface, seem to just get compounded once you start layering on poly or spar urethanes. In fact, with each additional coat, defects only seem to become more and more pronounced! (Honestly not sure why...)

SECOND: DO NOT leave the drying piece anywhere it can pick up dust or other particulate, as IT WILL! Dust and particulate usually lead me to have to cut back the surface of the previous coat, once fully dried, requiring another coat. Then there was always the risk that coat would pick junk up. It seems to take a good 12 hours for a coat to dry well enough and hard enough that it can be scuffed back properly for another coat, which leads to a very LONG finishing process...

THIRD: DO NOT mess with poly or spar after its started to settle, as once it starts to dry, messing with it will only introduce ripples or other defects that will not level out like the initial brush/applicator strokes.

Despite learning these things, I still struggle getting a good, flat, ripple-free, defect-free poly or spar urethane finish. Even if I try to use a satin rather than a gloss, getting DEFECT FREE finishes with these seems challenging.


I then tried just pure oils, but mostly drying oils like Danish or Tung w/ drying agents. Pure oils, just seem to take longer than I can comprehend, to actually dry. I think I spent about 30 days trying to coat a piece in pure linseed oil and get a glossy result, and it just didn't happen. With the drying oils, I started with danish, and on its own I don't think it was possible to get a glossy surface just by adding coats. I did eventually find some videos where people would coat with danish repeatedly for a few days, several times a day, then BUFF it to get more of a shiny appearance...but this was more of a satin sheen, not a glassy gloss. I started experimenting with Tung Oil, a drying one, late last year, and as I built up coats, it seemed like it might actually be able to achieve a nice, good, very glossy finish. However, it suffers from some of the same issues as the urethanes, notably that it picks up all kinds of dusty junk. I thought about placing it in some kind of container to keep the dust off of it, but then you end up starving the finish of the oxygen it needs to cure... I did eventually build up a decent amount of tung oil on a couple of pieces, and while they did appear to be getting shinier, there was something about it that just didn't look...good. It is entirely possible, and likely, that the problem was me and that I wasn't applying the finish properly.

I'm curious how those of you who do achieve good, clear, glassy gloss finishes achieve them, and with what finishes? Are you using just an oil, or a poly, or something else? How do you achieve those beautiful, smooth, mirror glass like results in the end?
 
If you want a really shiny finish, you have to get rid of highs and lows. When working on fiberglass, 3 rolled on coats of epoxy are applied. It looks like orange peel. It is then sanded until zero shiny spots are seen, then it gets painted.

When building furniture, I use scrapers to prepare the wood, add finish and sand. Add finish and sand, repeat until it is like glass.

I’ve wet sanded with Danish oil finish and it’s extremely slick.

YMMV.
 
Lacquer is easy to build to a glass-like finish, and fairly quickly compared to all other finishes. Another nice thing is that each coats melts into the previous.

Polyurethane can also be sprayed and wet-sanded, but the cycle time is much longer between coats.

Tim
 
I'm with Tim.
I like Sherwin Williams T77..75 precat lacquer.
Sand to 180 grit. Apply three coats. Let cure for a day, and continue sanding if super high gloss needed.
Sanding at over 180 grit smears over the pores and doesn't let the coating penetrate. I used to sand the wood to 400 and apply the finish then some experimenting let me know that was a waste of sandpaper at least on larger pieces that are likely to be handled. Sanding the chemical coating to a high gloss is where the higher grits come in.
 
High gloss requires a flawless surface to start with, every lump and ripple is magnified. Double for pigmented finishes but you can use filler to correct the surface. Many finishes like polyurethane and alkyd varnishes show witness lines if you sand through one coat to an earlier one, so you want a product in which the layers "burn in" and meld together. This narrows your choices considerably. Nitrocellulose, acrylic and CAB acrylic (water-white/non-yellowing) lacquers are some options that abrade easily and can be buffed out once they cure thoroughly, after several weeks for best results. Another option is French polish, i.e. padded shellac. They all require considerable labor, patience and finesse.
 
I'm with Tim.
I like Sherwin Williams T77..75 precat lacquer.
Sand to 180 grit. Apply three coats. Let cure for a day, and continue sanding if super high gloss needed.
Sanding at over 180 grit smears over the pores and doesn't let the coating penetrate. I used to sand the wood to 400 and apply the finish then some experimenting let me know that was a waste of sandpaper at least on larger pieces that are likely to be handled. Sanding the chemical coating to a high gloss is where the higher grits come in.
You have to be really careful with precat lacquer. There is a maximum coating thickness. Exceed that film thickness and you cold crazing.

Important Considerations: From Sherwin Williams application guide.
  • Film Thickness:
    The maximum dry film thickness of the total system should not exceed 4.0 mils.

 
There's a great finishing video by Steve Skinner out there on the web somewhere. Worth a watch. He uses spar varnish.
I am pretty sure that's the method I followed. This was the video:

View: https://youtu.be/MVQEJf7KkoQ?si=yX1JWYg9c0H8Axlu


I don't know if it's the arid air of Colorado, or poor application technique, but I always ended up with slight ripples, that affected the specular highlights, so you could tell the finish wasn't smooth. I put quite a bit of effort in trying to perfect it, even totally stripping prior attempts and retrying, burned through over a can of that Helmsman Spar. I tried thinning it once, which seemed to result in the imperfections in the wood showing through even more (the thickness of that spar actually seemed to level out over them a bit initially.)

That technique, using a foam brush and slowly dragging it across the slowly rotating piece, with the back of the brush just slightly off the surface, DOES seem to provide a nice even coat that quickly levels... After leaving the pieces turning (at just 50rpm) for a while, the initially flat surface always ended up showing ripples. I tried stopping the lathe after various times to see if that would prevent the ripples, but instead I would then get drips.

I am quite bummed I couldn't figure that out, as this method DOES in fact produce an AMAZING glassy gloss surface. I wasted something like $60 or $70 worth of spar trying to figure it out...i guess that has made me a bit reluctant to try again... But, I do think it's a viable method to get an incredible glossy finish. If no other options that get shared here work, I may try again. The ripples affected the specular highlights...the surface did look like GLASS, but it was an imperfect finish, and I did not feel I could sell the pieces. I eventually stripped em all, and finished them another way, leaving a satin sheen rather than gloss.
 
You have to be really careful with precat lacquer. There is a maximum coating thickness. Exceed that film thickness and you cold crazing.

Important Considerations: From Sherwin Williams application guide.
  • Film Thickness:
    The maximum dry film thickness of the total system should not exceed 4.0 mils.

I think something was lost here. We're there additional bullet points?
 
I'm with Tim.
I like Sherwin Williams T77..75 precat lacquer.
Sand to 180 grit. Apply three coats. Let cure for a day, and continue sanding if super high gloss needed.
Sanding at over 180 grit smears over the pores and doesn't let the coating penetrate. I used to sand the wood to 400 and apply the finish then some experimenting let me know that was a waste of sandpaper at least on larger pieces that are likely to be handled. Sanding the chemical coating to a high gloss is where the higher grits come in.
How is the chatoyance with this?
 
Lacquer is easy to build to a glass-like finish, and fairly quickly compared to all other finishes. Another nice thing is that each coats melts into the previous.

Polyurethane can also be sprayed and wet-sanded, but the cycle time is much longer between coats.

Tim
So, I have, I suspect, poor application technique with lacquer. I would like to try again, but I always seem to end up with an orange peel type texture.

Not too long ago someone said they were convinced I wasn't using enough in each coat. I did try at the time on some junk pieces using more per coat, and ended up with some runs. With both Watco and Deft.

Maybe I was too close. I have heard differing opinions on how close you should spray. FWIW, I have only used spray cans, so probably not precat, and definitely not with my own spray gun. I have never used enough finish to be able to mix and use precast lacquer fast enough to avoid most of it expiring on me anyway, though...

If there is a gem of a video out there on how to properly spray either watco or prolux (deft), I'd love a link!
 
High gloss requires a flawless surface to start with, every lump and ripple is magnified. Double for pigmented finishes but you can use filler to correct the surface. Many finishes like polyurethane and alkyd varnishes show witness lines if you sand through one coat to an earlier one, so you want a product in which the layers "burn in" and meld together. This narrows your choices considerably. Nitrocellulose, acrylic and CAB acrylic (water-white/non-yellowing) lacquers are some options that abrade easily and can be buffed out once they cure thoroughly, after several weeks for best results. Another option is French polish, i.e. padded shellac. They all require considerable labor, patience and finesse.

Ah, yes, I've run into witness lines when sanding prior coats. One of the things that lead me to abandon it last year.

So, could you describe flawless? I kind of ran I to two issues, in my attempts to get a "flawless" wood surface before applying the first coat of any urethane. Either I could even see witness of the sanding scratches in the wood, if I say stopped at 220 or lower... Or, if I stopped at say 400 (I even tried 600), then I seemed to notice unsightly characteristics in the wood itself (especially with certain kinds of grain) that I for the life of me, usually just could never correct.

Is there a preferred technique for getting a sufficient and appropriately flawless starting surface?

FWIW, I may also be overly perfectionist and expecting a level of flawless that is unattainable... 😜
 
Is there a preferred technique for getting a sufficient and appropriately flawless starting surface?
It's just like playing the flute. Blow across one end and run your fingers up and down the outside. Turn a clean, pure shape with no tearout and sand as little as possible. When I work out the details I will post here, and I trust you will do the same.
 
Last edited:
A quality high gloss surface can be had with the same sort of process used on cars. Finish the finish by wet sanding the dried finish up to the finest grit available at the auto parts store and then move on to finer and finer pastes. Lacquer and shellac are easier to work than most other types of finishes and soft spar varnish wouldn't be my first choice. I didn't watch the entire video linked above but my impression is that the starkly glossy surface of a freshly dried and untouched clear varnish is viewed as not-ready-for-delivery by many woodworkers. One of the Bob Flexner books covers all this in detail.
 
Last edited:
How is the chatoyance with this?
Like any transparent finish on dead plant fiber, the contrasts are great at first and then fade as UV changes the exposed surface over time.
I think if it were my job to eliminate chatoyance with a coating, I couldn't do it. Maybe some type of "oil" may work. Since that has never been a goal for me, I've got no real experience.
 
So, I have, I suspect, poor application technique with lacquer. I would like to try again, but I always seem to end up with an orange peel type texture.

Not too long ago someone said they were convinced I wasn't using enough in each coat. I did try at the time on some junk pieces using more per coat, and ended up with some runs. With both Watco and Deft.

Maybe I was too close. I have heard differing opinions on how close you should spray. FWIW, I have only used spray cans, so probably not precat, and definitely not with my own spray gun. I have never used enough finish to be able to mix and use precast lacquer fast enough to avoid most of it expiring on me anyway, though...

If there is a gem of a video out there on how to properly spray either watco or prolux (deft), I'd love a link!
Odds are if you are getting orange peal, you are trying to put additional coats on with the wrong timing.
If you are spraying Lacquer, and trying to sand the dust specs off then spray another coat, you have probably went beyond the time required to apply additional coats and now need to wait days for it to cure before applying additional coats. This is also especially true with polyurethane, as by the time it is hard enough to sand, it is well beyond the acceptable recoat time and you will have to wait for it to cure to recoat. So for both Poly and Lacq, once you go beyond their stated recoat time, you then have to wait till their cure time before recoating.
This can be a couple days for Lacq, or up to a week for Poly. If you are see an orange peel look when recoating, this is a classic sign of trying to recoat between their stated recoat time, and the cure time. Just because it feels dry and hard to the touch, doesn't mean it's ok to recoat. Once it gets to that point you most likely will have to wait for it to actually cure.
This is why most will try and get two to three base coats on first, then wait for it to cure, sand and then spray final finish coat on.
It's still going to be about a three day or more process for Lacq, or over a week for Poly.
 
Inadequate time between coats of lacquer or shellac will often cause blushing because the solvent in the previous coat is still evaporating. Improper gun setup, solvent ratio and surface prep can all cause orange peel.
 
Orange peel isn’t a bad thing…….if you use it to your advantage. When all the shiny little peel bottoms disappear, that means the high spots have been sanded off and you are contacting the entire surface with your sandpaper. Also avoid fingers under the sandpaper and use some type of backing such as ridged foam so even pressure is applied and you avoid making the top uneven from the finger pressure.
 
There's no need to use catalyzed lacquer on decorative turned pieces. Catalyzation is used to increase finish hardness and chemical resistance, but it typically comes with its own issues like short shelf life, limits on overall film thickness and recoat windows. Non-cat lacquers like nitrocellulose and CAB acrylic are easier to use and look as good. Orange peel with these finishes is often due to drying before the wet film has a chance to flow out and can be countered by spraying closer to the work, spraying a slightly thicker coat, or using more solvent or a retarder.

Spraying finishes is a bit of an art governed by chemistry. Most good finishers try to stick with a proven set of products and processes for predictable results, arrived at by lots of experimentation. Here are a couple of books that touch on spray finishing.
Bob Flexner
Jeff Jewitt
 
I have Bob Flexner's book on "Understanding Wood Finishing." I don't think I've read every single word, but I have read most of it. For any kind of varnish, I don't even bother photographing a piece for a month. I know it takes ages to cure.

@Ed Sandle Thanks for the tip on wait time... I guess I haven't paid enough attention to that, and maybe that is the problem, or part of the problem. For a while, I was even waiting till it was dry, then sanding back, but I don't know that I was waiting for it to fully cure before sanding back...

@Kevin Jenness Someone else mentioned the same thing, that the lacquer needed to flow. I think there is indeed an art to that, as if I put on enough in a given coat, that it has that "wet film" over the whole surface, I often get runs.

I think I need to experiment a lot more and figure out the timing and quantity to get enough flow, and make sure I don't run out the recoat clock.
 
Traditional non-catalyzed lacquer doesn't have a recoat window. You can shoot a new coat after an hour or a day and it will burn in. If you recoat too soon you may get blushing from trapped solvent. If you are putting on smooth coats without sags or dust nibs it's unnecessary to sand between coats. You do need to be very careful about exhausting the overspray as the solvents are both toxic and highly flammable.

Using a decent gun allows for a lot more control than a rattle can. You can adjust fluid and air flow and mix in additives like solvent, retarders and tints. I always dial in the adjustments on a scrap panel including gun distance to the work and how fast I move the gun.
 
Last edited:
Traditional non-catalyzed lacquer doesn't have a recoat window. You can shoot a new coat after an hour or a day and it will burn in. If you recoat too soon you may get blushing from trapped solvent. If you are putting on smooth coats without sags or dust nibs it's unnecessary to sand between coats. Using a decent gun allows for a lot more control than a rattle can.

Ok, thanks. So, I have only ever used the off the shelf spray can lacquer. I have mostly used the Watco stuff, gloss or satin. The watco can says it dries in 30 minutes, but they say the recoat time is "allow to dry for two hours then recoat." Now, I would say, sometimes I get back to it around 2-3 hours, sometimes it might be the next day, depending on how late it was (I most often turn later in the day into the evening, and frequently enough I don't get to recoats until the next day.)

For some time, I looked for "Deft" lacquer, which seemed to be the all time favorite can spray lacquer of most turners I've met. I could never find any, tried ordering it off Amazon a few times and the sellers would usually end up either never shipping anything or tell me they had none left. I eventually discovered that the Deft brand had been bought by a company, IIRC, named PPG, and that over the last few years they had been working on rebranding Deft as "ProLuxe." I then realized I'd seen ProLuxe numerous times for sale locally, and then finally noticed the little badge on the cans that say: "Same DEFT Formula New Name" and finally bought some.

I have a can of that, that I've only done some test runs with. This stuff says to recoat at 30 minutes. It also says recoat three OR MORE times, so it seems that you need at least three recoats.

I think maybe where I go awry, is distance, perhaps. The ProLuxe says 6-10 inches, the Watco says 8-12 inches, and I suspect I may be spraying too close these days which is resulting in the runs... When I get runs, I wonder if I'm overcompensating, and spraying from too far away, and not getting a good enough coat. I am curious what most people here would say as far as spraying distance goes.

The flow factor, is something I wasn't really aware of until more recently. I think mostly in the past, I was putting too little in each coat. I wonder if that was part of the cause of orange peel... I've got a couple junk pieces of wood I'm going to turn round, sand smooth, and test with today, and see if I can find the sweet spot for distance, and make sure I'm getting enough on each coat.
Flow rate, speed of gun travel and distance are all inter-related.With a rattle can the flow is fixed. The closer you are to the work the smaller the effective fan width and the faster you have to move to maintain an optimal wet thickness and avoid sagging. The farther away you are the slower you should move, and the more likely you are to get orange peel as the more solvent evaporates before it hits thye surface.

Set up a scrap panel on edge and play around with distance and speed until you get a well-atomised wet coat that is thin enough not to sag. If you spray the piece on the lathe you can rotate it slowly to avoid runs as some do with epoxy or varnish, but with lacquer the tack time is far shorter.

Again, be safe. Use a good respirator and plenty of airflow to keep the fumes at a safe level.
 
Inadequate time between coats of lacquer or shellac will often cause blushing because the solvent in the previous coat is still evaporating. Improper gun setup, solvent ratio and surface prep can all cause orange peel.
Lots of bad information showing up here with lacquer. Blushing is caused by trapping moisture from the air inside the coat of finish as the solvent flashes off quickly. You can get blushing on the very first coat. Inadequate recoat time is not the main reason, and you can limit blushing by adding a retarder to the solvent. I used to buy my lacquer in 5 gallons buckets when I ran a woodworking business. I'd guess I've sprayed over 500 gallons over 52 years of woodworking. And I certainly have a lot of experience with humidity in Central IL. I also disagree that wood prep causes orange peel. A rattle can's biggest issue is low pressure and poor atomization from a crappy nozzle. But that reason was not well received the last time I posted it on here. Many thought the finish out of a rattle can was just fine and they never had orange peel from a rattle can. So believe and do what you want. Experience is not always accepted as knowledge on the internet! And speaking of safety. I'm 72 and have recently been diagnosed with liver damage and pancreatic enzyme deficiency. I can't eat any fatty foods, not even a hamburger. No more pizza either. I can only eat twice a day since my digestion is so bad it takes a half day to digest a meal and it won't be long I'll have to buy 2 bales of toilet paper at Costco. DON'T SPRAY BEHIND A FLOOR FAN!
 
Last edited:
I think something was lost here. We're there additional bullet points?
Yes there are many more bullet points, but they have nothing to do with film thickness. I usually get criticized for providing information that is off subject. I only wanted to make one point in that post. I had an apprentice spray some chairs for our home. He wanted to do a great job, this is what I got. Crazing at it's worst.
 

Attachments

  • IMG_4051.jpg
    IMG_4051.jpg
    67 KB · Views: 15
Last edited:
Yes there are many more bullet points, but they have nothing to do with film thickness. I usually get criticized for providing information that is off subject. I only wanted to make one point in that post. I had an apprentice spray some chairs for our home. He wanted to do a great job, this is what I got. Crazing at it's worst.
Ok, interesting.

So, four mils, four thousandths then right? That seems really thin, but, I don't really know how thick a single coat is either. I have a rough idea of what four thou is...and both cans of my spray lacquer recommend "at least" three coats.

Is this the dried thickness, I assume? I've been spraying the Watco all day, and it seems that this stuff thins out considerably once it dries. Fresh on, though, it seems quite a bit thicker, so I guess its a lot of VOCs at first that evaporate. If I had to guess, I'd say one coat is probably a fraction of a mil, but not sure exactly what fraction.
 
I'm no expert, but I have persisted with a few pieces to get a nice glossy finish, but it's a process. I usually use Minwax fast dry poly. I'm not set up for spraying, so the first coat gets brushed on to fill any open grain and saturate the wood. On more porous wood, I'll brush a 2nd coat on after the first is dry. Before teh next coat, I give the piece a light sanding to remove any high spots, raised grain, or roughness. The coats that follow get thinned slightly (10 to 20%) with mineral spirits, and applied with a small piece of cloth. I will use microfiber towels or used T shirt, towel, etc. and cut roughly 3" squares. I fold in each side, then fold and pinch together top and bottom. (keeps cut edges from making contact and leaving lint/debris) I dip and wipe it out so I'm just wetting the whole surface. As it get closer to having a perfect smooth surface, I wet sand with 1000-1500 grit before recoating. At some point, it's ready to let cure, then buff.
 
I'm no expert, but I have persisted with a few pieces to get a nice glossy finish, but it's a process. I usually use Minwax fast dry poly. The first coat is brushed on to fill the grain. On more porous wood, I'll brush a 2nd coat on. Once dry, I give the piece a light sanding to remove any high spots, raised grain, or roughness. The coats that follow get thinned slightly (10 to 20%) with mineral spirits, and applied with a small piece of cloth. I will use microfiber towels or used T shirt, towel, etc. and cut roughly 3" squares. I fold in each side, then fold and pinch together top and bottom. (keeps cut edges from making contact and leaving lint/debris) I dip and wipe it out so I'm just wetting the whole surface. As it get closer to having a perfect smooth surface, I wet sand with 1000-1500 grit before recoating. At some point, it's ready to let cure, then buff.

When you say fast dry, is that WOP? Or something else?

Regarding mineral spirits...what kind do you use? Here in Colorado the Nanny State, we've been told we can't have real mineral spirits anymore, and all we have are the "odorless" (which stink to high heavens) containing mostly the aliphatic compounds and none of the good aeromatic compouonds. Normal mineral spirits contain both, and the flash points of the aeromatics usually make it a better solvent, as I understand. In the past, I tried using the odorless mineral spirits sold here in Colorado to thin poly, and it seemed to actually ruin it? Whatever is in the odorless mineral spirits we are allowed here in Colorado, they aren't even useful for cleaning anything up, like spilled paint or poly even. The stuff is pretty much useless...

I've often wondered if thinning poly with a more effective solvent might make it work better. I don't know what other solvents would be useful though. I think once I looked at the solvents used by Minwax themselves, and they were some pretty arcane compounds with highly complex chemical names that made little sense to me. Not your average VNMP or Toluene.
 
Yes there are many more bullet points, but they have nothing to do with film thickness. I usually get criticized for providing information that is off subject. I only wanted to make one point in that post. I had an apprentice spray some chairs for our home. He wanted to do a great job, this is what I got. Crazing at it's worst.
If you sand until the high until the high areas disappear and the sanding hits the low spots, it will be flat and slick. Once the shiny low spot disappear, it will be flat and you can get the high luster you are looking for.
 
Ok, interesting.

So, four mils, four thousandths then right? That seems really thin, but, I don't really know how thick a single coat is either. I have a rough idea of what four thou is...and both cans of my spray lacquer recommend "at least" three coats.

Is this the dried thickness, I assume? I've been spraying the Watco all day, and it seems that this stuff thins out considerably once it dries. Fresh on, though, it seems quite a bit thicker, so I guess its a lot of VOCs at first that evaporate. If I had to guess, I'd say one coat is probably a fraction of a mil, but not sure exactly what fraction.
Application instructions are super easy to find on the internet. I didn't give a link since you weren't the one that uses it. I was warning Bob Vaughan. Measuring wet coat thickness is very easy. The make aluminum "combs" that do that.
 
If you sand until the high until the high areas disappear and the sanding hits the low spots, it will be flat and slick. Once the shiny low spot disappear, it will be flat and you can get the high luster you are looking for.
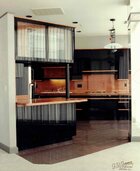
Like I said Webb, I've used hundreds of gallons of lacquer. You don't have to explain the process to me. Making it flat has nothing to do with making it slick, it just makes it flat. Polishing with liquid polishing compounds and power buffing make it slick and provide a much higher luster than just sanding. This is a gloss black kitchen I built and finished for a penthouse condo. The photographer didn't want to shoot at night, so you get to see the reflection of the vertical blinds. Lacquer as smooth as glass.
 

Attachments

  • black lacquer.jpeg
    black lacquer.jpeg
    204.6 KB · Views: 19
Last edited:
When you say fast dry, is that WOP? Or something else?

Regarding mineral spirits...what kind do you use? Here in Colorado the Nanny State, we've been told we can't have real mineral spirits anymore, and all we have are the "odorless" (which stink to high heavens) containing mostly the aliphatic compounds and none of the good aeromatic compouonds. Normal mineral spirits contain both, and the flash points of the aeromatics usually make it a better solvent, as I understand. In the past, I tried using the odorless mineral spirits sold here in Colorado to thin poly, and it seemed to actually ruin it? Whatever is in the odorless mineral spirits we are allowed here in Colorado, they aren't even useful for cleaning anything up, like spilled paint or poly even. The stuff is pretty much useless...

I've often wondered if thinning poly with a more effective solvent might make it work better. I don't know what other solvents would be useful though. I think once I looked at the solvents used by Minwax themselves, and they were some pretty arcane compounds with highly complex chemical names that made little sense to me. Not your average VNMP or Toluene.

It's just polyurethane that dries fast. Their wipe-on poly is more expensive and is likely thinned just the fast dry down a bit. Here in Michigan, we can still get the regular mineral spirits, so that's what I use.
 
Ok, interesting.

So, four mils, four thousandths then right? That seems really thin, but, I don't really know how thick a single coat is either. I have a rough idea of what four thou is...and both cans of my spray lacquer recommend "at least" three coats.

Is this the dried thickness, I assume? I've been spraying the Watco all day, and it seems that this stuff thins out considerably once it dries. Fresh on, though, it seems quite a bit thicker, so I guess its a lot of VOCs at first that evaporate. If I had to guess, I'd say one coat is probably a fraction of a mil, but not sure exactly what fraction.
You can estimate the dried film thickness per coat by looking at the product data sheet to see the percentage of solids and multiply that by the wet film thickness measured with a comb gauge available from any decent paint store. A typical wet coat might be 4 mils, with a 25% solids mix that should leave about 1 mil dry. With non-catalyzed finishes dry film thickness is not a problem but it can be with catalyzed products.
 
You can estimate the dried film thickness per coat by looking at the product data sheet to see the percentage of solids and multiply that by the wet film thickness measured with a comb gauge available from any decent paint store. A typical wet coat might be 4 mils, with a 25% solids mix that should leave about 1 mil dry. With non-catalyzed finishes dry film thickness is not a problem but it can be with catalyzed products.

I don't think the spray can stuff I'm using is even a mil thick when dried. I've spent the day mostly with the (now empty) Watco can. I think I've been estimating my distances wrong, and have been spraying too far away. You mentioned previously that too far, and more solvent can evaporate before it hits the piece. I was going by a very rough rule that a hands breadth is about 6", but I measured mine and its a tad over 8". I think I've probably been spraying from a foot or more away. So I adjusted, and tried an actual 6" and and actual 8", and I don't seem to be getting much orange peel anymore. I think I still need to figure out how much to put on per coat, which I'll do tomorrow.

Burned through a whole can of Watco, and am now on the ProLuxe/Deft. I also don't think I cleaned up the surfaces of these test pieces well enough, so I'm going to rework them tomorrow and sand em to a smoother, better surface and see how clean and smooth a result I can get.

I am not exactly sure what kind of lacquers these are. I doubt pre-cat, they are from a can, but not sure if all canned lacquers are nitrocellulose (which I think can yellow a bit over time??) or something else? For a nice glossy surface, though, I think with a bit more practice (maybe a couple more cans, sadly its a bit of a waste, but) in the long run I might actually be able to use lacquer reliably, which I've not been able to do before. So it might be an option for both glassy gloss, as well as maybe a viable finish for light/white colored woods I don't want to yellow.

I think it was you who shared a shellac brand link in my other thread. That Platina might also be an option, maybe as an initial coat beneath clear lacquer to help bring out the chatoyance more, if necessary, for woods that can benefit from it.
 
I have Bob Flexner's book on "Understanding Wood Finishing." I don't think I've read every single word, but I have read most of it. For any kind of varnish, I don't even bother photographing a piece for a month. I know it takes ages to cure.

@Ed Sandle Thanks for the tip on wait time... I guess I haven't paid enough attention to that, and maybe that is the problem, or part of the problem. For a while, I was even waiting till it was dry, then sanding back, but I don't know that I was waiting for it to fully cure before sanding back...

@Kevin Jenness Someone else mentioned the same thing, that the lacquer needed to flow. I think there is indeed an art to that, as if I put on enough in a given coat, that it has that "wet film" over the whole surface, I often get runs.

I think I need to experiment a lot more and figure out the timing and quantity to get enough flow, and make sure I don't run out the recoat clock.
Even with Laq, once you get past a couple hours, it's a couple days before you can spray again. Honestly I never paid any attention to this either, till one day I was working on refinishing an old school house desk for our granddaughter. The wood top was simple, but the painted framework and legs were giving me fits. I would spray a coat in the morning, sand mid day then try to spray another coat. Would krackle up almost like you were spraying lacq over enamel. So that's what I thought was happening and I would sand again and try misting thin coats on and it would semi work but everywhere I applied more than a mist, it would orange peal badly.
Finally swallowed my pride and called the customer help line on the can. If only reading the instructions, it would have been so much easier. I explained what I was doing and what was happening, and first thing she asked was, did I read the part about recoat times?
Couldn't lie, and told her no, she said try that and call back if that didn't work.
Sanded it again, then waited about 3 days, then applied about 3 coats and waited for it to cure, sanded out a couple runs and sprayed the final coat. Amazing, follow the directions and it worked like a charm.
In all my times in woodturning, I have only put a gloss finish on about 6 pieces at most and when doing that, I have done it on the lathe with it revolving and applied multiple coats as fast as it starts to dry. I did have one piece that had a run once and had to wait for it to cure then sand and recoat. If I do have any nibs from dust or what ever, I will wait for it to cure, wet sand, then wait a few more days to make sure it has fully cured then very lightly buff. I probably wait for double the wait time for curing to buff as if you start buffing too soon and the finish somewhat melts and flows, you are up the creek as to refinishing once you have put wax on.

Interesting stuff. Well, this is helpful. Probably explains some of my problems. The recoat times seem to differ a fair bit between brands. The ProLuxe is 30 minutes, while the Watco is 2 hours. I was probably mis-applying times across different brands in the past.

I do hate sanding lacquer. In my past experience once it is cured its pretty hard stuff, and sanding it was not easy. So once cured...if you recoat...do you still get that "subsequent coats melt and blend with the prior coats" benefit of lacquer? Or once cured, are any subsequent coats actually just layering on top of the cured layer, without melting it and blending into it?

I think what I'm going to do here, is buy a couple more cans and spend some time, really figuring out how to apply lacquer effectively every time. I guess I've had this mentality in the past of not wasting any finish, but I have effectively wasted some cans in the past just because I start using them, then years go by, and they either lose their pressure or something and the cans no longer work. Even if that didn't happen, not using finish is still wasting finish. :P Its probably worth just lacquering some junk items for a while until I can consistently get good results, then I'll know I can use lacquer whenever I need to.

You mention wax...is that from the buffing? I have honestly never considered waxing a lacquered finish... For that matter, I have never considered waxing a poly or spar urethane finish either. With those finishes, I always considered them the only finish, especially if it was supposed to be glossy. The thing about most waxes that I learned some years ago, is they have a crystalline structure, but an irregular one. Carnauba and Bees waxes both have large, irregular crystal structures that lead to them limiting how glossy a finish you can get with them. I learned this probably in 2021, when I started using Pens Plus to finish my pens. That stuff has something called microcrystalline wax, Cosmolloid 80H to be specific...same stuff that is in Renaissance Wax. This synthetic wax has small and very regular crystals, which allows for that ultra crystal clear glassy gloss finish:

EV1KgwW.jpg


Once I learned that carnauba and bees wax just can't produce the same kind of clear result, I haven't used them much. At least, not on anything I wanted to be truly shiny with a glass like shine. Anything else, and wax will help give things a satin sheen.

This also makes me wonder, how much buffing, even without wax and say just your trip and white diamond compounds, might affect the gloss? If you get a glassy gloss finish just out of the can (lacquer, poly or spar, for that matter)...would buffing actually enhance it, or diminish that gloss? Buffing actually does add scratches, right? Super fine, maybe as high as 30,000 grit, but still scratches...that may not exist on an original just cured glossy lac/poly/spar finish?
 
I started another finish based thread a minute ago, and this thought came into my head while writing it. I have tried, and struggled with, achieving a nice glossy finish on my pieces. Maybe to qualify this even more...I am not jsut talking "shiny"...which is achievable to a degree with many finishes, and a lot easier. More specifically, I am thinking GLASSY GLOSS, where the piece is VERY glossy, maybe even mirror finish glossy. I've seen a lot of pieces like this and they often look quite appealing, and at least on some things, I wish I could achieve the same kind of finish on my own pieces. I do like a good satin sheen on most things, but I'd like to expand my skills to include the ability to create a good glassy gloss when a piece warrants it (or when a customer might explicitly want it.)

I tried a lot in the spring last year, particularly with polyurethane and spar urethane, but also oil. With the urethanes, the challenge I always seem to have is streaking or dripping. With oil, by the time I seem to get enough oil on a piece for it to even start getting glossy, it looks like "it has too much oil!" I spent a lot of time trying a variety of different techniques to apply poly and spar, from brushing on with bristle brushes, then foam brushes, then thinning and brushing, then using a foam brush to apply in a very specific manner while the piece was turning at about 50rpm...

I did learn a few really good lessons.

FIRST: Make sure you sand the surface of the wood so its very smooth and clean. Any defects in the wood surface, seem to just get compounded once you start layering on poly or spar urethanes. In fact, with each additional coat, defects only seem to become more and more pronounced! (Honestly not sure why...)

SECOND: DO NOT leave the drying piece anywhere it can pick up dust or other particulate, as IT WILL! Dust and particulate usually lead me to have to cut back the surface of the previous coat, once fully dried, requiring another coat. Then there was always the risk that coat would pick junk up. It seems to take a good 12 hours for a coat to dry well enough and hard enough that it can be scuffed back properly for another coat, which leads to a very LONG finishing process...

THIRD: DO NOT mess with poly or spar after its started to settle, as once it starts to dry, messing with it will only introduce ripples or other defects that will not level out like the initial brush/applicator strokes.

Despite learning these things, I still struggle getting a good, flat, ripple-free, defect-free poly or spar urethane finish. Even if I try to use a satin rather than a gloss, getting DEFECT FREE finishes with these seems challenging.


I then tried just pure oils, but mostly drying oils like Danish or Tung w/ drying agents. Pure oils, just seem to take longer than I can comprehend, to actually dry. I think I spent about 30 days trying to coat a piece in pure linseed oil and get a glossy result, and it just didn't happen. With the drying oils, I started with danish, and on its own I don't think it was possible to get a glossy surface just by adding coats. I did eventually find some videos where people would coat with danish repeatedly for a few days, several times a day, then BUFF it to get more of a shiny appearance...but this was more of a satin sheen, not a glassy gloss. I started experimenting with Tung Oil, a drying one, late last year, and as I built up coats, it seemed like it might actually be able to achieve a nice, good, very glossy finish. However, it suffers from some of the same issues as the urethanes, notably that it picks up all kinds of dusty junk. I thought about placing it in some kind of container to keep the dust off of it, but then you end up starving the finish of the oxygen it needs to cure... I did eventually build up a decent amount of tung oil on a couple of pieces, and while they did appear to be getting shinier, there was something about it that just didn't look...good. It is entirely possible, and likely, that the problem was me and that I wasn't applying the finish properly.

I'm curious how those of you who do achieve good, clear, glassy gloss finishes achieve them, and with what finishes? Are you using just an oil, or a poly, or something else? How do you achieve those beautiful, smooth, mirror glass like results in the end?
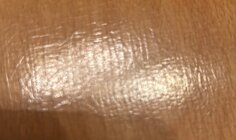
I rarely go for true glassy gloss unless I am doing a fancy shaving brush, or my early pen phase I went through with ca finishes, which can be beautiful if well done. When I want gloss and a fine finish on a bowl, I first give it a good buff with Yorkshire Grit after carefully sanded to 600 or higher if I'm feeling fancy (or until my back gives out). Then just multiple coats of thinned TruOil gunstock finish, applied with a good burnish with old t-shirt squares. If you're patient and enjoy "finishing the finish," as I do, it's just a joy to use, and really makes a special bowl almost glow with its own light, especially on dense woods like bradford pear, but I use it on everything unless I'm going for a nice food-safe finish. Just try it if you haven't already. It' sort of a Formby's style wiping varnish. Some of the most glorious Circassian Walnut shotgun stocks are finished with it-think about that.

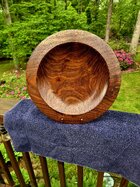
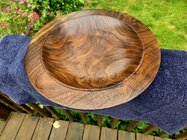
I got the finest finish I have ever gotten on a recent Oregon Black Walnut platter wet-sanded with thinned T and T Danish Oil. Rubbing in light thinned coats followed by lots of burnishing with old t-shirts until cured. I went to 800 grit on the Danish Oil and lots of rubbing it out (don't!) with old t-shirts or cheesecloth in the later coat. I followed that with 3 coats of their thinned Varnish Oil burnished in. That's the key on those oils-light, thinned coats and lots of burnishing, preferably on a sunny deck on a dry, windy day.20250422_090022.jpg. This one just glowed after that treatment. It's shiny without looking plastic (which TruOil can after several coats).
20250422_090142.jpg
There are many turners who finish even larger works with CA or clear-coat epoxy. I've experimented like that (always will), but my Papaw James Reeves logged the mountains of North Carolina and made very prize furniture from black walnut and wormy chestnut. So walnut is in my blood (and putting rashes on my skin if I forget the barrier cream). To me, walnut just needs to be oil-finished for the richness it gives to the wood.
 
Last edited:
I rarely go for true glassy gloss unless I am doing a fancy shaving brush, or my early pen phase I went through with ca finishes, which can be beautiful if well done. When I want gloss and a fine finish on a bowl, I first give it a good buff with Yorkshire Grit after carefully sanded to 600 or higher if I'm feeling fancy (or until my back gives out). Then just multiple coats of thinned TruOil gunstock finish, applied with a good burnish with old t-shirt squares. If you're patient and enjoy "finishing the finish," as I do, it's just a joy to use, and really makes a special bowl almost glow with its own light, especially on dense woods like bradford pear, but I use it on everything unless I'm going for a nice food-safe finish. Just try it if you haven't already. It' sort of a Formby's style wiping varnish. Some of the most glorious Circassian Walnut shotgun stocks are finished with it-think about that.

I got the finest finish I have ever gotten on a recent Oregon Black Walnut platter wet-sanded with thinned T and T Danish Oil. Rubbing in light thinned coats followed by lots of burnishing with old t-shirts until cured. I went to 800 grit on the Danish Oil and lots of rubbing it out (don't!) with old t-shirts or cheesecloth in the later coat. I followed that with 3 coats of their thinned Varnish Oil burnished in. That's the key on those oils-light, thinned coats and lots of burnishing, preferably on a sunny deck on a dry, windy day.


That is one stunning finish!! Wow. I imagine surface prep is just as important as the actual application technique here? I'm definitely better these days with surface prep, and I usually had sand, but I can probably still do better. Your underlying surface there, looks just as exceptional as the finish job! I do indeed like a satin sheen...its actually how I finish most of my pieces. To a satin sheen. Still, sometimes, I just think a piece will do really well, with a glossy finish. I am honestly not sure how many platters/plates or bowls, I'd actually finish glossy. I really like a satin or luster finish on those. I guess, when I think about it, its really more the vases, maybe some boxes, smaller items like that, that come to mind when I think "That glossy finish is excellent!" Kind of like you said...pens with CA. I've finished pens with friction polishes (terrible for longevity/durability), Pens Plus (a special kind of friction polish that includes Cosmolloid 80H microcrystalline wax, which makes the finish glassy glossy with much greater durability), and CA. I like the Pens Plus and CA gloss on my pens. But, I don't think I'd try to achieve that kind of gloss, on a bowl or platter, really. Nor on most boxes, or many other small to medium items. Its just certain items, often vases or other kinds of decorations (I recently made some turned eggs for easter, that I thought would have looked good with a glassy gloss), that sometimes, not always, I think might work well with glossy finishes.

Anyway...wonderful job on that platter. I've been quite inspired by JKJ's finishes. This is on the same level, stunning. If I some day can achieve a finish like this, then I might be able to say that day: I've touched the level of the great finishers of my time. ;)
 
I'm always learning, believe me. I just go the extra mile with a gorgeous piece of walnut. I've started experimenting with a formula that involves thinned coats applied lightly, followed by lots of rubbing and burnishing. And yes, surface prep is everything if you're going shiny. My finishes have gotten noticeably better since I started wet-sanding with the thinned oil those last few coats followed by (you already know). The quest continues.
 
Back
Top