• November 2025 Turning Challenge: Wall Hanging! (click here for details)
  • Congratulations to Craig Morton, People's Choice in the October 2025 Turning Challenge (click here for details)
  • Congratulations to Tracey Lee for "Huggins with Rope" being selected as Turning of the Week for November 10, 2025 (click here for details)
  • Welcome new registering member. Your username must be your real First and Last name (for example: John Doe). "Screen names" and "handles" are not allowed and your registration will be deleted if you don't use your real name. Also, do not use all caps nor all lower case.

Getting rid of surface swirls

Joined
Feb 25, 2025
Messages
402
Likes
514
Location
Jackson, MS
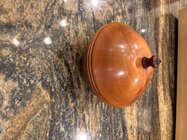
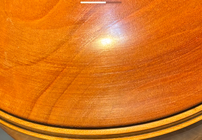
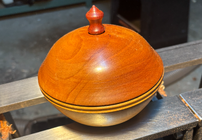
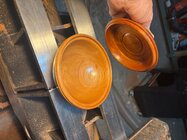
Hope I don’t lose my hair imitating Richard Raffan making a box when I turned this today. It finished out nicely but I can see sanding swirls upon close examination. I can rechuck it without leaving chuck marks and refinish the surface. I’m thinking the course grit sandpaper was the culprit. Also this was a practice project so any helpful advice is appreciated.

If this was you, how would you fix it?

As a side note, my friend and local mentor Gerald Lawrence stopped by the other day to give me a lesson on sharpening bowl gouges. Fortunately I had that figured out before he got here so he gave me a tutorial on roughing out green bowls using my freshly sharpened bowl gouges. He also checked out my new lathe.

He also brought me a piece of Ipe which I’m trying to figure out how to purpose and a piece of bloodwood which I made the finial for the lid of the box. It’s also funny how 2 pieces of cherry are different colors.
 

Attachments

  • IMG_2634.png
    IMG_2634.png
    4.7 MB · Views: 78
  • IMG_2635.png
    IMG_2635.png
    4.5 MB · Views: 76
  • IMG_7624.jpeg
    IMG_7624.jpeg
    407.7 KB · Views: 77
Last edited:
If talking about sanding scratches around the surface of a spindle blank, I have learned several things to reduce/eliminate them.

First, don't apply heavy pressure through the sandpaper onto the spindle blank, just enough pressure to yield sanding dust.
Second, after each grit with the lathe running, reduce the speed to zero and hand sand the length of the spindle blank, against the sanding scratches around the diameter.
Third, don't skip too many grits. I've found it seldom necessary to use the next grit (80 then 100, 100 then 120, . . .) A suggestion I've often read is not to jump more than 150% of the current grit (80 then 120, 120 then 180, 180 then 240, . . . or 100 then 150, 150 then 220, . . .).
If sanding scratches are still pestering when sanding completed, after sanding with the next grit in a sequence reduce the speed to zero and direct a "raking" penlight light along the length of the sanded area to highlight scratches as shadows.
 
I don’t consider those as swirls. You get swirls off a random orbit sander when you don’t get rid of the swirls from the last course grit. To get rid of rings from the course grit, you shut the lathe off and sand with the grain with a thick felt or cork backed sanding block. Another help is to dampen a rag and wipe down the wood with the lathe shut off. This swells up the scratches and fuzz, and makes it easier to sand off when the wood dries.
 
Use better light. Reduce the ambient light level and use a raking light from one or both ends of the lathe across the work to make the sanding scratches more visible. Then work your way through the grits, making sure each one eliminates the previous grit's scratches. Alternating rotary power sanding, hand sanding with the lathe on and/or hand sanding with the grain is a good way to distinguish the marks from successive grits.
 
Some tips to add to those above...

It appears from those scratches that when you were hand sanding with a coarse grit, you might have held the sandpaper in one place (and probably pressed harder than you needed to). When you are hand sanding, make sure the lathe is at a relatively slow speed (maybe 300-400 rpm) and move the sandpaper quickly back and forth (parallel with the lathe bed) so that the wood is contacted by a different part of the sandpaper (and thus different abrasive particles) each time it passes the sandpaper. I find that this matters most with the coarser grits, but helps on all grits.

Also, you could try spending more time on the next-finer grit until you can confirm that the rings from the coarser grit have been sanded away.

The judicious use of an inertial or rotary sander reduces the sort of ring pattern you get when hand sanding with coarse grits.
 
I sand with 3x readers and after sanding a grit with the lathe running I sand across those scratches with the lathe off till there gone. That way I know I got all the previous grit scratches out. Nothing worse then getting down to 320 grit and seeing a 100 grit scratch still there.
 
I’m going to rechuck and lightly touch the surface to start with a new surface to sand. It does look like I was way too heavy handed with the course grit trying to get the end grain smooth.
 
A completely different thought, one I think @Odie would also suggest- spend a bit more time with fine finishing cuts with a freshly sharpened tool. By doing this, you'll find that you can probably skip the course to medium grits (if you determine this is your issue), and move right from tool to finer grits (150/180 and higher). The other advice offered is sound, and should help you get a better surface. Keep at it!
 
A completely different thought, one I think @Odie would also suggest- spend a bit more time with fine finishing cuts with a freshly sharpened tool. By doing this, you'll find that you can probably skip the course to medium grits (if you determine this is your issue), and move right from tool to finer grits (150/180 and higher). The other advice offered is sound, and should help you get a better surface. Keep at it!
That’s exactly what I did this afternoon. Much better. Still room for improvement but I was more pleased with the top curve. Thank you everyone for the tips.
 

Attachments

  • IMG_7627.jpeg
    IMG_7627.jpeg
    479.5 KB · Views: 26
On any face grain/bowl grain orientation, I sand to 400, with an angle drill, and then polish the walnut oil in with the grey scotchbrite pads. Most of the time this works fine, but I have learned over 30 years what needs to be done. Half of it is surface prep. For bowls, I always prefer a shear scrape inside and outside. Round nose scraper on the inside, and spear point on the outside. This leaves me the best surfaces. Having excellent lighting is another huge point so you can actually see what is going on. Some one said, "Never take a finished piece from the shop into the house on a sunny day. Sunlight causes scratches." As close to natural sunlight spectrum as you can get. Also, 80 grit scratches take almost enough work to get rid of, so that some times it is worth going back to your tools for cleaner cuts. If I do start at 80, then I go to 100, 120, 150, 180, 220, 320, and 400. 120 grit will remove 100 grit scratches, with 120, it takes a LONG time!

robo hippy

I've been looking at getting some new tools...first time in a while. A spear point external scraper is one of the top two on my list (other is a three point tool.) Wondering which spear point you would recommend?
 
A completely different thought, one I think @Odie would also suggest- spend a bit more time with fine finishing cuts with a freshly sharpened tool. By doing this, you'll find that you can probably skip the course to medium grits (if you determine this is your issue), and move right from tool to finer grits (150/180 and higher). The other advice offered is sound, and should help you get a better surface. Keep at it!

I think this is truly sound advice. This has been my focus with all my recent turnings...to turn the wood as clean as I can, so I can start at higher grits. Not only does it reduce the risk of ending up with sanding marks, but the sanding process goes much faster as well. Instead of 180, 240, 320, 400, 600 (and maybe more), its often just 400, 600, maybe I'll start at 320.

Does take the right tools, though. A good NR scraper for internal scraping, with a good burr, and the right tool for external scraping, are key IME. I am still lacking a good external scraper.
 
It finished out nicely but I can see sanding swirls upon close examination.

Are these circular sanding scratches or swirls from coarse grits from power sanding with rotating disks?

I don't tolerate circular sanding scratches. For most things, especially face work (bowls, platters, boxes):
I rarely sand by holding sandpaper against a surface with the lathe spinning.

I NEVER use power sanding on a drill. Banished to cleaning rusty metals.

  • I try to make clean, continuous final cuts. Sharp, sharp, shaving sharp tools always. When approaching the finial cut I make several practice "final" cuts so my hands will be ready. This allows me to vary my tool presentation, speed, etc, to best determine what works best with that particular species and piece of wood.

  • Follow final cuts with negative rake scrapers of my own grind after first removing the grinder burr, stropping the edge, and raising a smooth burr with a burnisher.

  • Turn off the lathe, mount the work in a carving/finishing stand and remove any marks from the negative rake scrapers with hand scraping.

  • After hand scraping on most woods I can usually start with 400 or maybe 320 grit. 240 if I'm having a really bad day. Occasionally 600 grit only. I back strips of sanding paper with a flexible Magic Rub eraser - my "soft sanding block". Always use high quality paper - not the place to save money. My favorites are Klingspor Gold for 400 or below, Indasia Rhynowet Redline for 600 and higher.

  • I sand by hand, usually off the lathe. Sometimes sitting in a comfortable chair. Follow each sanding direction by sanding perpendicular (or nearly perpendicular) to the first sanding. If I can't remove the sanding scratches from that grit with the same paper in a different direction, no way I'll be able to remove them with a finer grit.

  • On wide, flat or gradually curved surfaces I might use a 600 grit disk on a pneumatic random orbital sander running at a very low speed, light pressure.

  • When no sanding scratches are visible, I dampen a piece of paper towel with naphtha and apply to the surface. Naphtha dries very quickly and leaves no residue. As the naphtha dries it will reveal any "hidden" sanding scratches since the liquid in a sanding scratch will dry slower than that from the surface, revealing the scratch which will be a little darker. I might do this several times, rotating work in good light to inspect from several angles.

  • After applying finish (usually oil), I often wet sand with fine sandpaper and/or 0000 steel wool to get a surface that satisfies me

I know this is not what many would choose to do but it's what I do and what works for me.

I modify this procedure somewhat when smoothing spindles, especially thin spindles.

Another thing - I know people HATE sanding, I've heard it many times. I don't mind sanding - I think of it as kind of a Zen thing, relaxing, meditative, good exercise...

JKJ
 
I agree with @John K Jordan about my feeling of the sanding task. I see it as just part of the process. Actually, I'm happy to sand, it's anticipatory, it means I'm nearing the end when I can take the piece off the machine and admire the fruits of my labor. Sanding and finishing, the grand finale. Tah-dah!
 
As for which spear point scraper, there are a number of them out there. I did buy a Richard Raffen spear point scraper years ago and didn't like it, mostly because I didn't know how to use it. I now have several in my shop. I had Jimmy at D Way send me some unshaped blanks/square end. I used an angle grinder to cut off the square end and then shaped my own. I think Mike Mahoney has a signature one. I would figure that Doug Thompson probably has one. There must be many others. I have almost all M42 and V10 tools, from Doug and Jimmy.

I do have a 3 point tool some where in my shop. I never use it.

robo hippy
 
I would figure that Doug Thompson probably has one.

I haven't seen one at Doug's, but they are trivial to make from his flat scraper stock. I make them with convex side curves leading to a point. Can shear scrape in tight places.

I do have a 3 point tool some where in my shop. I never use it.

Do you mean one of those 3-facet tools made from round stock that everyone calls a 3-point even though it has just one point? I don't like them either.

What I find FAR more useful is what I call my Wicked Point Tool, also ground from round rod but with a different shape, different facets. I think it cuts cleaner and can make much tighter grooves if needed. I reach of it rather than the skew to make shallow or medium v-grooves, texturing, texture edge cleanup, grooves for friction burning, etc. Gets into very tight spaces but can also shear scrape on convex curves.

I've posted a picture before - sorry to repeat but someone else may have missed it:

point_tool_comp2.jpg

I have 3/8" and 1/4" now, made the first one in 2016.

JKJ
 
I haven't seen one at Doug's, but they are trivial to make from his flat scraper stock. I make them with convex side curves leading to a point. Can shear scrape in tight places.


Do you mean one of those 3-facet tools made from round stock that everyone calls a 3-point even though it has just one point? I don't like them either.

What I find FAR more useful is what I call my Wicked Point Tool, also ground from round rod but with a different shape, different facets. I think it cuts cleaner and can make much tighter grooves if needed. I reach of it rather than the skew to make shallow or medium v-grooves, texturing, texture edge cleanup, grooves for friction burning, etc. Gets into very tight spaces but can also shear scrape on convex curves.

I've posted a picture before - sorry to repeat but someone else may have missed it:

View attachment 81429

I have 3/8" and 1/4" now, made the first one in 2016.

JKJ
Ah, THIS is what I was thinking about. I don't know why they are called three point tools, as its just one point. I think what people are really thinking about is that they are often more three-sided pyramid shaped in terms of how they are ground. But this here, with the curve ground into the top, was really what I want.
 
But this here, with the curve ground into the top, was really what I want.
Thank you!

I'd never seen anything like it (although probably someone sometime did it somewhere) so it was an original design for me. The grind makes a sharper edge which cuts cleaner grooves than many tools, far easier than a skew and with no risk for the intermediate skew user. Thompson 10V steel, ground on an 8" CBN with the platform the same for all three areas (I think - I'd have to check). I use it a lot.

It scrapes the sides of v-grooves instead of cutting but they are pretty clean, especially if shallow and made with good, fine-grain wood. No tearout.

The point tool with three equal facets is probably better for small beads but I can easily do those another way.

I often reach for one to add detail and texture to things like this, delineate other types of texture, make parallel grooves. Since these may be used on horseback on jumping, the texture is important.

1762903874331.jpeg

crops_2015_comp.jpg

Also good for quickly making a shallow v-groove before friction burning.

JKJ
 

Welcome.

The stippled texturing here...do you do that with this same point tool as well? Just kind of jab it in randomly to create the texture? This basically the kind of handles I'd like for each of the coffee scoops I'm trying to make here. A bunch of different, unique designs, with different grooves and texturing (both on the handles and outsides of the scoops.)

I really need to pick up a metal rod and make this tool...
 
The stippled texturing here...do you do that with this same point tool as well?

No, I stipple with a tiny sort-of egg-shaped spiral-cut carbide bit on a Dremel.

Sometimes I'll first turn a raised area, sometimes with slightly tapered side bands.
I use a pencil to mark the extents of where I want the stippling.
Touch (stab) the end of the Dremel bit to a spot. Experiment with rotational speed. I rest my hand on the tool rest.
Move some random amount and repeat, sometimes with random depth for different sized dimples. '
Stay within the two lines. Be careful not to carve too far from the lines.
When all the way around, I clean up the edges (which are never perfect) with grooves.
Smooth everything else and apply finish.

All this takes a bit or time but not too much for small areas.

Here a student is stippling a crop handle, making a rider's crop for a friend.
(I did the turning since she wasn't interested!)
Second picture: using the drill bit as a mandrel for finishing up the end and prepping for finish.
1762915721858.jpeg
After stippling and cleaning up the edges I'll go over the area lightly with 600 grit paper to remove any "fuzzies".
I might fold the sandpaper (Indasia Redline Rhynowet 400 grit) to sand in the grooves

I've been stippling for years with the same Dremel and the same bit.
I also use lots of other texturing techniques - some are described in my texturing document.
I sometimes use the wicked point tool to do what I call distressed texturing, as in the top wand in the center pic.
More of this is in the texturing document.

I spent about 100 hours turning, carving, and texturing the bowl in the upper left.
Texturing stoppers, wands, and handles, and bottle stoppers are very quick.
1762915810408.jpeg

Stippling on the lid of an African Blackwood box.
1762917367966.jpeg


I really need to pick up a metal rod and make this tool...

I buy 1/4, 3/8, and 1/2" round rods from Thompson Tools. I keep a half dozen or so on hand in case another idea hits. I also use them to grind small NRS.
I shape by hand on the 60 grit CBN and sharpen on the 600 grit CBN wheels. Maybe practice on cheaper HSS.

JKJ
 
Back
Top