• June 2025 Turning Challenge: Turn a Wand! (click here for details)
  • Sign up for the 2025 AAW Forum Box Swap by Monday, June 30th (click here for details)
  • Congratulations to Walker Westbrook for "Archaeological Record" being selected as Turning of the Week for June 23, 2025 (click here for details)
  • Welcome new registering member. Your username must be your real First and Last name (for example: John Doe). "Screen names" and "handles" are not allowed and your registration will be deleted if you don't use your real name. Also, do not use all caps nor all lower case.

Glue up question

Joined
Dec 25, 2019
Messages
80
Likes
33
Location
Glen Spey, New York
I want to glue up two 6/4 oak boards along the long grain to get a wider board for a platter. Then turn the platter keeping it square and dishing out the interior, finished thickness I think about 1/4-3/8"
Question is should I have a straight 90* square glue line or should I rip the boards at some sort of a bevel angle to give a little more glue surface area.
 
Bruce, if you join them with a 90* joint, you will see the 90* on 2 sides of the platter when it’s finished. If it’s other than 90*, to me it would look odd on the edge. Being 6/4 stock, I’d think you would be fine with 90*.
 
Yes is see what your saying about looking odd, I think it might look like a line of ///// going up the side as the platter edge rises.
90* it is “Let it be said, Let it be done”

Thank you for your reply.
 
Do a 90 degree joint as suggested. I did one once on a skewed angle like that and it didn't look right. and it was hard to clamp. Another thing to keep in mind is try to match the grain the best you can. Flip the boards around and see what looks best. Sometimes you can cut a small amount from the width to get a good grain match.
 
Last edited:
Yes is see what your saying about looking odd, I think it might look like a line of ///// going up the side as the platter edge rises.
90* it is “Let it be said, Let it be done”

Thank you for your reply.

If you ripped strips of the board, and glued a bunch of strips at an angle (say 45°), I think that might look pretty interesting. If you just had one single seam, though, yeah, I think that might look odd. But your `/////` made me think you were intending to cut many strips, and if that's the case, the angle of the strips vs. the grain could look interesting, I think...
 
A straight joint is absolutely fine but I’d recommend gluing 3 pieces together rather than just 2. When you glue 2 together with a central joint, there is a lot of pressure on that join once you’ve turned a disc and you’ll probably find the joint opens up in quite short time. Making it in 3 will reduce pressure on the joints and give a better chance of longevity.

Hth

Richard
 
@ Vincent, yes I did exactly that, planed the joint down and matched it the best I could. It's actually very difficult to desert where the seam is the way I jointed it.

@ Jon, No I did not mean a bunch of strips glued on a bevel but that might look cool. No I just meant a single straight line 45* bevel. It's going to be a shallow asian style platter or very shallow rectangular bowl with curved but square edges ( at least what I vision) The //// were just what I pictured it would look like as the seam went up the rise in the side to the edge...probably wrong as I think about it though.

I'll post pictures when I'm done, thanks for to all for help.
 
The quality of the joint is most important. Also not squeezing every last bit of glue out of the joint. The wood glue we now use makes the joint stronger than the wood. With a bit of grain matching, you might not even see a joint in the finished product.
 
If one had the right jig/skills, what I think might look cool is to join the boards using dove tails. Just tail to tail, no pins. On the other hand, that may just look weird.
 
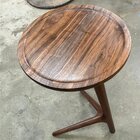
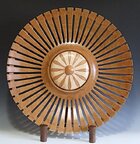
I do a lot of glue ups to get a wider piece. No problem with 90 degree edges if you pay attention to details. Most are two board glue ups with a slip-match. The first picture of walnut is a end table that I build. The glue line is right in the center. These start with lumber at 7/8" and end at about 5/8" thick. In the second picture the lumber starts 6/4 or thicker and ends up being a 1/4" thick or so.
IMG_5241 - Copy.jpgDSCF1808.JPG

I did a quick search to see if I could find something about slip-matching and found this excellent utube that may be of interest.

View: https://www.youtube.com/watch?v=nOmeNwgfFSQ&t=647s


When making this type of glue up I like a freshly machined edge to glue. I check the fit closely and use Titebond Original. If I do my part the glue joint will be stronger than the wood.
 
Joints cut at other than 90* require some method to keep the pieces from squirming out of alignment. Common methods like splines or tongue and groove can be hard to hide in a turned piece but cauls on each side of the glueup can be used to keep things in line if you are going for a decorative scheme. Cutting through a glueline at an angle will accentuate its visible thickness.

Using one rather than multiple gluejoints in a platter will not increase the "pressure" on the joint or be more likely to delaminate. The important thing is to have your pieces at equilibrium moisture content with conditions in service.
 
A single 90 degree glue joint will be just fine. I generally plane both edges together by hand in my vise. This way if you are off of 90 be a couple of degrees you still end up with a perfect glueing surface.

Just don't make the mistake of using a recess like I did early on in my journey. That really puts pressure on the glue joint😄
 
FYI:

I don't know if this will work for everyone but to access the degree symbol on your keyboard:

Hold ALT key down
Enter 0176 on your numbers keypad
Release ALT

Like so...... 90°

=o=
 
12/4 stock, or thicker, bandsaw ripped in two and bookmatch edge glued back together would look great if the wood had lots of figure. Test the figure appearance of both long edge matches for different mirrored image patterns. The glueline itself then simply becomes a mirror, of sorts. This is not the point of the original request, but it came to mind reading the thread.
 
º
FYI:

I don't know if this will work for everyone but to access the degree symbol on your keyboard:

Hold ALT key down
Enter 0176 on your numbers keypad
Release ALT

Like so...... 90°

=o=
On a Mac - hold the "option" key and hit "0"(zero) ... º Don't know if that works on other non-Mac keyboards, but I think they all have a few of those weird keys on the bottom row. ☺️
A few more: "option" plus $ = ¢ / plus letter O = ø and Ø (caps) for diameter / plus letter R = ®

Non-Mac - (I think these will still work). ALT key plus 0216 = Ø / plus 0162 = ¢ / plus 0188 = ¼ / plus 0189 = ½ / plus0190 = ¾ .... although it might be simpler to just type those in.
 
FYI:

I don't know if this will work for everyone but to access the degree symbol on your keyboard:

Hold ALT key down
Enter 0176 on your numbers keypad
Release ALT

Like so...... 90°

=o=

Don't know about Apple software but Windows has a Character Map program that gives all the codes or lets you copy and any symbol for pasting.

And for a edge glue joint, a caul might be necessary. I use them when gluing multiple strips to make cutting boards, even though all my cuts are precisely 90°, or as close as my PM table saw can cut.

JKJ
 
I do a lot of glue-ups for turning. Virtually all come straight from a clean tablesaw cut or from my thickness planer with good results. I’d echo the comment to plan joints such that you cut as near perpendicularly as possible on the lathe as shallow lathe cuts through a joint will accentuate it by spreading the few mils of the joint over a wider surface. Also, Titebond3 works well for dark wood joints but will show significantly on lighter woods, I’ve adopted using Titebond 2 Extend for nearly all glue-ups as it leaves the clearest joint and is about as water resistant as T3.
 
A single 90 degree glue joint will be just fine. I generally plane both edges together by hand in my vise. This way if you are off of 90 be a couple of degrees you still end up with a perfect glueing surface.

Just don't make the mistake of using a recess like I did early on in my journey. That really puts pressure on the glue joint😄
Glad you included that in your post, I was going to use a recess for holding but now I will use a glue block instead .

You figure you need 6/4 to get 1/4" thick? I would resaw one board, get a beautiful grain match, and have plenty of thickness for 1/4" thickness.
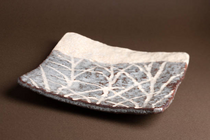
no not to get the thickness but rather to get the depth of the platter, It'll be a rectangular dish/shallow bowl with the corners elevated and the center and sides concave.
Kind of like this but made of wood obviously. 1751195884109.png
 
Back
Top