Well circa 1998 or so.
As I recall the way the process works is you have a blank 18-24” long.
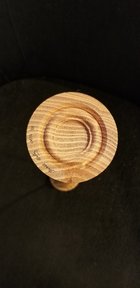
Hold the square in the chuck. Turn a long tenon on one end. Turn a slight concave in the end and sand it this is the finished bottom of the bottom. Add a couple decorative grooves on the bottom. Then cut in about 1/4 above the bottom a tiny bit to create the edge of the top of the goblet base.
Cut a decorative groove. The diameter of the base is set so the groove is a perfect circle
Reverse and chuck the long tenon. The 1/4” base will be in the chuck.
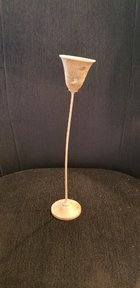
Round the cylinder, Remove the tailstock, hollow the cup. Sand the inside of the cup. Shape the outside of the cup.
Bring the tailstock up to the up. Stewart packed the cup with tissue. Rubber chuckies do that job now. I’ve also seen people use styrofoam and rubber balls inside the goblet cup to rest the live center against to turn the outside of the cup into the stem.
Now the goblet can be re chucked so that it is held in the decorative base groove.
The stem is turned from the cup to the base.
After about 4” of stem tape the cup to the live center and use the tailstock to pull on the cup rather that push.
Before taping Sand the outside of the cup and 3” of stem.
The pulling reduces wobble in the stem.
After 6-10 inches of stem add a string steady
Turn the rest of the stem. Every couple of inches sand the stem,
Last make finish cuts on the top of the base trying to remember how deep your concave went.
When I do the split hollow-form seed jars. I finish turn the bottom and the opening inside the tenon.
I turned one of these for after dinner entertainment at SWAT-2017 along with Trent Bosch. Trent turned a traditional hollow form in an informal race and finished first. A fun time. Since then I have done several of these in club demos and also did a club workshop where students turned them...

www.aawforum.org