• Congratulations to Rick Moreton, People's Choice in the July 2025 Turning Challenge (click here for details)
  • Congratulations to Michael Foster for "Costa II" being selected as Turning of the Week for July 28th, 2025 (click here for details)
  • Welcome new registering member. Your username must be your real First and Last name (for example: John Doe). "Screen names" and "handles" are not allowed and your registration will be deleted if you don't use your real name. Also, do not use all caps nor all lower case.

Help diagnosing why I bounced a bowl off my face shield

Joined
Jun 3, 2007
Messages
16
Likes
9
Location
Norwich, CT
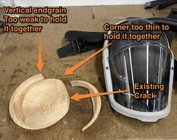
As you can see in the picture below, I had a bowl come apart on me. Luckily, I was wearing a face shield, so when the bowl came off it bounced off the shield and came to rest a few feet away. I’m trying to understand what happened, to try and not do it again.

This was a rough turned elm bowl about 7-1/2” in diameter. It had been drying for almost 10 years. I had turned a recess on the inside of the bowl and had it mounted on 5” dovetail jaws in expansion mode, so that I could practice my 40/40 style grind push cuts on the outside without the tailstock in the way.

I had finished the last of the finishing cuts and was about the stop the lathe when the bowl came apart. I was turning at approx. 800 RPM, so I don’t think I was turning at an excessive speed for the size of the bowl. When the bowl came apart, I wasn’t making any cuts at the time, the bowl was just spinning, so it wasn’t catch induced which would be easier to understand.

Thoughts on what might have cause the failure. My thoughts so far are: 1/I put too much pressure when I expanded the jaws and as I thinned the wall with cuts it was just too much force, 2/there was a crack I didn’t see from drying and as I thinned the wall it let go? Other ideas? Precautions I should take on the next one I turn this way?
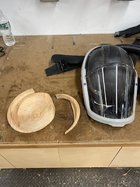
IMG_1114.jpeg
 
I vote #2 , looks like stress fractures following the grain , I have had a couple of those myself, and only been bowl turning about a year , may be a bit more...

as far as prevention , there's none to prevent the cracking and separation , really, but I'd think you would have heard or felt a difference in the sound or feel (Though I suppose getting in tune with the "feel" may take a lot more practice, but I been doing that since I went deaf at age 6) - usually I am able to feel through the tool, usually or just through the vibrations on the machine, when there's something out of whack in the bowl such as a crack - I often will tap the bowl with the side of the tool every so often while I am adjusting or inspecting after a cut or cuts, and it does result in a detectable difference in "tone" when there's something amiss.. I am one of those that will stop every few cuts and take a look at my results with the lathe off, so it sort of becomes second nature to inspect for cracking and defects...
 
Most likely #2, positioning yourself outside the zone where the item being turned is most likely to travel if it comes loose is your
best preventative measure. Some turners will move the headstock to the tail-stock end of the lathe and where they have better
access to the inside of the bowl when turning, this position usually puts you outside of the danger zone. Standing off to one side
of the other of the spinning bowl will also keep you out of the danger zone, when a bowl comes off its mount while turning it spins
in the direction it will be moving in when it contacts the lathe ways or tool rest, at that point it may deflect slightly but the momentum
of the bowl usually keeps it going in that direction. Until the spinning item has depleted the energy built up into the spinning mass, the
item will continue spin and bounce off of any surface in its way. Many years ago, I had a work piece come out of the chuck jaws, hit the floor,
bounced off the wall behind me, and then hit the ceiling before dropping to the floor. A lot of energy is stored in a spinning mass, the heavier
the mass and the speed it is turning will determine the potential energy being released.
 
Cant tell for sure but there appears to be very little wood outside the rebate. That's asking for it to come off the lathe. I'm a tenon fan myself. I've thrown a few bowls over the years due to improperly made tenons in my early tears but never had a bowl explode.
 
Cant tell for sure but there appears to be very little wood outside the rebate. That's asking for it to come off the lathe. I'm a tenon fan myself. I've thrown a few bowls over the years due to improperly made tenons in my early tears but never had a bowl explode.
I think I turned the rebate a lot deeper than it needed to be, and aguably took one too many cuts on the outside. The surprising part for me was that I was done cutting, then the bowl came apart just sitting there spinning.

I like tenons also, but hard to mount a rough bowl to get full access to the outside for finish turning with a tenon. Since the bowl is still rough I also can't see how I'd use a vacuum chuck. Also I don't want the tailstock in the way, so a friction/jam chuck would not work for what I'm trying to do. I've seen and heard of other's doing this successfully, so I'm sure it's something I did wrong. I haven't lost anything off the lathe in years, so I was a bit shocked when this happened.
 
Wood that can pull apart gradually pulls apart more and more until it does.

Did the recess hold fail? A picture of recess would be useful


If the recess held-
My guess is a preexisting crack
With the supporting structures too weak to hold it together.
8F8AB2DD-9A59-4ED6-A002-F1C72B9B656E.jpeg
 
Last edited:
a rough turned elm bowl about 7-1/2” in diameter..... I had turned a recess on the inside of the bowl and had it mounted on 5” dovetail jaws in expansion mode

Looking at the photo, I agree with John, it looks like the wall is too thin to support an expansion mounting. With a wall thickness of 1/2" or 3/4" I think it would have worked.

As to why the camel's back didn't break the moment the last straw was loaded, it takes time for the fracture to occur once the process is begun.

I understand why you were keeping the tailstock out. So as to alternative holding methods (in addition to thicker walls and less expansion pressure), there's Cole jaws, Longworth chuck and vacuum chucks to consider. These will hold the workpiece, but only to a point, so you need to use light cuts.

If the bowl's rim is thick enough and flat, you can glue on a sacrificial mounting block, then later part this off. (Take the outer diameter and subtract the inner diameter. Multiply the result by pi to get the glue surface area.)
 
Thank you for the kind thoughtful replies so far. I tried asking this same question on a social media group and let's just say got a whole lot of un-helpful feedback that failed to understand what I was trying to accomplish all the way to down right just rude and disrespectful feedback. Been a member here for ages, but for whatever reason haven't posted much. An oversight I need to correct. Thank you again for the salient feedback. I'm off to try another bowl the same way, hopefully with a less deep rebate, not as many finish cuts, and no bounces off my face shield.
 
I had a somewhat similar issue and I believe it was sapwood in the rebate/recess (newbie mistake?) In my case the piece was spalted so I wasn't entirely sure if it was sapwood or if the spalting had weakened the wood somewhat or both. The orientation of the blank was such that the heartwood was towards the lip of the bowl and the sapwood was at the bottom. I believe what John and Mark have said may have been a factor also, there was not a lot of wood around the rebate. I was not hit by the piece and it was at 600 rpm so not as much momentum. So many factors to consider that everyone has mentioned that I will be trying to be aware when I mount my pieces.
I'm very glad you weren't injured and it looks like your 3m helmet held up well.
Money well spent!
 
Last edited:
I'm very glad you weren't injured and it looks like your 3m helmet held up well.
Thank you, Al. Yes the 3M helmet did it's job. I'm hesitant these days to mention it. Half the time I get accused of bragging. I've been turning in an Airshield, and recently a Versaflo for 13+ years, ever since I had a pen blank come apart while sanding and shatter a pair of safety glasses years a go. Was a stabilized blank with some sort of internal defect. I still have those glasses in the shop as a reminder of what can happen from even a small piece of work.

The good news is I just re-turned another elm bowl the same way as the bowl that came apart. This time I turned a far less deep rebate, and it held together just fine for my outside turning. I did turn the inside a bit too thin, but I'm well versed in that sound and caught it before anything came apart. So put one down in the successful outside turning column! I'm usually a pull cut and sheer scrape kind of guy on out outside of my work (been that way for 15+ years), but I'm really liking the finish I'm getting from the 40/40 grind and push cut method. Not sure it's the answer for every situation, but nice to have another tool in the toolbox. Now off to practice some more.
 
Well, as others have said, it is most likely a combination of errors. Yes, you can over tighten inside a recess/rebate. You can do it to the point where it breaks, and/or do it to the point where even a tiny bit of force can make the bowl come apart. Especially if there is already a crack in the wood, and this could have been part of the problem. I like mine snug, but not too tight, and have learned by experience just how much I can get away with. One never ending argument is about which is better, recess or tenon. The answer, to me, is that both are fine as long as they are made correctly.

Second note here, ALWAYS stand out of the line of fire!

robo hippy
 
Definitely cut the wall too thin at the recess. Existing crack may have been an influence, hard to tell without analyzing the pieces.

For what you want to do (40/40 on the OD w/o TS) make sure you leave more material thickness at the clamping area. Plan to remove the thickness on the ID.

hard to mount a rough bowl to get full access to the outside for finish turning with a tenon
Pretty much impossible with a 40/40, but I do a lot of it with an Ellsworth grind. A wing pull cut (no bevel) to get round, introduce the bevel to smooth it, shear scrape to clean up.

In general I prefer tenons due to the situation that happened to you - both work but require different process design considerations.
 
Last edited:
After reading your initial post I was going to recommend a pull cut with the tailstock in place. But, later you said you've done that in the past but wanted to try the 40/40 push cut. As you said, maybe that cut can't be used in all situations.

Re: Vacuum chucking. Since you turned a recess (and I assume flatted the rim) you could have mounted it on a vacuum plate (disc) - but, I would still recommend using the tailstock. You could even make a custom fit vacuum disc to fit your recess if you thought that might be more secure. If you had enough "sucking" power and enough wood thickness you could try using the 40/40 push cut .... just very lightly!!! :rolleyes: Just be sure to stay out of the "Line of Fire". :)
 
Couple other thoughts. If you're going to continue this method of returning, remember that the bowl will be oval rather than round, so it won't perfectly fit the circle of the jaws. (doesn't seem to present a problem with a vacuum chuck, just sayin'). Also, the recess you're mounting into should be as close to the 'perfect circle' for your jaws as possible. If the recess is larger than this, you will be pushing outward with a much smaller portion of the jaws, in the very center of the jaw. Which means, you should position that center of the jaw at 45 degrees from either the flat grain or the end grain, so you're pushing on equally stiff parts of the bowl, and the least likely to split parts of the bowl.

All in all, I would encourage you to consider alternative methods of reversing rough turned blanks. Clearly you're addicted to this hobby by now--get yourself a vacuum chuck! Or choose from the list of choices Mark J. presented.
 
Paul - glad you are okay! You mention you were just getting done with your finishing cuts on the exterior of the bowl.

Pictures can be deceiving, but the rim thickness in the pic appears out of whack. The left side and right side of the rim, in the photo, seem way thicker than the top and bottom part of the rim. Seems to me they should be uniform thickness if you trued up the rim on the interior, where you formed the recess, and you were done with exterior.

Anyway, my 2 cents, the rim looks way too thin to hold with the pressure of the jaws pushing outward. As Mark, and others have said, Cole jaws (compresses) would be a way better option if you don't want to use tailstock support. Of course Cole jaws could crack the wood too if too much pressure is applied.
 
As you can see in the picture below, I had a bowl come apart on me. Luckily, I was wearing a face shield, so when the bowl came off it bounced off the shield and came to rest a few feet away. I’m trying to understand what happened, to try and not do it again.

This was a rough turned elm bowl about 7-1/2” in diameter. It had been drying for almost 10 years. I had turned a recess on the inside of the bowl and had it mounted on 5” dovetail jaws in expansion mode, so that I could practice my 40/40 style grind push cuts on the outside without the tailstock in the way.

I had finished the last of the finishing cuts and was about the stop the lathe when the bowl came apart. I was turning at approx. 800 RPM, so I don’t think I was turning at an excessive speed for the size of the bowl. When the bowl came apart, I wasn’t making any cuts at the time, the bowl was just spinning, so it wasn’t catch induced which would be easier to understand.

Thoughts on what might have cause the failure. My thoughts so far are: 1/I put too much pressure when I expanded the jaws and as I thinned the wall with cuts it was just too much force, 2/there was a crack I didn’t see from drying and as I thinned the wall it let go? Other ideas? Precautions I should take on the next one I turn this way?
Just thought I'd let you know that I am on the same 4040 transition path. I also just turned a huge ash blank that was sitting around my shop for 20 years into a 14x5 bowl and it cracked just as I hollowed it. It was measured at 7% moisture content. Obviously, the change in environment caused enough movement to cause the crack. So these things can happen. I was fortunate enough to have a big 5" tenon on my Vicmarc chuck in compression mode. I heard the crack while I was turning it! If my chuck jaws were holding the bowl in the expansion mode then the combination of the wood stressed and wanting to move, plus the force applied by the gouge, plus centrifugal forces all had to be contained by the chuck. Compression mode offsets all these forces. Expansion mode holds the work but at the same time, it adds its own force in the same direction as the other forces and may add to a blow-up. I was lucky.

in your case, the 5" jaws less 7 1/2 bowl diameter really leaves you with the maximum of 2 1/2 inches which is only a maximum 1 1 /4 of an inch of material on both sides of the recess. A lot of that was turned away, so speculate there was much less than 1 1/4 " remaining. Obvious, not enough to support the usual centrifugal forces and the forces from the changing crack size. Your initial intuition was correct. In the photo of your bowl, you showed the top of the bowl view. Did the bottom view show the crack running across the tenon?

As far as precautions and things that I would change:
You got rid of the tailstock, but you now have the headstock in the way. You can make partial push cuts on the side but you can't make a full curve. This setup LIMITS YOUR BOWL DESIGN. If you need to practice making the bottom of the bowl with all push cuts, then secure a sound blank on a faceplate and have fun without both the headstock and tailstock in your way. Just like Batty does. Practice making all different kinds of curbs, arcs, and ogees.
Most of all I would look at all the videos and feeds from AAW, the web from Batty and/or Ashley Harwood. Follow their chuck-up steps in the bowl-making process and 2nd turning process. IMHO, I think mixing both Elsworth and Batty techniques enhances your bowl-making techniques but overall will inhibit 40/40 progress. I know, it's been 4 years since I began.
I just saw three live Batty sessions at the Totally Turning Symposium. No torn grain, little sanding.... inspiring!
I hope this was helpful
Have fun too!
 
The 40/40 grind push cut is something I'm playing with. I'm pretty much Ellsworth trained, was fortunate to live about 5 hours from his old place in PA so got to spend quite a few days with him when I was just starting out. There's really nothing lacking in his methods, but since I'm an engineer, if it ain't broke take it apart and fix it... I also turn mainly hollow forms, and I'm not seeing a lot of applicability in the push cut style to the way I turn hollow forms. I've chatted with Ashely Harwood, and she agreed that the push cut may not be the best method when turning a side-grain hollow form and trying to work on both sides of the curve. I'm on a self imposed 30-day challenge to turn a bowl a day with the push cut method to try and learn it and then add it to my tool box as an option.
 
Paul, my experience with twice turning is limited, but it appears to me that your approach is unique? How does Stuart (or Ashley) twice turn using the 40/40?
 
The 40/40 grind push cut is something I'm playing with. I'm pretty much Ellsworth trained, was fortunate to live about 5 hours from his old place in PA so got to spend quite a few days with him when I was just starting out. There's really nothing lacking in his methods, but since I'm an engineer, if it ain't broke take it apart and fix it... I also turn mainly hollow forms, and I'm not seeing a lot of applicability in the push cut style to the way I turn hollow forms. I've chatted with Ashely Harwood, and she agreed that the push cut may not be the best method when turning a side-grain hollow form and trying to work on both sides of the curve. I'm on a self imposed 30-day challenge to turn a bowl a day with the push cut method to try and learn it and then add it to my tool box as an option.
Engineer as well. I’ve not tried Stuart’s full bowl method due to the need for the jam chuck to do the OD. Just a pita to make all those jam chucks. I make more NE vs flt rim bowls anyway so I use the same methods for both.

I do use the 40/40 where possible, such as roughing out the shape with big push cuts, rough hollowing out bowls, and the steeper wall bowl finish cuts. I use it for roughing hollow forms and yes using push cuts the wrong direction - just removing material - but it is an opportunity to practice tool control.
 
Paul, my experience with twice turning is limited, but it appears to me that your approach is unique? How does Stuart (or Ashley) twice turn using the 40/40?
Mark, I was so interested in how they did it that I bought Ashley's Bowl Turning video from TWW Guild. Her process looks like this:
  1. Use a friction chuck with the open part of the bowl towards the headstock and the tailstock into the bottom outside of the bowl to true up the tenon from the first turning, or in my case turn a tenon since I'm dealing with cored bowls.
  2. Reverse the bowl and hold it in a chuck by the tenon. Foot of the bowl is towards the headstock.
  3. Turn a shallow recess on the inside of the bowl.
  4. Reverse the bowl and use a chuck to expand into the recess on the inside of the bowl, open part of the bowl is now towards the headstock.
  5. Turn the outside of the bowl unimpeded
  6. Once the outside is done, reverse again and hold by the tenon on the foot and turn the inside.
  7. Reverse once more, holding with either a jam chuck, or in my case a vacuum chuck, and finish the foot.
Hopefully that's not too confusing. It's actually much simpler to do, then to type out.
 
due to the need for the jam chuck to do the OD. Just a pita to make all those jam chucks
I don't use his jam chuck method either. I use a vacuum chuck. I saw in one of his YouTube demos that he said the jam chuck is great to turn a very thin wall bowl, his comment was he'd use it for a 1/16" Cocobolo bowl he'd sell for upwards for a grand. But for a run of the mill salad bowl, he'd just throw it on a vacuum chuck to finish the foot. I think it was Bruce Lee that said something like, "Absorb what is useful, reject what is useless, add what is essentially your own", so for me the jam chuck doesn't add any value, but I may try it at some point to mess around with really thin wall bowls.
 
If I was going to twice turn bowls, I would mount the blank using a jamb chuck in the headstock and the tailstock. The jamb chuck would not be an exact fit like Stuart uses for his demo bowls, but some thing similar to the inside shape of the bowl, and it is only used for returning the tenon. You can also turn most of the outside of the bowl while it is engaged in the jamb chuck. Then reverse and finish turn the inside. If you want to practice a push cut with the 40/40, then use a face plate on the top side of the bowl blank, or I just drill a recess for my chuck. A 2 5/8 forstner bit works perfectly for my Vicmark chuck. I prefer to slide the headstock down for my bowl turning. You can also get a lot of practice with that push cut when turning most of the inside of a bowl.

robo hippy
Once again our woodturning terminology rears its ugly head. Your "jam" (jamb?) chuck is what Paul (and I) calls a "friction" chuck - or perhaps a "pressure" chuck - which doesn't work without the tailstock. Paul didn't want the tailstock in the way so he could practice his 40/40 push cut.

You're right - a different mounting method (i.e. faceplate) would be best to practice the cut.

He was re-turning a rough turned bowl, so perhaps a 40/40 push cut is not an option here without a tailstock.
 
Yes, I avoided using the term "jam" or "jamb" chuck in my discussion. Stuart and Harwood use a jam chuck in a very specific way in their method of turning and I was hoping to avoid confusion....

As to my original question, I did glean enough information to address my initial problem. I have re-turned several more bowls using my original method with 100% success. I do believe I had cut the original recess too deeply, and applied too much pressure, and perhaps there was an internal defect. Regardless I have learned from my mistake the the feedback here and have been finding success.

As to the commentary on other methods of turning the outside of a bowl, I have stayed out of those conversations. Simply because I am looking to perform a specific technique in a specific way for the moment. One that I'd like to master a bit and add to my repertoire. Not that it's any better or worse, just one that I want to work on. I'm Ellsworth trained, having spent several weekends with him when he was still in PA, and well versed in the pull-cut and shear scrape method of finishing the outside of a bowl. From this discussion, I have several new ideas to try for outside bowl finishing, ones that I will try out once I'm done with my 40/40 grind and push cut experiments. I feel the more methods I have in my toolbox the better.
 
I did identify a bit of torn out endgrain with what Ellsworth calls the slicing cuts, that then required some shear scraping cuts, as he calls them, to clean up. With the 40/40 and push cuts I got not torn endgrain. Net end result was an equivalent surface. In the case of the slicing cut + shear scraping cut I did not have to remount the bowl while wile with the 40/40 and push cut I did have to mount on to the internal recess to get full access for the push cut. So in the end one method required two cuts and a single mounting. The other method required one cut, but took two mountings to get get ready for that single cut.

At the end of the day, I'm mainly a hollow form turner and will be sticking with my pull cuts. I do a batch of bowls once a year for the holiday season and don't see myself shifting to the push cut method for the couple of dozen or so bowls that I do. That's what works for me. For others it may differ, but it's always good to have options.
 
I also just turned a huge ash blank that was sitting around my shop for 20 years into a 14x5 bowl and it cracked just as I hollowed it. It was measured at 7% moisture content. Obviously, the change in environment caused enough movement to cause the crack.

Actually, the cause of the wood cracking is internal stresses being disrupted when part of the wood is removed (this includes intrinsic stresses that are the result of balancing the mass distribution of the tree against the force of gravity and also stresses that develop as a result of shrinkage as the wood dries). When wood is harvested, the stresses that were previously in equilibrium cause the wood to warp and split until once again in equilibrium. When a piece of wood is mounted on a lathe and material removed, the equilibrium of internal stresses is once again disrupted which will cause the turning to warp and occasionally crack until equilibrium is restored. Green wood usually warps without cracking. Dry wood is usually stiff enough so that warping is minimal, but if the stresses are great enough, it could cause the wood to crack.
 
At the end of the day, I'm mainly a hollow form turner and will be sticking with my pull cuts. I do a batch of bowls once a year for the holiday season and don't see myself shifting to the push cut method for the couple of dozen or so bowls that I do. That's what works for me. For others it may differ, but it's always good to have options.
Similar experience.
I have used the 40/40 a wee bit. I think the surface made by a pull cut with an Ellsworth grind is at least a good and maybe a bit better than the 40/40 push cut.

I do find the 40/40 my preferred tool on platters. With shallow curves on the rim.
I don’t often do platters but it is easy to use the 40/40 as I turn the bottom side on a screw Mount and the shallow curve on the rim goes with the 40/40. Need the Ellsworth for center bowls.
 
Actually, the cause of the wood cracking is internal stresses being disrupted when part of the wood is removed (this includes intrinsic stresses that are the result of balancing the mass distribution of the tree against the force of gravity and also stresses that develop as a result of shrinkage as the wood dries). When wood is harvested, the stresses that were previously in equilibrium cause the wood to warp and split until once again in equilibrium. When a piece of wood is mounted on a lathe and material removed, the equilibrium of internal stresses is once again disrupted which will cause the turning to warp and occasionally crack until equilibrium is restored. Green wood usually warps without cracking. Dry wood is usually stiff enough so that warping is minimal, but if the stresses are great enough, it could cause the wood to crack.
Ok, thanks for a more detailed explanation. So, what methods would you use before or while turning to reduce the cracking from equilibrium changes from this old dry wood? I have a lot of blanks that I collected and saved up for retirement. It's nice to creatively fill cracks once in a while. Not so much all the time.
 
As you can see in the picture below, I had a bowl come apart on me.

With my senior citizen eyes, I can barely tell there is what's left of a bowl. :) If you could post some much larger close-up images of both sides with views from various perspectives I think that it would be a considerable help in getting opinions that would be more than guessing.
 
Ok, thanks for a more detailed explanation. So, what methods would you use before or while turning to reduce the cracking from equilibrium changes from this old dry wood? I have a lot of blanks that I collected and saved up for retirement. It's nice to creatively fill cracks once in a while. Not so much all the time.

Al Hockenbery's post #7 mostly answer's what I would or wouldn't do. I prefer using tenons and rarely use a mortise or recess especially not for something very thin. Also, certain shapes (such as a small radius transition from a fairly flat bottom to a steep wall) are more prone to failure. I prefer smooth continuous curves that don't have a "transition" from side to bottom. Examples include parabolic, elliptical, circular, and catenary curves. If the wood is "reaction wood" from a limb or leaning tree or certain species such as oak then cracking may be your next design opportunity.
 
I was interested to see that Richard Raffan used the same technique for chucking bowls for second turning in this video remounting roughed bowls. He uses a square end scraper to make a minimal rabbet inside the bowls to accept one of his numerous chucks and get unobstructed access to the outside. He doesn't use the 40-40 grind, though and makes considerable use of standard scrapers both on edge and flat on the rest to get to a point where he starts sanding with 180#.
 
what methods would you use before or while turning to reduce the cracking from equilibrium changes from this old dry wood?
Its not clear if the blank is old and dry, or the roughed bowl is.

For blanks dont leave sharp corners during the 1st turn before drying. Inspect blanks for problem areas - branch piths, inclusions etc that crack while drying or increase stress that could let go during 2nd turn.

For old rough-outs - some boil green rough outs, it may help old dry pieces, somebody may have an opinion. I like to get the ID and OD both very close to round before finishing either to release stress. Leave the most wall wood for your ID mortice. A problem I see with your 40/40 method relates to getting the id/od round before finishing - may not be enough wall wood for the mortice. Even with the 10% rule I sometimes get thinner than intended when rounding out, wood and the particular piece dependent.

Tear out with slicing cut - yes, I get the same. Try a light bevel rubbing slicing cut going the wrong way - rim to bottom. Ellsworth discusses shear scraping this way, so I tried it with light slicing cuts as well. Appears to me to help.
 
I roll my eyes every time I hear about some one who finish cuts side grain bowls with a gouge and proclaims 'no tear out'. Checked one of Stuarts bowls during a break in the demo, and yes, there was not visible tear out, unless you looked closely, but you could easily feel it with your fingers. To me, the whole point of finish cuts is to reduce tear out to a point where you don't have much work left to remove all evidence. Since 2 quarter sections of each revolution of a side grain bowl is going against the grain, there is going to be tear out. Best ways of reducing it can vary a lot depending on the wood. A flat scraper with the burr honed off can leave a very fine finish on hard maple. It doesn't work for big leaf maple. Same for NRSs, since they are still scrapers. A swept back gouge held flat/parallel to the lathe bed is operating more as a NRS than a shear scrape, though I have seen many call that cut a shear scrape. I consider a shear scrape to be the cutting edge held at an angle to the rotation of the wood and the bevel is not in contact with the wood. The higher the shear angle is, the cleaner the cut is, usually. I prefer to shear scrape with scrapers with a burnished burr. The dropped handle method with a swept back gouge, either pull or push cut, with the bevel rubbing can leave a very nice surface, most of the time. Same with using a swept back gouge for a shear scrape. As near as I can tell, the higher the shear/sheer, as in sheer face of a cliff (Lyle's definition), the cleaner the cut is. Most of the time, 45 degrees is sufficient, but some times you need to go higher. Much beyond 60 to 70 degrees and it is more difficult to do. Some woods like green Madrone, green dogwood, and green pear cut like butter with almost no tear out no matter which tool you use. Some like big leaf maple always seem to have more tear out than others. Also huge in reducing tear out is a very gentle cut, and learning how to 'feel' when you are pushing too hard (any fans of the old garage band the Seeds here? Pushing Too Hard). I have been turning a bunch of big leaf maple recently, and instead of starting sanding at 120 or higher, I am having to start with 100 grit. Nothing seems to be able to fix that.... Not shear angle, not 600 grit wheel, not shear scrape, not NRSs.....

robo hippy
 
I was interested to see that Richard Raffan used the same technique for chucking bowls for second turning in this video remounting roughed bowls. He uses a square end scraper to make a minimal rabbet inside the bowls to accept one of his numerous chucks and get unobstructed access to the outside. He doesn't use the 40-40 grind, though and makes considerable use of standard scrapers both on edge and flat on the rest to get to a point where he starts sanding with 180#.

It appears that Richard Raffan copied my method ... years before I "invented" it. :)
 
With many experienced opinions offered here, my observation is the 5" inside mortice on a 7.5" bowl seems out of proportion as I would be using a 2" expanding chuck for that bowl, and have a somewhat flat outside bottom for some structure to expand into. That said I have lost a few bowls with an expanding chuck, mostly when coring. The other observation is the radial crack from the pith, as I never trust those without using the chuck form the outside.
My first experience of a whack on the face shield was a few days ago, removing a 9"core that freed and climbed / deflected right up the Mcnaughten blade/handle to my shield. I know I am supposed to stop and bang it to see if it can free, but I am looking a making a way to use the tailstock to keep some pressure on the center of the core as it is in the way for most coring operations. Guess I need to make a new post for that.
 
Check this out Jim, I used it with Oneway but you may be able to make it work with a McNaughton.
 
Check this out Jim, I used it with Oneway but you may be able to make it work with a McNaughton.
Thanks, Gary. That is a feature I like about the Oneway is the handle is lower that the centerline, allowing it to cross under a tailstock extention. Unfortunately, the Mcnaughten is on the same plane.
 
Back
Top