• The forum upgrades have been completed. These were moderate security fixes from our software vendor and it looks like everything is working well. If you see any problems please post in the Forum Technical Support forum or email us at forum_moderator (at) aawforum.org. Thank you
  • February 2026 Turning Challenge: Cookie Jar! (click here for details)
  • Congratulations to Chad Eames for "Red Tines" being selected as Turning of the Week for February 23, 2026 (click here for details)
  • AAW Symposium demonstrators announced - If the 2026 AAW International Woodturning Symposium is not on your calendar, now is the time to register. And there are discounts available if you sign up early, by Feb. 28. Early Bird pricing gives you the best rate for our 40th Anniversary Symposium in Raleigh, North Carolina, June 4–7, 2026. (There are discounts for AAW chapter members too) For more information vist the discussion thread here or the AAW registration page
  • Welcome new registering member. Your username must be your real First and Last name (for example: John Doe). "Screen names" and "handles" are not allowed and your registration will be deleted if you don't use your real name. Also, do not use all caps nor all lower case.

Holding and Positioning Your Dust Hood

I have a piece of mesh from a discarded fly screen over the mouth of my dust hood to catch the sandpaper that I inevitably let slip while I'm sanding.
Regular (fly) screening probably inhibits maximum air movement. I have a section of 1/2" hardware cloth over my opening.
 
If you want it for collecting sanding dust, use 2 1/2" Loc-Line. It is self supporting, adjustable to any position and stays there. I mounted it using electrical strut channel from Lowes. I also mounted a light using the same strut channel, and I'm going to mount the monitor for my video hollower when I get a chance. Loc-Line 24" long can be purchased at Amazon for under $30. Had to turn a coupler to connect the shop vac to Loc-Line, but otherwise it was a simple installation.

Loc-Line Lathe Hose 2.jpgLoc-Line Lathe Hose 1.jpg
 
@Dave Mueller Is that used with a shop vac or dust collector? Most dust collectors that I'm familiar with have 4-6"ø hoses & fittings. Shop vacs are noisy and could overheat with continued use.
 
I have a plastic dust hood held up by a microphone gooseneck like this:
41eZ4RS2LtL._SL1109_.jpg

The gooseneck is mounted to the lathe stand with a flange mount:

51UE+imZ58L._AC_SL1200_.jpg


The hood is connected with a small adapter piece fastened with a bolt to a hole drilled in the hood:

71e6+UxxjRL._AC_SL1500_.jpg
 
Anybody have a solution for the front of lathe? When I am turning the outside of a bowl all the dust chips etc shoot in the opposite direction as my dust hood. Behind the lathe I have a 6” port attached to a 38” tv bracket attched to a metal pole near the cage mount.
 
Anybody have a solution for the front of lathe? When I am turning the outside of a bowl all the dust chips etc shoot in the opposite direction as my dust hood. Behind the lathe I have a 6” port attached to a 38” tv bracket attched to a metal pole near the cage mount.
Dust collection doesn't work well for chips. There are way to many unless turning small items. It is best used when sanding.
I clean up chips using a snow shovel and put them in 65 gallon trash bags.
 
Made mine telescope toward the lathe 4" powertec duct slides into 4" S&D
 

Attachments

  • PSX_20240227_182601.jpg
    PSX_20240227_182601.jpg
    30.3 KB · Views: 55
@Dave Mueller Is that used with a shop vac or dust collector? Most dust collectors that I'm familiar with have 4-6"ø hoses & fittings. Shop vacs are noisy and could overheat with continued use.
I can confirm this! When I first started I used my old shop vac.. one day it started billowing dark black smoke. I took it to the driveway to cool down and took apart. The armature wrapping was roasted
 
Hi Walter. I'll add a couple of pictures to this old thread, just to keep it interesting. I have an old Rockler dust intake that I used for years at a sanding lathe, and I've attached it to the wall behind my turning lathe. I'm not sure if the part is still available from the source, since things come in and go out of fashion.

I'm typically make dozens of same-sized parts in runs, in the current case handles for custom coffee scoops made from upcycled steam radiator vents. That means that I can keep the same setup for weeks at a time, once I have a setup that works for the specific size part I'm making. I have the dust hose connected to a small Dust Deputy and a stand-alone vacuum because the main shop Clear Vue is overkill for the small amount of dust I get from turning those small spindles.
 

Attachments

  • 20240317_082633.jpg
    20240317_082633.jpg
    622.8 KB · Views: 48
  • 20240317_082538.jpg
    20240317_082538.jpg
    518.3 KB · Views: 48
I thought I'd add my version of a dust hood here as I found AAW forum when searching for ideas for my own dust hood solution. I wanted something that could be moved out of the way or along the bed and, having seen something similar on Glen Lucas's YouTube channel, figured I could build something for an awful lot less than the several hundred pounds his system would cost.

I had a Manfrotto magic arm left over from my time working in the film world so that is the adjustable arm. It's clamped to an old towel rail that was in the 'it'll come in useful one day' box. The bell mouth is 3D printed in sections and glued together, I modified a design I found on Printables.com and scaled to fit the 125mm ducting I use for the dust collection.

That just left a way to hold the hose/bellmouth securely. I ended up designing the black part from scratch. I'm a complete novice with 3d design and used Tinkercad, an online 3d design package built for school kids. You select individual shapes and scale them to fit, the trick was putting them together in the correct order so that the recesses and handle were in the right place before inserting the blank hole through the middle of it all and grouping it to create a single object. I was really pleased that it came out spot on first time off the printer.

The bell mouth is a good friction fit so it can be removed from the duct if needed. As I already had the various bits in boxes, it just cost me a couple of quid for the PETG 3d printing filament.

IMG_8904.jpegIMG_8905.jpegIMG_8906.jpeg
 
I thought I'd add my version of a dust hood here as I found AAW forum when searching for ideas for my own dust hood solution. I wanted something that could be moved out of the way or along the bed and, having seen something similar on Glen Lucas's YouTube channel, figured I could build something for an awful lot less than the several hundred pounds his system would cost.

I had a Manfrotto magic arm left over from my time working in the film world so that is the adjustable arm. It's clamped to an old towel rail that was in the 'it'll come in useful one day' box. The bell mouth is 3D printed in sections and glued together, I modified a design I found on Printables.com and scaled to fit the 125mm ducting I use for the dust collection.

That just left a way to hold the hose/bellmouth securely. I ended up designing the black part from scratch. I'm a complete novice with 3d design and used Tinkercad, an online 3d design package built for school kids. You select individual shapes and scale them to fit, the trick was putting them together in the correct order so that the recesses and handle were in the right place before inserting the blank hole through the middle of it all and grouping it to create a single object. I was really pleased that it came out spot on first time off the printer.

The bell mouth is a good friction fit so it can be removed from the duct if needed. As I already had the various bits in boxes, it just cost me a couple of quid for the PETG 3d printing filament.
Thanks for posting this! I have been using an old Manfrotto magic arm clamped to a 2x4. This is much more adjustable as you can move it along the rail. I will be on the lookout for a rail now.
 
I'm using the stand that came with the big hood sold by woodcraft. But I didn't like it - always in the way, the stand had to be way too close to the lathe, and the hood didn't really seem to be doing anything to capture more dust (for me, anyway). So I "fixed" it.

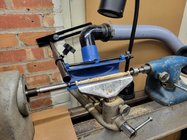
A length of 3" PVC pipe gets the stand away from the lathe, and the 3" PVC coupler fits just right into the pipe on the hood stand. (Couplers for 3" PVC fit just right into the end of a 4" dust collector hose, too).
I put a pipe clamp on the stand's height adjustment so I can just rotate it out of the way. My lathe is not against a wall, so there's room for the stand, and I can just drag the stand out of the way when I need more space.
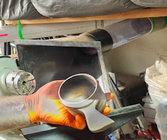
And I turned a bell mouth which seems to really help it capture more dust.
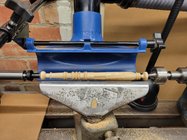
I glued a couple small rare earth magnets to the DC's remote control, and glued a metal bit on top of the PVC. So the switch is right there (but I can move it to another machine).
View attachment 56956
Kudos to you! It really amazes me how few of us turners have actually turned our own bell mouth!
 
an old thread relives! Might as well add to it. I have a homemade lathe stand and this is screwed into it. The DC can slid on the track to accomdate any place I am turning. 1770760464606.jpeg
 
This is what i did. I have a number of hoods i tried (including a Big Gulp) and they all worked well. That stand is one of HF's roller extenstion stands, I just removed the roller. I should point out I only use this when sanding, I don't try to collect the chips.lathe.JPG
 
Back
Top