• July 2025 Turning Challenge: Turn a Multi-axis Weed Pot! (click here for details)
  • Congratulations to Kent Reisdorph for "Sugarberry Bowl" being selected as Turning of the Week for July 14, 2025 (click here for details)
  • Welcome new registering member. Your username must be your real First and Last name (for example: John Doe). "Screen names" and "handles" are not allowed and your registration will be deleted if you don't use your real name. Also, do not use all caps nor all lower case.

Hollow Form Assistance

Joined
Dec 15, 2018
Messages
105
Likes
266
Location
Novato, CA
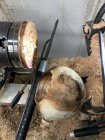
I recently attended an Ellsworth demo. I was inspired to try and complete a hollow form like he did. Turned a log to a sphere then rotated the pith to the side. I made it to point where I thought it would be ok. However when I removed the form from the chuck there was far to much mass in the walls and I re mounted and began to thin the walls again.

As you can see in the photos I took out too much material from the transition point and that was the end of it. What’s your procedure for avoiding this and checking overall wall thickness?

On a side note, David completed his form in seemingly minutes and with such ease. I realize he is a master at his craft but he made it look deceivingly easy!
 

Attachments

  • F999BCDB-F377-4BA4-908B-2FEB53BCDC50.jpeg
    F999BCDB-F377-4BA4-908B-2FEB53BCDC50.jpeg
    507.9 KB · Views: 207
The bottom curve is where many forms fail
Very easy to get it too thin turning the corner.
A spherical form gets pretty easy with practice since the inside is an arc.

steps I use are
Drill a depth hole
hog our the interior leaving the walls thick
3/4” thick a little thicker near the bottom

Thenin 2-3” increments I turn the inside
Wall to thickness. Measure with calipers or
Bent wires
 
A depth gauge that can measure across the rim of the bowl extending to the bottom of the bowl is handy for bowl turning.
You can normally run one hand on the outside and one hand on the inside of the bowl and get a pretty close approximate of wall thickness.
The further you get towards the bottom the harder it is to approximate, this is where a set of calipers really helps for precise measurements.
 
I would add another suggestion: Clean up the exterior, perhaps including sanding before proceeding with extensive hollowing. Otherwise the wood may move significantly before you return to do it later.
 
The bottom curve is where many forms fail
Very easy to get it too thin turning the corner.
A spherical form gets pretty easy with practice since the inside is an arc.

steps I use are
Drill a depth hole
hog our the interior leaving the walls thick
3/4” thick a little thicker near the bottom

Thenin 2-3” increments I turn the inside
Wall to thickness. Measure with calipers or
Bent wires

Thanks Al. I did drill a hole to about 3/4" depth from bottom. I was under the impression that thinning the first quadrant to desired wall thickness was prudent to avoid chatter? I need to find welding wire or the like to make cheap calipers.

A depth gauge that can measure across the rim of the bowl extending to the bottom of the bowl is handy for bowl turning.
You can normally run one hand on the outside and one hand on the inside of the bowl and get a pretty close approximate of wall thickness.
The further you get towards the bottom the harder it is to approximate, this is where a set of calipers really helps for precise measurements.

I have some medium calipers. I use a ruler and whatever tool I am using to gauge depth which for bowls has worked fine. Thanks

I would add another suggestion: Clean up the exterior, perhaps including sanding before proceeding with extensive hollowing. Otherwise the wood may move significantly before you return to do it later.

I am with you. I had it much more consistent but felt a flat spot and kept fooling with it, which was a mistake. It seemed that the wood was moving so much that even shear scraping was bouncing like crazy and had to stop. I haven't had much luck sanding green wood, seems to clog my paper so quickly that it proves useless?
 
First I had a laser pointer, then I spent $10 to get an EBay USB inspection camera, hooked it to a free ancient laptop from a friend, and had a camera system for my homemade articulated hollowing system. Haven't gone out the bottom since I started using a laser. Free hand hollowing is an admirable goal, but I got tired of the vibration going through my shoulder and cutting out through the bottom after all the effort.
 

Attachments

  • hollowforms.jpg
    hollowforms.jpg
    91.4 KB · Views: 29
I started hollowing free hand and kept at it for about about 5 yrs and felt it really helped me to understand the process. I went through many forms as well when I first started and had some terrible catches too. Al is spot on with the wire gauge. One thing that really helped me was to slow down. I started checking thicknesses a lot more marking locations and looking with a light. I started using dry wood for hollowing as I couldn't finish in one session and green wood would just move to much. I know, turning dry is a rougher ride but I felt I learned a great deal about tool control. I also would try and keep my forms to gentle curves and larger openings to see what was happening. Good luck.
 
When I first started doing hollow forms I was chicken and measured a lot. Remember you need to measure wall thickness perpendicular to the wall so you have to move your calipers carefully. measuring often saves a lot of wood. As I got more confident I didn't measure as often and of course cut through a few. then I got a laser rig and that helped a lot but if you don't set the laser carefully and your turning thin you can still cut through. I was working on a camera rig before I sold the house and had to move and build a new workshop. I think that is the most accurate method but again you do have to take the time to set it up accurately. One of the most important things and it takes practice, listen. You can learn to hear a wall getting thin. Then it's time to stop and measure.
 
One thing I've noticed in watching highly skilled demonstrators make hollow forms is that they 'waste' a lot of wood. In other words, the base of the form is nowhere near the chuck, unlike in your photograph. Also, I made some Ellsworthesque thickness gauges out of plastic coated wire, which may have been sold for clothes lines, and they work great. You don't need special wire, just something reasonably stiff but still malleable.
 
I’ve done hand held hollowing up to ~ 8 in but tired of the amount of concentration required to prevent catches and disintegrating a form I had time into. I still do small stuff up to 2-3” depth, ornaments, boxes, by hand held, but now use a captive rig (Jamieson) for anything larger. I use Ron Brown’s laser rig some on hand tools, and now have a camera setup for the captive. The laser is better than just measuring, but the camera is much better - although I learned the hard way that the camera can shift and you can go right thru a wall quickly. I always have my dc on and cant hear the sound change John mentioned very well. I’ve only lost the 1 piece since using the camera, much better yield than measuring or laser.
 
If I was to get serious about hollow forms, I would go with the Trent Bosch method of the camera over the hollowing tip. I am pretty sure there are multiple variations of it, but unlike the laser, you don't have to readjust it for every different tip. Really efficient! The lasers are next best bet, and the bent wire calipers are last on the list...

robo hippy
 
On a side note, David completed his form in seemingly minutes and with such ease. I realize he is a master at his craft but he made it look deceivingly easy!
Why wouldn't he make it look easy? The guy is the consummate professional, devoutly dedicated to his trade for decades. I suppose it's my age. When someone comments with surprise that I do something effortlessly, it brings about a certain twinge of discomfort. I've spent half my life perfecting my skills, if it didn't look like I was a master at it, that means I've failed miserably. In this age of instant gratification, some will always be surprised that they may have some problems after a year or two of effort. "How long does it take to make a hollow vessel like that?" "A lifetime!"
 
How long does it take to make a hollow vessel like that?" "A lifetime!

So true- And that may not be counting the years to grow the tree.

Like the old quote from old turners (Stubbs ??? ) When asked how long does it take to make a bowl.
His response “2 hours and 20 years of practice”
 
Why wouldn't he make it look easy? The guy is the consummate professional, devoutly dedicated to his trade for decades. I suppose it's my age. When someone comments with surprise that I do something effortlessly, it brings about a certain twinge of discomfort. I've spent half my life perfecting my skills, if it didn't look like I was a master at it, that means I've failed miserably. In this age of instant gratification, some will always be surprised that they may have some problems after a year or two of effort. "How long does it take to make a hollow vessel like that?" "A lifetime!"

The person who buys a turning isn't interested in the details ... they bought the turning because they like it. How you got from the tree the final product is your journey. There's no rule that says your journey is superior to what somebody else chooses to do. Having said that, an eye for form and proportion usually comes from experience ... meaning creating ugly pieces as part of one's education. The tools are probably irrelevant in developing one's artistic ability.

I don't have a camera system ... at least not yet, but being a gadget junkie I see one somewhere in my future arsenal of tools.

Trent Bosch is a young guy (compared to me) who has an amazing ability to think outside the box whether it has to do with his artistic creativity or some of the tools that he has designed. I suppose that it's the ultimate compliment that folks are always copying his ideas.
 
I use hollowing systems with lasers. I tried the camera stuff but now you have wires and you have a screen of some sort and you have to watch that screen. With the laser I have no wires or a screen that I can knock off or hit. With the laser I can concentrate on the piece itself. Hollowing by hand gave me the same results, a cut through the side.
 
I had the pleasure of attending a couple of Trent Bosch demos, so I will echo Bill Boehme's comments on Trent (as well as his other remarks). Trent did demo his camera system and I was surprised to see that it left me with a vague sense of motion sickness, but then I don't do well with video games.

I have a laser on my Harrison rig. I position the beam off of whatever portion of the cutting tool I'm using, and reposition as necessary. Then I check up on the laser's position frequently when I'm close to the goal wall thickness (I would do the same with a camera). The Harrison laser has a cord, but it's not in the way. On the plus side, no batteries.
 
I use the Bosch visualizer TV system. I was hollowing successfully for a long time but switching to the camera boosted my confidence to a new level.

I started hollowing with ornament balls around 1990. Took a week long David Ellsworth class 1995- hand hollowed mostly using the Stewart arm brace. 2000 switched to the using the Jamison handle with the lazer.
Got pretty good. Got hollow forms selected for AAW shows.
Demoed hollowing with this setup at 5 different regional symposiums and the AAW.

Met Trent Bosch in 2000 and have been fortunate to have assisted him in classes many times.
He is the most creative guy I know. Using the video camera is just one example of his creativity. Most of the thousands of people who hollow have video cameras and Trent is the one who thought to combine the two.

2012 started using the Bosch visualizer.
About 3 years ago started using the Simon Hope articulated system.
I now do a “high tech hollowing demo”

The foundation I got in David’s class made All the rest possible.


.
 
Last edited:
Back
Top