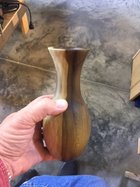
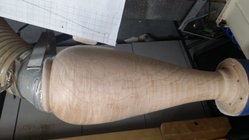
I want to add a sloped neck opening to some of my vase hollow form items. I've seen a pic in the gallery of the style I'm after but no details on best way to go about the steps. I made this one and decided not to attempt until I had a bit more info on the best order of steps. The only video online I found was a large pitcher where he simply turned like the one in the pic (much larger) I have here, cut it off with a saw and shaped with sanding. I would think if I made sure my wall thickness on the spout portion was consistent down to below the cutoff line then I could turn like this one and then cut it at an angle on my bandsaw and then sand to finish. I've seen some with the neck cut fairly straight, others with a slight curve. I don't think cutting then turning the neck opening is the best approach but, I'm the one asking for advice.

-
Congratulations to Chris Lawrence for "Dragon's Grip" being selected as Turning of the Week for March 30, 2026 (click here for details) -
Welcome new registering member. Your username must be your real First and Last name (for example: John Doe). "Screen names" and "handles" are not allowed and your registration will be deleted if you don't use your real name. Also, do not use all caps nor all lower case.
You are using an out of date browser. It may not display this or other websites correctly.
You should upgrade or use an alternative browser.
You should upgrade or use an alternative browser.
How do I add slope to neck of vase?
- Thread starter Randy Anderson
- Start date
- Joined
- Apr 27, 2004
- Messages
- 9,334
- Likes
- 6,159
- Location
- Lakeland, Florida
- Website
- www.hockenberywoodturning.com
i do a lot of curved lips on face grain hollow forms.
I use the contour of the log to shape the lip.
basically turn the outside first then the wide opening is hollowed like a bowl.
On an endgrain you will be better off rough shaping the outside finish turning the inside the finish turning the outside
a good preparation for what you want to do is turning some NE goblets or vases


this pitcher lip is created by hollowing a 1/4 log
i have cut lips like this on endgrain pieces. I stand behind the saw an pull the finished piece through curving the cut.
this lip is formed hollowing through a healed over limb scar
there is goblet thread in the tips forum
also look for a video of a demo by ruddy Lopez
I use the contour of the log to shape the lip.
basically turn the outside first then the wide opening is hollowed like a bowl.
On an endgrain you will be better off rough shaping the outside finish turning the inside the finish turning the outside
a good preparation for what you want to do is turning some NE goblets or vases
this pitcher lip is created by hollowing a 1/4 log
i have cut lips like this on endgrain pieces. I stand behind the saw an pull the finished piece through curving the cut.
this lip is formed hollowing through a healed over limb scar
there is goblet thread in the tips forum
also look for a video of a demo by ruddy Lopez
Last edited:
- Joined
- Apr 27, 2004
- Messages
- 9,334
- Likes
- 6,159
- Location
- Lakeland, Florida
- Website
- www.hockenberywoodturning.com
the way I think of the lipped vessels is a goblet( endgrain hollowing) or small bowl (face grain hollowing) for the rim the bottom of the bowl or goblet is the opening into the hollow form
You might find this demo by Rudy lopez useful
View: https://www.youtube.com/watch?v=X7se6hIfivA
You might find this demo by Rudy lopez useful
Yes, turning and then cutting the rim to the "slope" you like is the easier way to do it, unless you're doing a natural edge. And yes, the secret to either way is a consistent wall thickness. I've done them using a bandsaw to shape the rim. That's a cut you need to be very careful with and use a finer toothed blade so it doesn't try to roll the piece in your hands, maybe even make a jig to hold the piece. A lot of us turners have a 3 or 4 tpi blade on our bandsaw and that's not good for cutting a thin walled vase. For that reason, I usually use a coping saw and hand cut it with the chuck holding it for me. Then it takes a little work to clean it up.
Design wise a vase like that should not contain any straight lines. The example shown is almost there it just needs to eliminate those straight points. The flared lip to beyond the narrowest point or neck should be a continuous concave curve blending into a convex curve for the lower portion of the vase. Once you have that pleasing outside form then you can bore a hole about 1/2" less diameter then the outer diameter of the narrowest point of the neck and continue to turn the inside to about a 1/4" wall thickness. The internal work can be done with a detail gouge in a back cutting format or scraping as R Lopez was doing or with a small ring tool, but always from the center out for a down hill cut.
The picture you show is what I call a weed pot. To my thinking, weed pots are to a woodturner what scales are to a musician - okay, etudes if you make nice ones.
The "fair curve" is challenging and, for me, the push-cut with straight-up flute is what makes it challenging. And when perfected one direction, work on your ambidextrousness.
When doing weed-pots, I put a little dove-tail tenon on both ends of maybe a 8" log, chuck and drill a 1.5" forstner hole about an inch deep, reverse chuck, and then drill a 5/8" hole maybe 5" deep. I then cut the top surface and put the small cone on my Oneway live center. Between centers with a 3/4" spur and the live center, I'm able to shape.
While a simple little give-away, it can be a bit challenging to cut continuous fair curves (no flats allowed), and meet in the middle of the neck with a left-hand and the a right-hand push cut.
Truth be known, I get the same kick out of a well formed weed-pot as I do from a large piece headed for the gallery.
john lucas
AAW Forum Expert
Its just a giant cove. My video on turning coves showed several.ways with different tools. Pick the method that works for you ..go to you tube and type in john60lucas/coves
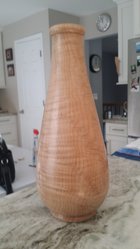

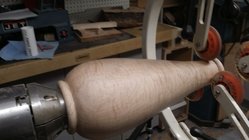
Thanks. I did this weed pot/vase recently and added the sloped neck look. Which I really like. It's not hollow in the bottom so a bit heavy of course. I tell folks that makes them stand up if they put tall items in them for display. I'll need to work on my curves a bit more I think. This one could have used a bit more flare and curve symmetry.
