One more question for those of you have and use this system. How do you store your knife sets and the fingers when not in use? Any pictures of how you store these might be just what I need as I try to figure out how to adjust my turning room to handle this new system so they are out of the way yet accessible when needed.
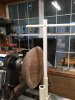
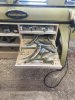
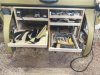
Your second question first: I store the knife sets in a cabinet. Not great and takes room but the different knives do kinda nest together when their arcs are in the air.
Question: there seems to be a wide range of possible core diameters for each knife set. If you choose any of them will the depth still be determined by the zero + desired bottom thickness (+ or -) 1/8 or so depending on placement of Knife post being centered or not? Is there a better choice between using knife set 3 at it's widest diameter setting or Knife set 4 at a smaller diameter to get the same thing? I assume you choose the knife set with the depth you have to work with after the money bowl is marked. If not, please explain.
It took some noodling to get my mind wrapped around why one should choose one knife over another. I needed to draw it out to get an understanding of the differences. In the drawing, the red, orange, and yellow arcs represent the #4, #3, and #2 knife sets (I don’t own the #1). The grey hemisphere is a wood blank and the dotted blue hemisphere inside that is the cut line that would yield 10% wall thickness (the wood’s center line is also shown by a dotted blue line). Look to the center and bottom half of the drawings to see what my words are referring to.

In this first illustration above, the desired bottom thickness is not possible with yellow #2 knife because the wood will hit the knife support tube before the depth is achieved — even though the arc at the beginning is perfect.

In this second illustration above, the desired bottom thickness is possible with orange #3 knife but the coring base needs to be moved away from you for the beginning of the orange arc to fall in the right place. This movement changes where the knife arc intersects the desired cut line but the difference is only about 1/8” thicker than needed at the bottom. However,
note the space between the dotted arc and the solid orange arc — this represents a portion of the wall being thicker than necessary. This is because the center point for the bowl’s hemisphere can not be located at the center point of the knives' arcs.

In this last illustration above, the desired bottom thickness is possible with red #4 knife but the coring base needs to be moved far away from you for the beginning of the red arc to fall in the right place. Like knife #3 above this movement changes where the knife arc intersects the desired bottom center line and the difference is about 1/4” thicker than needed at the bottom. Now compare the space between the dotted arc and the solid red arc — this portion of the wall is substantially thicker than desired.
You
could adjust the placement of the larger knife to cut the beginning of the arc and intersect the bottom center but you wouldn’t really know how far toward the headstock to move the coring base and it still won’t follow any closer to the desired arc than the #3 knife would.
Through all of this I believe the answer to which knife is the best choice is to go with the smallest knife whose depth of cut will reach as deeply as you want. Then adjust the base toward or away from you to get the beginning of the cut to yield the entry wall thickness.
Thank you for asking the question because it helped me visualize what is happening and how that has jibed with my experiences. I believe I’ve chosen too large of a knife on more than one occasion because I’ve ended up with much thicker walls than I expected.


 :mad:
:mad:


")