• December 2025 Turning Challenge: Single Tree! (click here for details)
  • Congratulations to Bob Henrickson, People's Choice in the November 2025 Turning Challenge (click here for details)
  • Congratulations to Steven Gordon for "Dropped Ice Cream Cone" being selected as Turning of the Week for December 8, 2025 (click here for details)
  • Welcome new registering member. Your username must be your real First and Last name (for example: John Doe). "Screen names" and "handles" are not allowed and your registration will be deleted if you don't use your real name. Also, do not use all caps nor all lower case.

Inside Out Twig Pot

Joined
Sep 5, 2023
Messages
166
Likes
640
Location
Doylestown, PA
I made the first one of these for one of our monthly challenges. I made 2 more last week as retirement gifts. They are fun once they are off the lathe, on the lathe they can be scary and frustrating. I would only attempt with a safety/cup center.

1000009580.jpg
I would at the very least sketch out design on the wood first. This piece is 8/4 cherry 5.5" tall, 4" wide. The bottom 3/8 is for a tenon in the future. The top has an extra 1/8" for cleaning up the end. The first axis for turning is 3/8 from the right side. This will let my safety center (1/2") have contact all around. The second axis will be 1" from the left, that way the base will be as wide as possible.

1000009581.jpg
I cut the middle out in the bandsaw. The less you have to turn away on the lathe the better.

1000009585.jpg
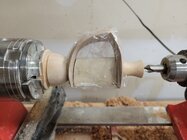
I use my 1/2" bowl gouge for the inside, since it is more substantial than my 3/8" spindle gouge. The section where the wood is parallel to the ways isn't that difficult to turn, it's just like roughing out a spindle blank.
1000009587.jpg
 
The sides are a pain in the rear end. The wood is moving faster but there is more air between cuts. Cutting on the right side(the bottom end of the twig pot) it doesn't feel too bad to do a more traditional push cut movement. Flute pointing at 11:00 and very very very slowly creeping up on the wood and the following along with the curve. Listening to the sound of the cut will give you a split second to correct if you are heading to a catch.
1000009588.jpg
Cutting on the left side still gives me anxiety. I am able to get the best result doing a scraping cut(flute at 10:00) while pushing in. Pulling works too but I get a better finish with the push. Any catches here are a pain as the tear out on end grain means you have to go much further. This is where I had to call it for the night, when I was a pass or two from removing tear out from one catch, I got another, and then another.
1000009589.jpg
This blank was also chipping out a lot, the two I made last week didn't have nearly as much. I will have to do a little more carving to hide it.

1000009591.jpg
 
Looks a little intimidating but I think I’ll try one. But just in case, do you sell them😁?!!
I still think it is intimidating, but you learn more from trying things that are hard. Stay safe, watch your knuckles, and take breaks if you start getting frustrated!

I sell very few things a year, most things stay at home or are given away as gifts. Keep signing up for the forum swaps is probably the easiest way to get one!
I keep a hammer close by to deal with frustration 😁.
I was planning on signing up for the swap but got sidetracked and forgot about it.
 
I did a few more light passes on the inside with the bowl gouge and turned a little bit on either side of the middle with a spindle roughing gouge.
1000009596.jpg

Next the outside gets trimmed on the bandsaw. I went a little too close on this one, there should be a little more meat in the middle. I already had a couple hours into this so I decided to go forwards anyway.
1000009597.jpg

It gets held between the other 2 centers now. A tenon is turned and then it is held in a chuck. The tailstock only has enough pressure to support the cuts. Since I got too close on the bandsaw the wood flexes a bit too much.
1000009598.jpg

I start with the right side. If I had a cone center I would drill the hole first. Right now this is the strongest the wood will be. My only live center isn't big enough to fit in the hole so I drill at the end. Just like with the inside, take light cuts. I find this less scary than the inside, even though the safety center is gone and it is held in a chuck. There is more room to move your tool/rest to get a more comfortable position. For this I mostly used my 3/8 spindle gouge.
1000009600.jpg
 
The left side is similar to the right. I use the roughing gouge to get the middle section and then back to the spindle gouge for the bottom 1/3.
1000009604.jpg

The base should be as wide as possible at the bottom. Of the 3 of these I've made before only 2 would stand up straight.
1000009606.jpg

The turning part of this piece is now done. You can see that there are 2 flat sections on either side of the middle. I mark out sections to grind away with my Dremel. Because I got some bad chip out earlier, I am also taking away 1/16" from the edges.
1000009609.jpg

With the shaping of the inside done it's time for everyone's favorite part, sanding! Starting at 80 grit on the middle section by hand. Then at 120 grit I also sand the base and top with the lathe on. Watch your fingers, it is easy to bump into a sharp corner. I keep going up to 320 grit, occasionally going back down when I notice I missed something. I keep an eye out for the seam where the 2 axes meet, correcting any wavy lines with more sanding. All that is left is to drill the top.
1000009611.jpg
 
I definitely made this one too thin. The wood started bouncing around and wouldn't drill straight. I stopped before I made it 1/8“ in. I found a scrap of plywood and cut it to fit inside the middle. Then I wrapped it up in tape to keep it from falling out. Now it is supported.
1000009613.jpg

After drilling the hole I cleaned up the top with my spindle gouge and started sanding the last little bit. Tomorrow it gets a few coats of shellac, some wax, and then parted off!
1000009614.jpg
 

Attachments

  • 1000009612.jpg
    1000009612.jpg
    307.5 KB · Views: 10
4 or 5 coats of shellac and some paste wax! All that is left is to part it off and clean up the bottom.
1000009620.jpg

I'm surprised it made it, I was half expecting this one to break apart at any moment. It is only a quarter inch of short grain holding up the top. After getting it off the lathe I noticed a few more drops of shellac and touched it up with 800 grit and more wax.

1000009630.jpg

With some dried lavender I saved from my yard this summer.
1000009623.jpg
 
I'm surprised it made it, I was half expecting this one to break apart at any moment. It is only a quarter inch of short grain holding up the top.

Excellent! THANK you for the step-by-step. This would make an excellent club demo.

I'm not surprised you were able to finish the piece. You obviously have the experience and fine tool control to turn anything!

Hey, looking at the finished piece it seems an variation could be fitting a small container in the bottom to hold water for a live flower. Would be take some interesting hollowing! Or hollow from the bottom at some earlier point in the process and plug before reversing. For a live flower, making the top a larger inner diameter could help with hollowing the bottom as well as allowing a few attached leaves to stay on the stem. And maybe a taller version.

Good clean fun!

JKJ
 
Back
Top