Hi all,Just started wood turning, I LOVE IT!, a lot to learn, I was a certified all round machinist for 40 yrs( metal) but wood turning requires quite the learning curve. I've gone through 5 lathes in a few months before finally buying the new Harbor frieght one ( 1hp-14 x 20 ) along with the stand. I love it, variable speed,reverse,adjustable height!!! Now I'm trying to prepare some wood blanks ( no band saw here!). I've coated some with "Titebond" original, not sure how long to wait, cracking has been an issue, maybe I'll try twice turning but boy could I use some advice, any suggestions????
-
Congratulations to John K. Jordan winner of the June 2025 Turning Challenge (click here for details) -
Congratulations to Bobby McCarly for "Hemostatmorphodon" being selected as Turning of the Week for July 7, 2025 (click here for details) -
Welcome new registering member. Your username must be your real First and Last name (for example: John Doe). "Screen names" and "handles" are not allowed and your registration will be deleted if you don't use your real name. Also, do not use all caps nor all lower case.
You are using an out of date browser. It may not display this or other websites correctly.
You should upgrade or use an alternative browser.
You should upgrade or use an alternative browser.
Joe Div
- Thread starter Joe Div
- Start date
Welcome to AAW, Joe.
The best suggestion I can give you when you are starting out is to consume everything on www.turnawoodbowl.com. Kent Weakley is an incredible teacher.
I have that lathe with the Wen branding. I moved up to a bigger lathe so I don't use it right now, but it is a good starter lathe. When processing blanks, you only need (or want) to seal the end grain. Moisture escapes much more rapidly through the end grain. By sealing the end grain, you equalize the drying throughout the blank. I use Anchorseal, but any wood glue or latex paint will work.
As far as how long to wait, there are several answers. One is don't wait at all. Turn it green. If you are air drying your blanks, depending on size, it could take 6 months to 2 years for them to dry down to 10% or so.
so you'd recommend "twice " turning?? I'm not sure of the procedure for turning "green". I did some and they warped!!! Should I turn green then coat with the glue? Please give me a process as I'm a little confused. Also, thank you for the welcome and especially any advice that speeds up my knowledge and ability!!
Dave Landers
Beta Tester
The thing is to get the wood thin enough that it will eventually dry. The longer it sits in a log or chunk, the more it will crack because it dries on the ends but not in the middle - so it shrinks differently and stresses the wood. The sealer (of whatever type) on the end grain will help slow down the drying, but won't stop it.
There are basically 2 common choices for bowls. Both start with green/wet wood, usually turned as soon as practical.
You can turn green to finish. Start with a wet blank and make a bowl. The thin walls will dry fairly quickly. The bowl will warp and move as it dries, so the end result won't be round - will be either oval or wavy or something. Usually you need to get a completed bowl in one session - even a lunch break will let the wood move and make it challenging to complete the process. And sanding usually needs to be done when the wood dries after a few days, so may have to be done by had as sanding an oval on the lathe is difficult at best.
Other option is twice turning. Turn a thick bowl from a green/wet blank. The norm is make the wall thickness 10% of the bowl diameter (so a 5" bowl would have 1/2" wall thickness). For most woods, this 10% will let the wood dry throughout, and there's enough material that once it's dry and oval, you can turn it a second time and there's still something round within that oval. Storing the thick bowls for drying is highly dependent on your environment (humidity, air movement, etc). Recommendations range from "just stack them" to paper bags to plastic to anchorseal ... Find another turner in your area (join a club!) and start with what they do. Anyway, it may take between 9 and 18 months for it to dry. Frustrating when you're starting out to have to wait that long, I know.
Some like the randomness or oval of a green-turned bowl, some need their bowls to be round.
Welcome. Join a local club. Use the search function on this site—I’ve spent hours reviewing subjects already discussed in depth.
thanks guys, I'll look into your advice.
Hi all,Just started wood turning, I LOVE IT!, a lot to learn, I was a certified all round machinist for 40 yrs( metal) but wood turning requires quite the learning curve.
Hello Joe!
I'm sure you will soon be making amazing things from wood! Caution: woodturning is so addictive maybe it should be illegal.
I've been woodturning for over 20 years but a few years ago I got a milling machine and a metal lathe and use it quite a bit. What fun!
Once, a friend came to my shop to have me make some "magic" wands. She had a lot of machining experience, having made equipment she needed for research while working on her PHD. A real eye-opener for her was that woodturners held the lathe tools in the hands instead of cranking on X and Z! I never imagined someone thinking that but that was all the lathe experience she ever had. "We" made a couple of Harry Potter inspired wands for her and a friend.
On the other side of this was a tiny segment I heard from the wonderful and amazing metalworker who creates the Clickspring videos. In one of his series about making a clock he made ALL the parts on metalworking machinery. In one video, he described the freedom and fun he felt when using a "graver" on the metal turning lathe, simply a scraper-type tool used freehand to make curves and more. I think he made a tool rest of sorts. I thought if he loved that, maybe he should try woodturning!
BTW, for those who don't know, you can easily turn metals like brass and aluminum on the wood lathe with woodturning tools.
Brass and aluminum are easy, using scrapers, skew, spindle gouges, parting tools, etc.
Some examples of small things
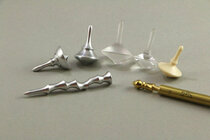
A few days ago in another thread showing one way I like to use small brass turnings:
Form
When I was first starting to turn 30yrs ago I remember reading a comment from Raffan about form. The words were different, but what stuck with me is 'When turning bowls form is what counts, wood tones and grain mellow but form is what you'll see as the years go by.' I think of this often when...
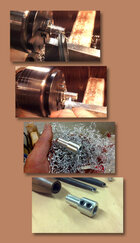
Making custom inserts for tool handles
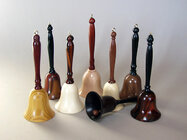
Cast acrylic handbell ornament with wood handle
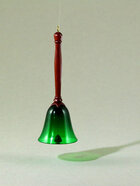
For plastics, don't bother with extruded - go with cast acrylics, available in lots of colors and sizes.
JKJ
Absolutely the toughest part is holding the tools consistent!!!! I also was used to the x n y method ( wouldn't mind having that option on a wood lathe though. I am a bit concered about turning aluminum, the "string" chips generated could be dangerous!! Wher would you get "cast acrylics??"
Absolutely the toughest part is holding the tools consistent!!!! I also was used to the x n y method ( wouldn't mind having that option on a wood lathe though. I am a bit concered about turning aluminum, the "string" chips generated could be dangerous!! Wher would you get "cast acrylics??"
As for holding the tools, I'll repeat what some of the best turners I know, in person and by reputation, have said about tool control - developing expertise at spindle turning can teach the hands and eyes the fine tool control that will allow turning anything, something that the common starting and sticking to turning bowls doesn't always do. So spindle turners, keep at it!
This is where I last bought cast acrylic rod but it's not cheap. There are probably other suppliers.
https://www.delviesplastics.com/p/Color_Acrylic_Rod.html
I've only bought 1.5" rod. I got started on this when someone in the plastics business brought a number of short colored pieces to a class to give away. Almost no one was interested except for me so I took home almost all of them! I wish I could find some short pieces of 3" dia rod - I'd love to try making some lidded boxes, maybe threaded.
One thing, I found out the hard way that the less color-dense plastic got almost transparent when turning thin. Before turning the green handbell ornament, I made a bell part with a nice piece of blue rod. When it got thin it was almost transparent, no good color at all! Duh.. I did have one short piece that looked almost black, but when I held it up the the light I could barely see some green at the thinner edges. When turned thin, it was fantastic. I make these bells very thin at the rim, graduating to much thicker where the handle connects.
In case anyone's interested, here's a handbell ornament made from the rosewood "tulip wood" that got cracked on one trip to Europe. So I cut it in half to show the construction! Look how thick the wall is away from the rim!
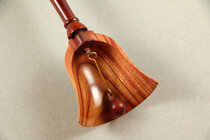
BTW, these ornaments may look complicated to make, but as my piano teacher always said, everything's easy once you know how. I did a demo on these at one TN club - I took blanks for the bells and handles and pieces of brass wire so I could hand out kits. I was surprised - about a dozen people made them and brought them to the next meeting.
The one in the earlier message is the only one I made to completion from plastic so far. I've made a BUNCH of these wood and given them away. I'd go to peoples houses years later and see them in a display case. Made me smile!
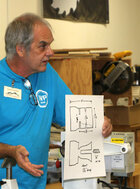
Me at a demo (10 years ago before I lost a bunch of weight!)
And before a club genius set up a state-of-the art video system!
Oh, I didn't think turning the aluminum was the least bit dangerous. Annoying, though, having to stop often to clear aluminum strands that were getting wrapped around the lthe spindle. The same thing with acrylic, worse but easier to clear. Brass, no problems.
JKJ
Last edited:
Dave covered the subject very well. My suggestion is to prepare blanks for drying, including some rough-turned bowls. While those are drying, turn some green wood. Experiment. See how the wood moves. Before long your blanks will be dry enough to turn. You might also consider a drying box. Mine is a 3' cube made from styrofoam house sheathing. You only need an incandescent bulb for a heat source. This article has everything you need: https://turnawoodbowl.com/drying-green-wood-bowls-6-methods-success/.so you'd recommend "twice " turning?? I'm not sure of the procedure for turning "green". I did some and they warped!!! Should I turn green then coat with the glue? Please give me a process as I'm a little confused. Also, thank you for the welcome and especially any advice that speeds up my knowledge and ability!!
Welcome Joe. Hold onto your hat, wood turning is a great ride!thanks guys, I'll look into your advice.
