• June 2025 Turning Challenge: Turn a Wand! (click here for details)
  • Sign up for the 2025 AAW Forum Box Swap by Monday, June 30th (click here for details)
  • Congratulations to Walker Westbrook for "Archaeological Record" being selected as Turning of the Week for June 23, 2025 (click here for details)
  • Welcome new registering member. Your username must be your real First and Last name (for example: John Doe). "Screen names" and "handles" are not allowed and your registration will be deleted if you don't use your real name. Also, do not use all caps nor all lower case.

June 2025 Challenge: Turn a Wand!

Michael Anderson

Super Moderator
Staff member
TOTW Team
Joined
Aug 22, 2022
Messages
1,910
Likes
6,242
Location
Chattanooga, TN
Hi everyone!

This month's challenge focuses on turning something that most folks did when they started out: a wand! Wands can be as simple or as complex as you wish. They can be constructed from a single piece of wood, or be composed of many. They can be wood-only, or they can have other materials included. They can be turned-only, or they can included carved/burned/painted embellishments. You get the picture--there is a lot of room for skillful and creative interpretation. Wands are also nice in that they are relatively thin, meaning you can use cutoffs easily.

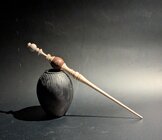
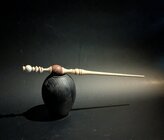
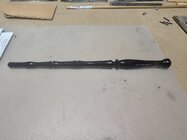
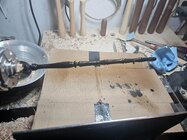
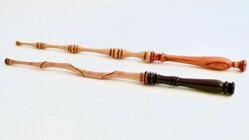
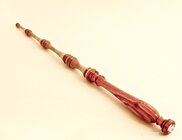
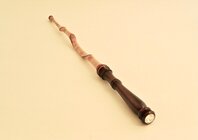
Here are a few inspiring wands to get you motivated (respectively made by Evan Bahr, Ken Wraight, and John K Jordan):

636485135384373963.JPG
638024243076054715.JPG
wands_tangle_P7203955cs.jpg

There are not too many restrictions for this challenge. The wands can be as large or as small as you like, but be sure to include the dimensions in your entry post. I'm excited to see what everyone submits! As a bonus, if anyone creates a wand that is realistic enough to produce actual magic, I will send you a bonus prize. ;)

Whatever you end up creating, be sure to have fun and challenge yourself. Feel free to embellish the wand as desired, or leave it bare wood. Here are the chellenge rules, as determined by AAW Forum legal counsel Dewey, Cheatum, and Howe:
  • Entries must be posted in this thread by ~11:59 pm Eastern Standard Time (EST) on June 28, 2025.
  • Feel free to post a maximum of two photos of your piece in this thread (I will use my favorite of the two when I create the voting thread).
  • Your wand can be any size, embellished or natural, one piece or multiple. Include your dimensions in your entry post.
  • As always, this is a turning contest, not a "moldy oldie" photo contest, so in fairness to everybody, make sure your work is something you have made since this challenge was issued on June 10, 2025.
  • You may not post any photos of your entry in this month’s challenge in any other thread or in the gallery until the voting has ended and a winner has been declared.
  • Voting will take place from June 29, 2025, through 11:59 pm EST on July 1, 2025.
  • Solicitation of votes will result in disqualification.
  • The winner might have to pass a lie detector test before collecting the grand prize of a dogleg high-carbon continental gouge. Good luck, have fun, make shavings, and let the chips fall where they may!!
 
If you haven't read through @John K Jordan's tutorial on thin spindle turning, please do. It is very helpful in general, and very relevant to this month's challenge:

 
If you haven't read through @John K Jordan's tutorial on thin spindle turning, please do. It is very helpful in general, and very relevant to this month's challenge:


Thanks, Sir Michael. If anyone has questions, just ask!

I started making wands when the Harry Potter books came out. Found out immediately it was difficult to control the flexing on a single part wand or other thin shaft (I use no steady rest) but figured out way that always works (it's all in the doc.) I've since made 100s, most of them pretty simple but Harry Potter fans and other magical people love them! I set up in front of the bookstore for a few of the book releases and made them while people watched - I suspect almost none had ever seen a lathe before.

wandmaking_comp1.jpg

Here's a student with her first wand.
I think spindle turning is so important to teach tool control I always start students with the skew. But skew is not required for wands - small roughing gouge, spindle gouges, Hunter tools - lots of ways work. 80 grit sandpaper - have at it. :eek:

Kristina_wand_comp_IMG_7396.jpg

One hint. I almost always make wands from a single piece of wood. But when I made some in two or three parts they were easier to turn since the flexing wasn't a problem. Multiple parts can look great too, for example with contrasting or complimentary woods, sometimes in three or more parts.

I also uploaded a PDF doc about some texturing methods if anyone's interested.

Warning: once Harry Potter fans find out you make wands they all want one!

JKJ
 
Last edited:
NOT AN ENTRY … it’s a “moldy oldie” photo.
These were made in 2010 as Christmas presents for my grandkids. Haven't turned any wands since then.

Tulipwood & Birdseye Maple and a multi-axis Ebony & Curly Maple.
About 12” in length (AIRC) and both have crystals on the butt end of the handle to add some “magic”.
 

Attachments

  • P1000024.jpeg
    P1000024.jpeg
    314.8 KB · Views: 27
  • P1000028.jpeg
    P1000028.jpeg
    403.9 KB · Views: 27
  • P1000029.jpeg
    P1000029.jpeg
    365.9 KB · Views: 27
Last edited:
NOT AN ENTRY … it’s a “moldy oldie” photo.
These were made in 2010 as Christmas presents for my grandkids.

Tulipwood & Birdseye Maple and a multi-axis Ebony & Curly Maple.
About 12” in length (AIRC) and both have crystals on the butt end of the handle to add some “magic”.
Very nice. That multi-axis one is amazing.
 
NOT AN ENTRY … it’s a “moldy oldie” photo.
These were made in 2010 as Christmas presents for my grandkids.

Tulipwood & Birdseye Maple and a multi-axis Ebony & Curly Maple.
About 12” in length (AIRC) and both have crystals on the butt end of the handle to add some “magic”.

Very nice. That multi-axis one is amazing.

I agree. Multi-axis is a nice touch.
I've done several long time ago, simple shape, no detail, but with gentle multi-axis, mostly enough to reshape the handle a bit, sanded to smooth - I'm told they feel good in the hand.
These are certainly oldies but I don't know if they are moldy since I haven't seen them since they got snatched up by friends.

Eastern Red Cedar from the farm.
P7203922cs.jpg

Is that burning, like with fire?! I never thought of trying that on a wand.
I LOVE turning holly, great for carving too. I took a nice block to Melissa and Graeme Priddle once and next time we spoke she said "you have any more like that?"!! :) No, but I took her some tupelo to try.

JKJ
 
Started with a 5/16th inch square of rose wood and a chunk of mallee out of the scrap bin. After turning and polish I distressed it with assorted objects.
Tech pic here:
View attachment 76785
Artsy pic for challenge here:
View attachment 76786
Fun contest! I enjoyed making this!
Only wand I own, bought years ago, has a dragon carved in it. IMG_1745.jpeg
 
I agree. Multi-axis is a nice touch.
I've done several long time ago, simple shape, no detail, but with gentle multi-axis, mostly enough to reshape the handle a bit, sanded to smooth - I'm told they feel good in the hand.
These are certainly oldies but I don't know if they are moldy since I haven't seen them since they got snatched up by friends.

Eastern Red Cedar from the farm.
View attachment 76777


Is that burning, like with fire?! I never thought of trying that on a wand.
I LOVE turning holly, great for carving too. I took a nice block to Melissa and Graeme Priddle once and next time we spoke she said "you have any more like that?"!! :) No, but I took her some tupelo to try.

JKJ
Yes, burned with a small propane torch. I wanted the want to look like it's seen some action.
I like holly as well. After Helene came through I had to take down a holly that was damaged by a large oak that had toppled.
This was just a branch section, still haven't really processed the larger sections.
 
I like holly as well

You may be aware, but if not: if taking down a holly tree on purpose it's best done in the dead of winter. If warm, fungal grey stain can spread quickly in boards and chunks, unchanging the wood except for making it uglier than ugly! I made that mistake once and have a tub full of ugly holly. (It's also a potential problem with other white woods such as maple.) The advice from the pros is cut when freezing, dry aggressively.

Still turns and carves beautifully, though.
I'm told a 2-part wood bleach will remove the stain at the surface. And dying a turning black with india ink will hide the stain and make it look like ebony!

Here's a photo of an oldie moldy (but unstained holly!) wand handle, carved, shellac applied, then the grooves filled with dark walnut grain filler and wiped off the surface as the filler dried.

wand_holly_carved_P7203954.jpg

When clearing the junk from our woods I always leave any holly trees, even if small. I have a huge holly out near the road but would never cut it - it's SO good for the honey bees! When flowering, I can hear the bees from half way across the field.

I'm starting to get ideas for a trial by fire wand, maybe an Avada Kedavra spell done wrong!

Just for fun, when someone brings a child to have one custom mad, I first send out a folded invitation on parchment paper sealed with real sealing wax with my "J" seal from a paper shop in Italy.
wand_invitation_pixelatedt.jpg
Inside is stuff about the wandmaker and instructions, for example:

Responsibility of the Owner
The wand may not be used for any evil or selfish purpose.
The wand may not be used to play tricks on helpless people or cats.
The owner will be responsible for any damage from misuse of the wand.
No muggle must ever touch the wand or see it in use.
Care of Wand
Take care to protect the wand from the elements, although it will withstand occasional use in rain or snow (or yuck, mountain troll snot.) Wipe off any moisture. You may occasionally apply a soft paste wax with a soft cloth. Do not sit on the wand or allow a dragon to step on it. Please use a charm to open cans rather than pry with the wand.
Warranty
Each custom wand is guaranteed against defects in workmanship and materials for a period of 10 generations or 300 years, whichever comes first. Coverage for lost and stolen wands is best described by the term "So Sorry." The warranty does not cover damage from childish pranks, carelessness, evil use, battle with evil forces, or chewing by an animal such as a cute puppy. For warranty service, return in person to Mr John or send by owl.


A good friend asked to bring his Harry Potter crazed nephew to have one custom made. I expected a little kid. When he got out of the car and stood up he kept going up and up. The teen nephew was a huge guy, well over 6' tall. I made the biggest honkin' wand ever with a large handle to fit his hand, his input on style, detail etc. The "kid" was thrilled! My friend said on the drive home the nephew said it was the best day of his life. :) He kept the wand on a special stand on the mantel and got it down to hold it when he watched the movies!

JKJ
 
Last edited:
The dragon on a wave was a sculpture I picked up many years ago when I was a teenager. I have always liked dragons and wizards!
Makes me tempted to start turning wands for the markets and 3D print a holder (lots of those dragon models on Thingverse and Printables) and sell the holder with the wand at a premium....
 
Here's an idea for display. I made this from walnut in 30 minutes, take it to show&tell at symposiums, demos, etc.
Can stand vertically or more reclined. Wand support cradles drilled with 2 sizes of Forstner bits.
Lets people see and compare a variety at one time and pick one to buy with your dragon stand.

wand_display_stand.jpg

Just yesterday I bumped into a stranger, an Amazon delivery driver, who wants three wands. I tell you, fans are EVERYWHERE.

If you REALLY want to make money, try rider's crops for Hunter Jumper competition. Can easily get $300-$500 each if the woodturning is exceptional and unique.
The big-time equine competition people are loaded - $60,000 horse, $1000 jacket, 1/2 mil trailer.
A competitor is required to have the proper "costume", the crop (jump bat) is part of the ensemble.

These are my personal design, an extension of the wand hobby, feel free to steal, er, learn from them. I have zero interest in making things to sell.

I buy the fiberglass/leather part - very inexpensive. Wood needed is only 8" long (unless you go for Dressage, far more effort to make, more critical specs, worth more).
Finish is Tru Oil for durability.
The trick is finding the right venue. I know about that. Travel is required.
crops_fan_fp.jpg
crops_2015_comp.jpg

JKJ

Oh rats, I've further watered down the June Challenge thread with more distraction. I sorry.
 
John, I have a buddy who's daughter rides and is really getting into it so I wouldn't mind gifting one. Can you tell me a little more about the fiberglass/leather part? Where to buy, what assembly is required, what length, that sort of thing... and thank you for sharing.

Here's an idea for display. I made this from walnut in 30 minutes, take it to show&tell at symposiums, demos, etc.
Can stand vertically or more reclined. Wand support cradles drilled with 2 sizes of Forstner bits.
Lets people see and compare a variety at one time and pick one to buy with your dragon stand.

View attachment 76813

Just yesterday I bumped into a stranger, an Amazon delivery driver, who wants three wands. I tell you, fans are EVERYWHERE.

If you REALLY want to make money, try rider's crops for Hunter Jumper competition. Can easily get $300-$500 each if the woodturning is exceptional and unique.
The big-time equine competition people are loaded - $60,000 horse, $1000 jacket, 1/2 mil trailer.
A competitor is required to have the proper "costume", the crop (jump bat) is part of the ensemble.

These are my personal design, an extension of the wand hobby, feel free to steal, er, learn from them. I have zero interest in making things to sell.

I buy the fiberglass/leather part - very inexpensive. Wood needed is only 8" long (unless you go for Dressage, far more effort to make, more critical specs, worth more).
Finish is Tru Oil for durability.
The trick is finding the right venue. I know about that. Travel is required.
View attachment 76814
View attachment 76815

JKJ

Oh rats, I've further watered down the June Challenge thread with more distraction. I sorry.
 
Here is my Magic Wand with a Magical Core compartment for the June AAW Challenge. It is approximately 13 1/2" long (34 cm) and has a Cocobolo handle and Curly Maple shaft with some of the interior components turned of Ebony. There are a total of ten components to make the wand and all of its contents. I can't give away all of my wandmaker secrets, but inside there are threaded brass fittings I turned smaller to fit the wand, brass tubes, priceless jewels, and Dragon Scales. I was fresh out of Dragon Heart Strings... ;-) It will be up to the wand's Witch or Wizard to add their own spells or magical treasures to the customizable wand core. AAW Challenge Magic Wand Triple.jpgAAW Challenge Magic Wand.jpg
 
Ok, I finished a new wand. Here's a photo for the challenge.

African Blackwood plus turned acrylic (lightly "unpolished" with 0000 steel wool). 13" long. Handle 3/4" dia at center swell.
View from the deck. The barely-visible horses by the shelter are a bonus.
for_posting_20250628_110800_ce.jpg

This was an excellent challenge, especially planning the steps. Stretched my rermaining brain cells.

Turned the acrylic spheres with alignment pins mostly using Nova's great dome chuck.
Hollowed the six little bowls to fit the acrylic while holding the blanks by tenons.
Made three sizes of hemispherical "alignment jam-centers" with short #2 morse tapers to hold the pieces while turning the outsides.
The MasterCarver was a big help for cutting the 10 curves on the little "bowls"without inviting disaster!
A Bohin mechanical pencil with white lead is perfect for layout on black wood.
Made an alignment fixture for gluing things up with epoxy - hot glue gun to the rescue!

for_forum_20250625_230312_c.jpg for_forum_20250625_132801.jpg for_forum_20250626_213153.jpg

JKJ
 
I'm glad I'm done with this one. Too many things going wrong and had to be fixed.

Banksia pod with resin pen blank that I made 6-7 years ago when I thought I would make a bunch of pens. It snapped twice, once when turning and then again when I was just holding while sanding the end of the lathe. If I ever make more blanks like this in the future I should look into getting some cactus juice and stabilize the banksia pod first. This was finished with CA glue.

The rest is a scrap of curly maple. The ball in the middle was originally bigger and I carved a 8 fluted twist into it. I had the bright idea of burning it and sanding back the high spots. That just burned off the high spots and the valleys didn't burn. I should have used paint. Remade the bead. Finished with shellac and paste wax.

20250628_150937.jpg
20250628_150559.jpg
 
I'm glad I'm done with this one. Too many things going wrong and had to be fixed.

Banksia pod with resin pen blank that I made 6-7 years ago when I thought I would make a bunch of pens. It snapped twice, once when turning and then again when I was just holding while sanding the end of the lathe. If I ever make more blanks like this in the future I should look into getting some cactus juice and stabilize the banksia pod first. This was finished with CA glue.

The rest is a scrap of curly maple. The ball in the middle was originally bigger and I carved a 8 fluted twist into it. I had the bright idea of burning it and sanding back the high spots. That just burned off the high spots and the valleys didn't burn. I should have used paint. Remade the bead. Finished with shellac and paste wax.

View attachment 76924
View attachment 76925
That handle looks awesome!! Glad you were able to work through the hiccups.
 
Ok, I finished a new wand. Here's a photo for the challenge.

African Blackwood plus turned acrylic (lightly "unpolished" with 0000 steel wool). 13" long. Handle 3/4" dia at center swell.
View from the deck. The barely-visible horses by the shelter are a bonus.
View attachment 76913

This was an excellent challenge, especially planning the steps. Stretched my rermaining brain cells.

Turned the acrylic spheres with alignment pins mostly using Nova's great dome chuck.
Hollowed the six little bowls to fit the acrylic while holding the blanks by tenons.
Made three sizes of hemispherical "alignment jam-centers" with short #2 morse tapers to hold the pieces while turning the outsides.
The MasterCarver was a big help for cutting the 10 curves on the little "bowls"without inviting disaster!
A Bohin mechanical pencil with white lead is perfect for layout on black wood.
Made an alignment fixture for gluing things up with epoxy - hot glue gun to the rescue!

View attachment 76917 View attachment 76919 View attachment 76918

JKJ
The carving around the beads is an EXCELLENT touch! Very well done!
 
Not an entry, just another moldy oldie. Made as part of a Halloween costume several years ago using wood harvested from the grandparent's farm. Had an original creation tale in the book tying back to one of her favorite activities on the farm.
Wand2.jpg
 
The carving around the beads is an EXCELLENT touch! Very well done!
Why thank you!

I plan to write up all this when I get time, in case anyone is interested in the process.

I turned the "beads" with cylindrical extensions on one or both ends which fit into holes drilled in the the three Blackwood pieces. I thought this would help with assembly and alignment.
I knew the absolute precision might suffer a bit in the process so I added a bit of clearance at each connection, the reason for making the alignment fixture. I put some System Three T88 epoxy in each connection, then let it set up while aligned in the fixture (as shown in the earlier pic on the bandsaw table.) That epoxy has a 30-45 minute working time and sets to final strength over several days. I don't think I would have had time put it together with 5-minute epoxy!

20250627_111527_C.jpg

For something complex I'm a compulsive planner, love big sheets of graph paper. I start with multiple simple sketched ideas on white paper, decide on a design, then refine and plan it before tool touches wood.
My chicken scratch, stained paper I worked from. I reserve the right to make small changes on a whim. :)
A second sheet has all the process steps so my tired brain doesn't cut away a tenon or something before it's time is up.

20250627_165921_CE.jpg

BTW, acrylic is easy to turn, sand, and polish. Get CAST acrylic. I buy from Delvies. Not cheap.

Make lots of things, for example, ornaments.
acrylic_ornament_green_bell.jpg


For simpler things with less chance of me destroying it from brain fog I'll just mount a blank, turn round, then turn till it looks done. :) That the way I've turned most of the wands I've made over the years.
The most fun and the least stress is when someone comes to the shop and I make one for them while they watch!

JKJ
 
Why thank you!

I plan to write up all this when I get time, in case anyone is interested in the process.

I turned the "beads" with cylindrical extensions on one or both ends which fit into holes drilled in the the three Blackwood pieces. I thought this would help with assembly and alignment.
I knew the absolute precision might suffer a bit in the process so I added a bit of clearance at each connection, the reason for making the alignment fixture. I put some System Three T88 epoxy in each connection, then let it set up while aligned in the fixture (as shown in the earlier pic on the bandsaw table.) That epoxy has a 30-45 minute working time and sets to final strength over several days. I don't think I would have had time put it together with 5-minute epoxy!

View attachment 76936

For something complex I'm a compulsive planner, love big sheets of graph paper. I start with multiple simple sketched ideas on white paper, decide on a design, then refine and plan it before tool touches wood.
My chicken scratch, stained paper I worked from. I reserve the right to make small changes on a whim. :)
A second sheet has all the process steps so my tired brain doesn't cut away a tenon or something before it's time is up.

View attachment 76939

BTW, acrylic is easy to turn, sand, and polish. Get CAST acrylic. I buy from Delvies. Not cheap.

Make lots of things, for example, ornaments.
View attachment 76940


For simpler things with less chance of me destroying it from brain fog I'll just mount a blank, turn round, then turn till it looks done. :) That the way I've turned most of the wands I've made over the years.
The most fun and the least stress is when someone comes to the shop and I make one for them while they watch!

JKJ
Thank you so much for your thorough explanations. You actually addressed one of my main concerns when I thought about turning an acrylic bead instead of rosewood. I had already turned the tenons on the wood side, but didn't consider turning pegs onto the end of the acrylic. I didn't want to see the wood tenons fitting through the clear acrylic, but turning the posts onto the beads clearly solves that issue, and the alignment jig would solve for any glue up issues. And the cast resin looks pricey, but if it's better to turn than the acrylic pen blanks, I'd be willing to commit to one color for a better end result.
 
I didn't want to see the wood tenons fitting through the clear acrylic

Same here. I thought of frosting the surface enough with sandpaper to hide the tenons, but might still be able to see them when held up to the light. It is a bit more difficult to turn a nice sphere with the extensions. I use the divide and conquer method - there are formulas but eyeballing gets close. Fortunately, the "ends" of mine are pretty well hidden.

I started turning acrylic when a wonderful gentleman who works in commercial display brought a bunch of offcuts to a class and offered them to everyone. Most people were focused on hollow forms but I just had to try the acrylic. At the end of the week I don't think anyone else took any so the guy said I could have them all. It wasn't too long after that when I looked for a supplier and ordered more, most I think 1.5" diameter. IIRC, I had to buy 4' lengths. Would go broke buying all of the colors! I might think of getting some in smaller diameters since I often turn away a lot. If I win the lottery maybe I'll get some larger diameter pieces. (But I heard a nasty rumor: apparently you have to play the lottery to win!)

BTW, the "strings" of acrylic that come off the tool can quickly ball up around the work. Might have brush them away occasionally just to see the cuts or stop the lathe and pull off the nest. If I position a strong DC pickup close to the work and get a strand started properly, the DC will pull in yards of a single strand from one pass!

JKJ
 
Thank you so much for your thorough explanations. You actually addressed one of my main concerns when I thought about turning an acrylic bead instead of rosewood. I had already turned the tenons on the wood side, but didn't consider turning pegs onto the end of the acrylic. I didn't want to see the wood tenons fitting through the clear acrylic, but turning the posts onto the beads clearly solves that issue, and the alignment jig would solve for any glue up issues. And the cast resin looks pricey, but if it's better to turn than the acrylic pen blanks, I'd be willing to commit to one color for a better end result.
Some acrylic blanks are more chippy than others and this also translates into more brittle. Would probably snap when casting a spell with the magic wand. The softer more forgiving ones might be better for this application and can handle detail without breaking. I use brass pen tubes inside my pen blank components in the wands because of the strength it provides. But clear acrylic is a whole nuther thing altogether. Thanks for sharing, John! That jig idea is something I will need to try.
 
Back
Top