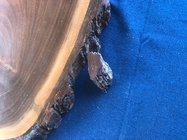
While this particular item is a platter, not a bowl, I think the same question would apply to a natural edge bowl. How do you repair a piece of bark that came off and how do you avoid a piece breaking off in the first place? I'm suspect the obvious answer is CA glue but I'm curious about how much, where, both sides? Or perhaps someone does something differently? Thank you for your suggestions.

-
We just finished moving the forums to a new hosting server. It looks like everything is functioning correctly but if you find a problem please report it in the Forum Technical Support Forum (click here) or email us at forum_moderator AT aawforum.org. Thanks! -
Beware of Counterfeit Woodturning Tools (click here for details) -
Johnathan Silwones is starting a new AAW chapter, Southern Alleghenies Woodturners, in Johnstown, PA. (click here for details) -
Congratulations to Dave Roberts for "2 Hats" being selected as Turning of the Week for April 22, 2024 (click here for details) -
Welcome new registering member. Your username must be your real First and Last name (for example: John Doe). "Screen names" and "handles" are not allowed and your registration will be deleted if you don't use your real name. Also, do not use all caps nor all lower case.
You are using an out of date browser. It may not display this or other websites correctly.
You should upgrade or use an alternative browser.
You should upgrade or use an alternative browser.
Keeping the Bark On
- Thread starter Dave Fritz
- Start date
If you want the bark, harvest the wood in the dead of winter. Sap is running already here in Central IL and that spongy cambium layer shrinks when it dries and the bark falls off. I use wood glue to glue a piece back on.
Thank you Richard, do you clamp it or how do you hold it in place until it dries?
I am of a different opinion. I love the ability to discretely reattach pieces like this using CA, specifically 2P-10. I don't have to worry about discoloration and a small bit of glue goes a long way
- Joined
- Apr 27, 2004
- Messages
- 8,642
- Likes
- 4,983
- Location
- Lakeland, Florida
- Website
- www.hockenberywoodturning.com
how do you avoid a piece breaking off in the first place?
Light cuts sharp tools
Cutting technique
1. What you should do
To absolutely keep the bark Cut the bark with supporting wood behind. On the outside this means cutting rim to foot and suffering the tearout from cutting unsupported fibers. Sharp tools light cut tear out is minimal. Once below the lowest rim you can cut from the foot.
2. What I do
I use a pull cut on the outside.
It almost always cuts the bark cleanly without breaking in it free.
You can also run thin CA along the bark edge before the finish cuts.
With the Ellsworth grind the wing doing the pull cut has a bevel angle of 25-30 degrees - skew like angle
The edge is just off verticals giving a high shear angle.
If you keep the gouge tip out of the wood you cannot get a catch.
The pull top view. ………… …….…… Light Pull cut turners view. ………………… Closeup pull cut on a spindle


Last edited:
1. Cut the wood healthy and alive when the tree is in the dormant stage.
2. Do not try to dry the wood, the best way to keep the bark on is to utilize the natural binders.
3. Once turning to thin gives you the best shot at a good bark edge.
4 Long continuous curves without ever coming to a point where end grain areas have the grain perpendicular to the side.
5. The best way to a clean tear out free cut on the wood and the bark is shearing with the leading point on a traditional bowl gouge.
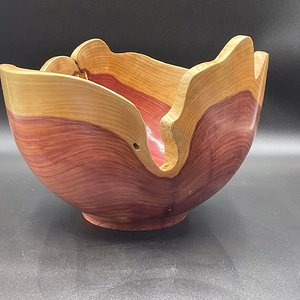
5. The goblet form below not only kept the sap wood white but the bark is complete with the larger outer bark in tact.

2. Do not try to dry the wood, the best way to keep the bark on is to utilize the natural binders.
3. Once turning to thin gives you the best shot at a good bark edge.
4 Long continuous curves without ever coming to a point where end grain areas have the grain perpendicular to the side.
5. The best way to a clean tear out free cut on the wood and the bark is shearing with the leading point on a traditional bowl gouge.
5. The goblet form below not only kept the sap wood white but the bark is complete with the larger outer bark in tact.
I’m going out on a very small limb here and ask why…I look at leaving the bark on as just another turner’s parlor trick - like a suction fit box that requires both hands to access whatever is inside or a hollow form with a base so small it requires a pile of marbles for security from slight breezes. Bark on turnings pretty much means you’ve created a shelf queen that will require dusting - and good luck keeping the bark intact through that over the span of its life on the royal shelf. Might as well keep a bottle of glue in the bowl so you’re ready for the inevitable. I’ve done a few, been happy with the results, but can’t find a use for them in long run
That said, the tool control required to keep it intact is a good exercise and can’t hurt (Al ad Don have great descriptions of good technique) but I prefer functional bowls for the most part so my natural edge pieces generally have the bark stripped off if it has stayed on.
The curmudgeon shall return to its lair under the bridge now…
- Joined
- Apr 27, 2004
- Messages
- 8,642
- Likes
- 4,983
- Location
- Lakeland, Florida
- Website
- www.hockenberywoodturning.com
A natural edge bowl wirthout bark can be used. In many cases the bark hides the rim’s elegant lines.
Usually leave the bark on natural edge hollowforms.
See how nice the rim looks on this piece posted today by @David Wyke
Simple answer - more work to remove the bark. It can take me 10 minutes to get the bark off a bowl I turned in 15-20 minutes.I’m going out on a very small limb here and ask why
I usually remove the bark from NE bowls.for the most part so my natural edge pieces generally have the bark stripped off if it has stayed on.
Usually leave the bark on natural edge hollowforms.
See how nice the rim looks on this piece posted today by @David Wyke
Dave a small crumb like that can be CA glued, just put some on both faces that fit together (enough as it will soak in).
I find that it is the heel of the tool that will force the bark off, you have to cut without the heel touching the bark.
If you think that the bark might come off, get CA on the border/seam of the wood and the bark, both inside and outside. then take a fine cut after to cut excess glue off.
Here are couple I have turned years ago, some where rough turned and returned after they were dry.
We do still have these pieces.
Handle the wood carefully so you do not loosen the bark even before you start.
Last edited:
I gave up on NE bowls with the bark on. Pieces were always falling off, and when I was at shows, people would pick them up by the bark rim... I since, if I even do one, will remove the bark. While it is a nice visual thing, it just is not practical, for sure if it is a piece that is intended for daily use, which almost all of my pieces are.
robo hippy
robo hippy
Everything posted so far holds true and yes these bowls are just eye candy, But how many of your bowls actually get use when you have been turning over 10 years?
Now I use a technique which I think makes it much easier to keep bark on. After shaping the outside and before hollowing I use a thin parting tool to make a cut in the bark at the final thickness of the bowl. This leaves a bit of a rough surface inside but it is easy to sand out. I use CA right away on both inside and outside cambium layer.
By the way I turn NE to finish . Tried the twice turn on my first and it is a nightmare.