Anybody use green instead of red?

-
February 2026 Turning Challenge: Cookie Jar! (click here for details) -
Congratulations to Chad Eames for "Red Tines" being selected as Turning of the Week for February 23, 2026 (click here for details) -
AAW Symposium demonstrators announced - If the 2026 AAW International Woodturning Symposium is not on your calendar, now is the time to register. And there are discounts available if you sign up early, by Feb. 28. Early Bird pricing gives you the best rate for our 40th Anniversary Symposium in Raleigh, North Carolina, June 4–7, 2026. (There are discounts for AAW chapter members too) For more information vist the discussion thread here or the AAW registration page
-
Welcome new registering member. Your username must be your real First and Last name (for example: John Doe). "Screen names" and "handles" are not allowed and your registration will be deleted if you don't use your real name. Also, do not use all caps nor all lower case.
You are using an out of date browser. It may not display this or other websites correctly.
You should upgrade or use an alternative browser.
You should upgrade or use an alternative browser.
Laser color for hollowing rig?
- Thread starter Brent@TurnRobust
- Start date
I think one issue is that green light lasers are generally more powerful than red light laser. At least that is what I believe to be true.
I use my Simple Hollowing System rig and red laser to do some operations that are different than hollowing. The things I do, have me focusing on that laser dot quite a bit, and I can say that wood and even pencil graphite are remarkably more reflective than one would think. I wear at least one pair of sunglasses to ease the eye strain. If you are trying to diminish the brightness of a red light laser the best sunglasses are green, which is the opposite color to red light. Green sunglasses would be fairly translucent to green laser light.
@Brent@TurnRobust , are you coming out with a new product, or is the matter of personal interest?
Do yourself a favor, switch over to a camera system. Super cheap with a DIY system that uses an inspection camera.
Anybody use green instead of red?
The green laser pointers I have are much brighter than the red. Part of this is because the human eye is more sensitive to green than red so it's easier to see. I like to use them to point out starts and astro things to people since the green beam looks like it's going to the top of the atmosphere (it's not). Those I have are bright enough for me to stand on the ground and point out to arborists which limbs I want removed, even when the sun is out. And the cats like to chase the green far better than the red!
Another part of the brightness is because those I have are larger and use more power than the average laser pointer. However, I do have a slim green pointer than uses AAA batteries and I'd hate to look into it as well!
Two things about green, though. Since the eye is more sensitive to green, what it shines on can be REALLY bright, sometimes almost too bright to look at depending on the surface. Might still be ok for hollowing since the beam needs to just barely kiss the surface.
Another potential problem is temporary blindness if the beam is directed into the eye, even accidentally. This can happen when moving a shiny tool through the beam at just the right angle. I used to work in and around optical/laser labs and the laser beams there were often invisible to the eye. I knew several people who had permanent streaks burned across their retinas when they just "popped in for a moment to check something" without putting on the required protective goggles and a wrench or something was moved or fell through the invisible beam, reflecting a streak across their eye.
(There was a sign in the laser lab formatted like an eye chart that said "DO NOT STARE INTO BEAM WITH REMAINING GOOD EYE". Good advice.)
I'm not saying a green laser can damage an eye instantly, I have no idea, but even an accidental prolonged directed beam could be at least painful and temporarily blinding - that's the reason it's illegal to shine a laser pointer towards a piloted aircraft!!
You might get one of each in the slim-line format and just try them. I see some on Amazon.. Here are three, red, green, and purple for $12.
But I agree about the camera.
JKJ
I'll rephrase the question. I don't see many folks using a green laser, and I'm wondering if there is a reason green vs red (blue is also available). I've gotten a couple of good responses in that regard. And that's what I'm interested in learning about. Sure, camera systems are great for their purpose, but that was not my question. Thanks.
I use red, green here three times the price if you can find one. We have a lot of control on lasers, max available is 1 milliwatt. The reason given is the more powerful have been used to harass pilots during landings.
The main thing to be aware of regarding damage is the laser power, and specifically its class rating. See Laser Classes here for more info (click through the chart on that page for a full-scale, zoomable PDF). AFAIK, the cone cell color sensitivity (what makes green apparently brighter than red at the same power) doesn't impact the danger of a given laser. It's primarily just how much energy the laser is able to put into the retina.I'm not saying a green laser can damage an eye instantly
I tried a blue one and it wasn't as visible. At the time, I couldn't find a green one for similar cost and with good reviews, so I stuck with red. I ended up buying a small pack of just red laser diodes for just a few dollars. I soldered one onto a worn out phone charging cord, so now I don't have to try to find spare batteries in the shop everytime I go to hollow something. Another benifit is that it has a very low profile, so it can fit thru the frame of my steady rest.
One thing I did (both with the battery powered pointers and my homemade plug-in) was cut down on the intensity a bit. I put a couple layers of masking tape over it, then pushed a pin thru the bright part of the dot. It made a tiny hole to filter out the extra light and it makes a much finer point. I sometimes have to dim the lights in the shop a bit, but it is much less intensity getting reflected back to my eyes.
One thing I did (both with the battery powered pointers and my homemade plug-in) was cut down on the intensity a bit. I put a couple layers of masking tape over it, then pushed a pin thru the bright part of the dot. It made a tiny hole to filter out the extra light and it makes a much finer point. I sometimes have to dim the lights in the shop a bit, but it is much less intensity getting reflected back to my eyes.
It seems to me that there are many lasing materials that produce a red light, and fewer that produce green. Maybe red lasers are cheaper as a result, and that's why people use them.
Green lasers are predominant as straight line layout tools on construction sites, in particular commercial sites used to lay out long walls and similar. Very bright and a lot of throw. And with posted signage warning of its use and potential for sight injuries. I'm guessing the ease of seeing the green over red is why green is used more in this realm.
Last edited:
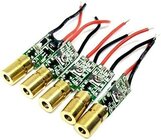
The lasers in my hollowing systems are only about a 1/2" long and until today I didn't know that a green laser in that size was available. On Amazon I searched for both (as I already have a bunch of the red ones). Here is what I found. The green ones are 5 for $36.88 and the red ones are 10 for $6.79. Maybe cost is the reason (plus the green ones have a little board attached, but they would still be usable in my setups). The red ones in my systems have been working for 20 years and I myself prefer the laser over the video systems. My red laser dots are very precise and I can set that as close as 30 thou to the cutting tip if I want to go very thin.
Attachments

Sorry I'll refrain from offering other advice to you n the future.I'll rephrase the question. I don't see many folks using a green laser, and I'm wondering if there is a reason green vs red (blue is also available). I've gotten a couple of good responses in that regard. And that's what I'm interested in learning about. Sure, camera systems are great for their purpose, but that was not my question. Thanks.
The interesting thing is I dont know of anybody who has one of these down under and being at the ends of the earth, I would hate to think the cost shipping down here. But certainly it is an improvement on my laser system, even tho' I have three lasers on mine to get around some of the issues of tool adjustment.Do yourself a favor, switch over to a camera system. Super cheap with a DIY system that uses an inspection camera.
Last edited:
I bought my inspection camera on eBay for less than $15. That is the total of my cash investment to make a camera system. Besides hollowing, You can work off a sketch for the outer shape with a camera if you are making multiples. You can't do that with a laser. We better be careful Brent runs a tight ship on his posts!
green travels a lot further. I have one that can point at night 1/2 mile. even in daylight its visible for quite a distance... but its overkill for a hollowing rig. can't see any advantage. red ones are very cheap.
How are these lasers being used for hollowing visualization? Can anyone point me to an example? Thanks
The laser sits on an arm directly over the piece. You offset the laser from the cutterhead to the desired wall thickness. The laser projects onto the piece and when it just about or does disappear off the edge, you've reached your desired wall thickness. You'll find lots of videos showing it on you tube I'd imagine.How are these lasers being used for hollowing visualization? Can anyone point me to an example? Thanks
here's just one of a bazillion: https://www.woodcraft.com/products/...VxVfkCcdMb-Rq9KUhGWIAwu9Q_s2BFUxoC4Y8QAvD_BwE
The interesting thing is I dont of anybody who has one of these down under and being at the ends of the earth, I would hate to think the cost shipping down here. But certainly it is an improvement on my laser system, even tho' I have three lasers on mine to get around some of the issues of tool adjustment.
Multiple lasers to reduce the adjustments? Darn it, why didn't I think of that??
I tried a very cheap ($12?) webcam connected to an old laptop that I almost had disposed of. It worked, but somehow my brain didn't process it well. It felt sort of weirdly disorienting feeling and watching my hands moving a tool around the inside of a stationary object in onepiece swinging around
You can see many videos on Lyle Jamieson's YouTube channel using the laser with his hollowing system.How are these lasers being used for hollowing visualization? Can anyone point me to an example? Thanks
Here's one link:
I do not understand why you would need 3 lasers. When I'm using the Hunter hollowers with the #1 carbide which is 6mm or slightly less than a 1/4" my laser dot is about 3mm. When I set that dot say 1/16" from the edge (middle) of the carbide cutter when in the cut I can't be more than about 20% in the cut left or right of center as I'm taking 1/16" cuts at a time and I'm not deviating any where where I would be getting into trouble. I only adjust the laser when changing tools and I used that same process when using the John Jordan and Kelton hollowers. I have been doing that for twenty years. I do remember when that time long ago I saw perhaps a video where the person using like one tool adjusted the laser for different areas. I use three tools and only set the laser once on each. The Jordans and Keltons had three tools each just like the Hunters I use now. Straight tool, slight bend and tightest bend for under lip. Maybe you are using just one tool and that could be why you use 3 lasers.The interesting thing is I dont know of anybody who has one of these down under and being at the ends of the earth, I would hate to think the cost shipping down here. But certainly it is an improvement on my laser system, even tho' I have three lasers on mine to get around some of the issues of tool adjustment.
How are these lasers being used for hollowing visualization? Can anyone point me to an example? Thanks
I'm going to skip the laser and go straight to a camera. I haven't built one yet for my Bosch stabilizer, but I think it can be put together for under $100. Simple, too. Here's the one Trent Bosch sells (too expensive for my blood).

I've seen the camera method before and that does seem pretty handy. I think I saw that exact demo you screenshotted or very similar just a few weeks ago.I'm going to skip the laser and go straight to a camera. I haven't built one yet for my Bosch stabilizer, but I think it can be put together for under $100. Simple, too. Here's the one Trent Bosch sells (too expensive for my blood).
View attachment 75459
As I go down the inside of the vessel , the laser point changes from say 3 o'clock to 12 noon and depends on the form a third position maybe required. This way I can hollow with without any change to the laser in regard the tools orientation to the vessel. I tend to use the Pro-Forme for bulk removal, Rolly Munro for fine cut on final thickness, Then scrapers if needed, no laser on the scraper.I do not understand why you would need 3 lasers. When I'm using the Hunter hollowers with the #1 carbide which is 6mm or slightly less than a 1/4" my laser dot is about 3mm. When I set that dot say 1/16" from the edge (middle) of the carbide cutter when in the cut I can't be more than about 20% in the cut left or right of center as I'm taking 1/16" cuts at a time and I'm not deviating any where where I would be getting into trouble. I only adjust the laser when changing tools and I used that same process when using the John Jordan and Kelton hollowers. I have been doing that for twenty years. I do remember when that time long ago I saw perhaps a video where the person using like one tool adjusted the laser for different areas. I use three tools and only set the laser once on each. The Jordans and Keltons had three tools each just like the Hunters I use now. Straight tool, slight bend and tightest bend for under lip. Maybe you are using just one tool and that could be why you use 3 lasers.
yes, it save a heaps of stopping and starting, initial set up time can be slow in the beginning, been using it for years. Camera parts here are that cheap like elsewhere.Multiple lasers to reduce the adjustments? Darn it, why didn't I think of that??
I tried a very cheap ($12?) webcam connected to an old laptop that I almost had disposed of. It worked, but somehow my brain didn't process it well. It felt sort of weirdly disorienting feeling and watching my hands moving a tool around the inside of a stationary object in onepiece swinging around
Bosch stabilizer with homemade camera system. Less than $30 invested. Due to use of an existing old surface tablet for the screen and old camera tripod.I'm going to skip the laser and go straight to a camera. I haven't built one yet for my Bosch stabilizer, but I think it can be put together for under $100. Simple, too. Here's the one Trent Bosch sells (too expensive for my blood).

Perfect! I'm going to order parts.Bosch stabilizer with homemade camera system. Less than $30 invested. Due to use of an existing old surface tablet for the screen and old camera tripod.
View attachment 75480
Don't forget a long usb extension cable to run from the back of the lathe up to the tablet without getting in the way of anything. And figuring out a camera mount.Perfect! I'm going to order parts.