• December 2025 Turning Challenge: Single Tree! (click here for details)
  • Congratulations to Bob Henrickson, People's Choice in the November 2025 Turning Challenge (click here for details)
  • Congratulations to Guillaume Fontaine for "Old Tea Pot" being selected as Turning of the Week for December 15, 2025 (click here for details)
  • Welcome new registering member. Your username must be your real First and Last name (for example: John Doe). "Screen names" and "handles" are not allowed and your registration will be deleted if you don't use your real name. Also, do not use all caps nor all lower case.

Laser signing

Joined
Feb 25, 2025
Messages
506
Likes
612
Location
Jackson, MS
When do you laser sign your work? I’m guessing after sanding but before finish applied. What if you have some pieces that are finished but not zapped?

My sweetheart got a LP1 for me, the box is staring at me and now I need to learn how to use.
 
like rick said - generally before finish is best, some finishes when you laser your logo on afterwards can leave really ugly burn mark stains around the image, creating a blurring effect - if you engrave before finishing you can lightly sand away any surface "burn" marks (more like smoke stains, I'd guess) but if doing it post-finishing you have a lot more work to clean up afterwards, if you want to keep it neat as possible.
 
You can engrave after the finish is applied just put some masking tape over the spot your going to engrave. Best to use green or white tape though the blue will absorber some of the diode laser.

I almost always engrave after the finish. I usually don’t have any issues, but I’ll try the tape trick.

This is done after Wood Lovers Wax finish.
IMG_9685.jpeg
 
My LP1 gets set up and used today here in the computer room. But planned use will be that when used for signing it will be done prior to finishing.
 
Joel, love the tools on the signature. Were they stock images or did you create? As in how did you do it?
 
1000009572.jpg

I keep it simple and just do my name and year in a circle. I designed it in Inkscape which is a free program. This is a small 1.5" wide box, not a large bowl with a giant signature 😂
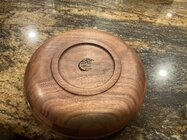
. There is also some wax on the bottom I need to clean up. I just got it back from a local show and they must have been worried about it getting knocked over.
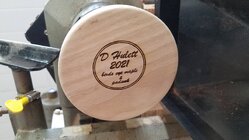
 
Once a design is done, how did you get the image in to the laser program?
I did mine with the laser pecker design app. On my iPad. Pretty simple but you do need to play around with the app a little as it’s not real user friendly. I am far from computer savvy I might add
 
generally before finish is best, some finishes when you laser your logo on afterwards can leave really ugly burn mark stains around the image, creating a blurring effect - if you engrave before finishing you can lightly sand away any surface "burn" marks (more like smoke stains, I'd guess) but if doing it post-finishing you have a lot more work to clean up afterwards, if you want to keep it neat as possible.

Years ago I had a laser engraving small business, so I encountered this issue a lot. On wood I always engraved through the finish. When there is smoke residue left on the surface it is easily removed with a bit of white vinegar, fast orange or isopropyl alcohol. Not a problem, just check the compatibility of the cleaners with the finish you are using. Experiment on a piece of scrap wood. There are many articles and YouTubes online that address this topic.

When a trophy shop laser engraves a wood plaque, the plaque is already finished, usually with a lacquer or poly finish.

I never tried engraving through tape as others have suggested, but I'll give that a try with my Laser Pecker LP2 Plus that just arrived yesterday.
 
Last edited:
I still sign most pieces with pyrography pen, because I think it personalizes the work. But I do use my Laserpecker LP1 on small items where I can't write that small/engrave that small. I recommend doing it before finishing. Also it is possible to scan in your signature and have the LP burn it.
 

Attachments

  • 20210717_121938.jpg
    20210717_121938.jpg
    322.7 KB · Views: 18
Joel, love the tools on the signature. Were they stock images or did you create? As in how did you do it?
I created the signature using powerpoint, then saved as an image (.jpg). Tools were actual pictures that I changed the color to black and white. I then have my signature stored in my photos on my iphone. When I start the LP app, I create from Album and load the image. It’s as easy as that.
 
Once a design is done, how did you get the image in to the laser program?
There are various ways, but I do it from my Android phone by making sure my image is stored to Google Photos (not google drive) and then sync to my cell phone, then from within the photos app on phone I select the picture and hit "Share" and in the options to share with, I share it to the Laserpecker app , sharing to the app causes it to launch and from there it is just a matter of setting up your options, previews, etc. (of course helps to have the LP1 powered up and ready to bluetooth connect to phone)
 
Sometimes before, sometimes after. I will sometimes put the first coats on while they still have a tenon. If I'm finishing a piece that has the tenon off, I try to leave the bottom bare until I do burn my logo on. On the pieces I haven't, it mostly burns thru the finish, except for the ones with UV inhibitor, then it takes multiple passes to penetrate thru.
 
Once a design is done, how did you get the image in to the laser program?

I have burned both before and after finishing, and I prefer before. After, I sometimes get a little cooking of whatever finish was applied. That leaves a halo of sorts around the image.

I have an Android phone and use Google Photos. I upload all my images to Google Photos. Then I just go select a photo in Google Photos on my phone, and share it to the LP.


1765290170865.png
 
Back
Top