• July 2025 Turning Challenge: Turn a Multi-axis Weed Pot! (click here for details)
  • Congratulations to James Seyfried for "NE Red Oak II" being selected as Turning of the Week for July 21, 2025 (click here for details)
  • Welcome new registering member. Your username must be your real First and Last name (for example: John Doe). "Screen names" and "handles" are not allowed and your registration will be deleted if you don't use your real name. Also, do not use all caps nor all lower case.

Looking for turning profile templates for sale

Joined
Mar 24, 2021
Messages
71
Likes
8
Location
Lexington, KY
Are there any woodworking supply companies that sell profile templates for turned pieces? I've done small turnings without much problem and now I'm about to attempt larger projects. I'm afraid if I don't have something to go by I'll just keep turning the thing further and further looking for 'the right' shape until I've gone too far and have nothing left.

Thanks
 
I dont know of any such animal but the closest thing to what your describing is called storyboarding. There are over 500 woodturning designs that are drawn on graph paper in this book by Weldon. https://www.amazon.com/Shapes-Woodt...watch_0?_encoding=UTF8&qid=1683847321&sr=1-25
It may only be available used.

51cObHenJSL.jpg


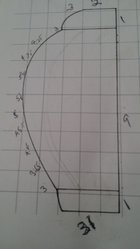
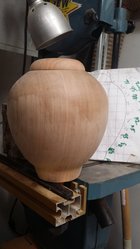
Here is one of the designs i photocopied from the book and turned using calipiers and parting tools to accurately capture the various depth of cut. Note the measurements i obtained if each square was 1"
20161231_084444.jpg20180422_194112.jpg
 
Last edited:
I, too, will recommend shapes for woodturners by David Weldon - you can scale up or down by simply changing the size of your graph paper cells to maintain proportions for the shape to just about any size desired. Then if you want template to "match up" you can always print out and cut out the shape on paper (or hand copy to a printed graph plotter)
 
looking for 'the right' shape until I've gone too far and have nothing l
Always a big issue

Getting the best curve on a bowl takes practice. Templates can help.

In a class with Liam O’Neil I got a few tips that I have used since that helps a lot when roughing a bowl
1. Set the rim - turn the edge of the rim
2. Turn a notion of the foot - the outer edge of the bottom that rests on the table
3. Connect the foot to the rim with a pleasing curve
The two fixed points are easy for the eye to see enabling the mind to see the curve.

What made my curves better was turning balls.
Turn a dozen balls or a dozen eggs. Known shape you either get a ball or you don’t
After a dozen the last 4 take about as long as the first and look better.
By magic the curves on bowls and hollow forms start to pop.
 
Brad, wise move. Templates really help me as a guide on larger hollow forms. It's easy for me to let the size and desire to not put nice wood on the floor end up letting the piece get too big of a vote in the outcome. In addition to the book, and others, I went around my house and found some larger vases I liked and transferred basic dimensions to paper templates. I clip the templates to the top edge of my dust collector hood as a visual guide while turning. Last tip - leave the piece in the chuck, take it off the lathe and stand it up on your bench. My opinion of the shape and proportions often changes seeing it standing up vs sideways.
 
I'm not sure that a set of templates to follow would be all that helpful. I'm guessing reading up on classic shapes, golden ratio, proportions, etc. will help you learn to design on the fly, evaluate your progress, and make you a better turner.
.
Turn lots of different shapes. Practice, repetition, and side-by-side comparisons. I've made a lot of duds, but each is a lesson. I try to pick them apart and what I'd do differently the next time.
 
Last edited:
Brad,
One of the things you've hit on is common with early turners. As they work to improve the look, the wood disappears and they end up with a shapely toothpick.

The skill needed here is taking light cuts. When you watch an expert do a demo, they'll go over the shape 8 times, refining the form until they're satisfied, but the size doesn't noticeably change. They just take off wispy shavings.

The skill starts with a freshly and well sharpened tool. Then you apply the bevel to the wood, gliding without cutting. Then the edge engages the wood, without pressure. As you get comfortable and more skillful, you'll be able to turn with softer hands--for now, consciously think about relaxing. Look at your knuckles--if they're white, you're too tense. Relax, soft hands, no pressure, no rush, just let the wood come to the tool.

I think Al Hockenbery's suggestion of spheres or eggs for practice is a good one, but you could do the same with a simply shaped small bowl. Use wood you don't care about, and turn a bunch of plain shapes, practicing thin cuts with a sharp tool producing wispy shavings. Do a bunch of them. Et Voila'.
 
For bowl profiles, Richard Raffan’s book - The Art of Turned Bowls - includes profiles throughout the book. While not to size, a copier/printer can bring them up to size. The best part of Richard’s book is the decades of experience he shares on getting from logs to finished piece. A great teacher.
 
Whatever one choses to use - templates, drawings, pictures, etc - dont get in a rush, dont try to make a masterpiece in the first few pieces. Find some forms you like (whatever the source), get some wood, and practice. Intend those pieces for the fire pit. Learn as you work way your through different pieces. You will start to connect what your eye sees and what you need to do with the tool to get there, and some of those fire pit pieces might end up on a shelf. Dont be afraid to just toss a piece that doent work out.
 
Back
Top