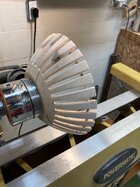
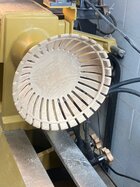
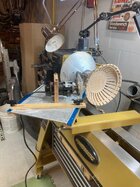
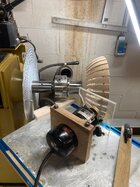
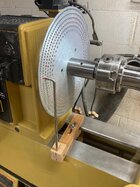
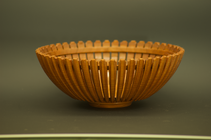
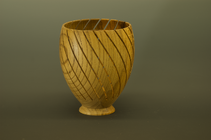
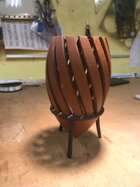
I'm going to do my best description of how to make a fluted bowl due to questions of a picture I posted on what's on your lathe thread. So here you go @Pat Wisniewski and @Greg Carles . I'm hoping some of the experts in this category will respond and maybe we can learn from each other. First I turn the outside of the bowl to shape and completely sand it to the desired finish, if you don't sand it completely before fluting you will lose your crisp edges. Next I turn the inside and this bowl is 5/16" wall thickness, you also have to leave a connecting ring of wood to hold the fingers of the bowl together after cutting the flutes. I made this ring 1/4" tall and 1/8" thick, this is shown in second picture. It helps when you turn the inside to leave enough thickness for a small tenon or recess to reverse the bowl when fluting. The first picture shows the example bowl, it's white oak, 6" diameter at the bottom of the flute, 13" diameter at rim, and 3" tall. First to determine how many flutes will fit I use the following formula from a you tube by William Lancaster. Diameter x 3.1416 = circumference divided by the size of router bit divided by two gives you the number of flutes. Our example is 6" diameter x 3.1416 =18.85 circumference divided by .25" router bit =75.4 divided by two = 37.7 flutes this gets you in the ball park. Next step is to set up your router rig shown in picture three. This rig is designed after one that @Dave Roberts told me to look at on his website. You can see in the fourth picture the 3" spindle extender, chuck, and extended jaws to get the clearance for the router. That's why I suggested the tenon on inside so you can do the router work from tailstock end to have more room to work.

-
March 2026 Turning Challenge: Olla! (click here for details) -
Congratulations to David Wyke, People's Choice in the February 2026 Turning Challenge (click here for details) -
Congratulations to Dave Bell for "Torus Teapot" being selected as Turning of the Week for March 9, 2026 (click here for details) -
Welcome new registering member. Your username must be your real First and Last name (for example: John Doe). "Screen names" and "handles" are not allowed and your registration will be deleted if you don't use your real name. Also, do not use all caps nor all lower case.
You are using an out of date browser. It may not display this or other websites correctly.
You should upgrade or use an alternative browser.
You should upgrade or use an alternative browser.
Making a Fluted Bowl
- Thread starter Vincent Vogel
- Start date
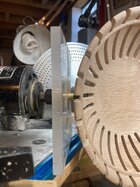
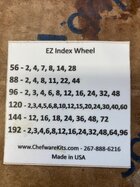
Page two. First picture is example of working from tailstock, it's much easier. I've found it easier to control the router if you move it from right to left. Next step is to mark your index wheel. Second picture is the chart that came with my wheel. I chose 30 flutes because I learned this works for this size bowl, as you notice I have deviated from the formula. 30 is on the 120 count ring so that's the ring we'll use for this project and according to instructions that came with the ring it's every fourth hole gets marked. After marking the ring I have a block of wood that puts your pencil at center height of spindle and I put pencil marks on the bowl to make sure it all looks right and works out. If not get the big eraser out and start over. I actually pencil in about four flutes to make sure they don't remove too much wood. Third picture is a detail of the router. I use a brass guide sized for the bit and let it rub the bowl this is how to control the depth of cut. I have cut at half depth then full depth and have done it removing all material in one pass without trouble. Last picture is showing what I made to hold the index plate firm. I learned a lot of this by trial and error and asking questions on these forums. If anyone has any suggestions to make the math easier it would help. I have experimented with different size bits and spacing. Hope I didn't forget anything.
Attachments

Vincent,
Thanks! That is a great description with clear photographs.
That is the same math I use in determining the rough number of flutes. I adjust number of flutes further depending upon species, such that dense, fine-grained woods which require less wood for strength get more flutes than softer, coarser-grained wood.
My index wheel has only three rings of stops: 48, 60, and 72 holes.
Attachments

Last edited:
- Joined
- Apr 18, 2023
- Messages
- 39
- Likes
- 1,626
- Location
- Pender Island, BC
- Website
- www.darawoodworks.com
Vincent, great job plotting your progress along with the photos, thanks for sharing.
The only thing I have to add is the formula is ok if just doing flutes but when doing finger bowls as we'll call them you have to make less flutes than the formula says so you have enough strength to support them.
Thanks for getting me started down this rabbit hole Dave.
I bought the index ring with more rings of stops because when I was researching it on this site it was suggested not to limit myself
Vincent,
Thanks! That is a great description with clear photographs.
That is the same math I use in determining the rough number of flutes. I adjust number of flutes further depending upon species, such that dense, fine-grained woods which require less wood for strength get more flutes than softer, coarser-grained wood.
My index wheel has only three rings of stops: 48, 60, and 72 holes.
Your work is much more sophisticated than mine Pat, you had a great teacher.Vincent, great job plotting your progress along with the photos, thanks for sharing.
Thanks for getting me started down this rabbit hole Dave.
I bought the index ring with more rings of stops because when I was researching it on this site it was suggested not to limit myself
I use a brass guide sized for the bit and let it rub the bowl this is how to control the depth of cut.

Same idea I guess. Fabricated out of a little strap steel. 48 hole indexing ring on my General lathe has worked great for this type of stuff. Never even thought of having the support ring on the inside, I'll have to try it.

This is the first one I did. I made one almost identical on the outboard side, 26" in diameter for a little wall art.