
-
April 2026 Turning Challenge: Salad Bowl! (click here for details) -
Congratulations to David Bartell, People's Choice in the March 2026 Turning Challenge (click here for details) -
Congratulations to Ethan Hoff for "Basket Illusion Platter" being selected as Turning of the Week for April 13, 2026 (click here for details) -
Welcome new registering member. Your username must be your real First and Last name (for example: John Doe). "Screen names" and "handles" are not allowed and your registration will be deleted if you don't use your real name. Also, do not use all caps nor all lower case.
You are using an out of date browser. It may not display this or other websites correctly.
You should upgrade or use an alternative browser.
You should upgrade or use an alternative browser.
New Photo Booth advise
- Thread starter Ted Pelfrey
- Start date
Jaramiah Severns
TOTW Team
It’s a solid photo, Ted. Looks like you’re using multiple light sources, which is making the image slightly over lit and is washing out the shadows. Too much light and not enough shadow tends to make the image look flat.
I like my shadows to be a little more pronounced, which gives the form a sense of depth. I opt for one main light source with a little bounce light from a white reflector on the opposite side.
If you’re not doing so already, be sure to shut off all of the other lights in the room, as well.
I like my shadows to be a little more pronounced, which gives the form a sense of depth. I opt for one main light source with a little bounce light from a white reflector on the opposite side.
If you’re not doing so already, be sure to shut off all of the other lights in the room, as well.
john lucas
AAW Forum Expert
Too much light from the front casting an ugly shadow on the back ground. Ideally shoot a subject like that vertically so there isnt so much back ground around it. I would be glad to work with you sometime
Howdy Ted, Hate to tell you, but you have started down another deep rabbit hole! ;-)
Just like joining the AAW and your local Woodturning club or guild, a local photography
club can be great. But there are also opportunities in day classes like you did at your
art center or at local libraries and online. Lots of fun!
I like your ornament and stand! Great job. As for the photo, You have a good smooth background set up to
limit distractions from your art and that's great. Try moving your subject forward towards you to reduce
shadows behind on the backdrop. I can see you have several light sources to play with also. That's awesome!
Good to experiment with. The ribbon is a fun splash of color on the tree, but distracting from your skills
as a turner.
I notice a distinct purple color cast to the backdrop. This could be from the light source or the color of
the backdrop itself. Better to shoot for neutral colors in the whites and grey tones. If the room where you shot the
photo is painted purple, it might be lots of reflected light. Ultra-high cost solution I have used before is
white printer paper taped to cereal boxes on the kitchen table will block and do extra fill light from the sides.
Doing your shoot on a table next to a window with daylight and one or two fill lights is my best result
for natural color. Open the curtains so they don't affect color.
No fancy expensive equipment needed! Although it's fun for doing other photos. You can do amazing things
with your cell phone and free software that is built in on the phone. This is just a fast three minute setup for the
Front Range Woodturners Newsletter I did yesterday. Cell phone, plastic backdrop taped to my computer monitor,
open window with indirect sunlight. No editing other than instant color correction on phone and then reduction
of file size for this share on the forum just now.
OK
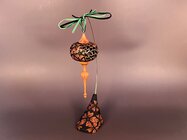
Lets critique my own photo I did here as an example.
Ornament on the left was still swinging when I snapped the shot and so it's hanging wonky? OR
Maybe my phone was too close and got too much lens distortion on both left and right.
A little washed out with undefined shadows like Mr Severns likes.
That glow line on my backdrop is in a bad spot. Ideal placement is centered behind the globes.
Pull the cell phone back so more of the subject is in focus.
Ugly hanger hooks.
Might have benefited from an additional light from above.
The best thing;
Getting to share some of this month's efforts with the members of my AAW chapter newsletter readers!
Don’t know about the lighting but what a beautiful piece!!
Thanks Dan also trying to figure out the correct proportions on an ornament.Don’t know about the lighting but what a beautiful piece!!
Don’t suppose you could snap a cell phone shot of your setup? ThanksIt’s a solid photo, Ted. Looks like you’re using multiple light sources, which is making the image slightly over lit and is washing out the shadows. Too much light and not enough shadow tends to make the image look flat.
I like my shadows to be a little more pronounced, which gives the form a sense of depth. I opt for one main light source with a little bounce light from a white reflector on the opposite side.
If you’re not doing so already, be sure to shut off all of the other lights in the room, as well.
Jaramiah Severns
TOTW Team
Of course! Here’s my set up and the image it captured.Don’t suppose you could snap a cell phone shot of your setup? Thanks


@Ted Pelfrey
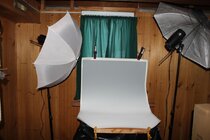
This is the "Photo Cube" I've been using for years for photographing nearly all small things. Incredibly cheap to make.
The background is always grey, but sometimes I change the color a bit with Photoshop if it "feels right" for that subject.
The second pic is of a handbell ornament I cut in half to show the wall thickness to students and at demos.


A PVC frame (two sides each glued with one 2-way at the front and two 3-way connectors - back, top and bottom with two cross bars pressed fit) with thin white cloth attached to two sides with safety pins. For a seamless background I use a piece of light grey poster board (not white) sitting flat for about half of the depth then curved up towards the back, held in place by small clamps on sticks. I cut out some long 2" wide strips on the sides of the poster board so the front part is forced to sit flat on the table by the PVC then the cutouts let the back part curve upwards. I also put a dowel rod across the top for when I want to suspend something like an ornament. (I hang from fine wire that's thinner than hair.)
The whole thing comes apart in minute when I want to use the table saw it usually sits on! Hmmm. Seem to use the table saw less and less every year...
I think I made a 2' cube. I do something different for big things, usually outside with natural light. (I used to have a full studio setup with roll-down backdrops, lights on stands, reflecting boards, umbrellas, foils, etc - could photograph people and such - they I realized I hated to photo people and sold or gave it all away! Stuck with wildlife and nature until wood turning. All that was way before digital photography, shooting and developing B&W film and enlargements! Things are SO much easier these days!)
I have two photo CFL lamps in adjustable fixtures, one on each side. I can move this up and down, away or closer, etc to get the lighting I want. I have an gooseneck lamp in front for highlights. I used to tape a piece of tissue paper to the front of that but now I use photo flash diffuser fastened with velcro. (BTW, I've read a zillion books and articles with opinions on lighting for photography ("this is right, that is wrong") and pay no attention to them - the only opinion I care about is what suits me! Ego problem?) Sometimes I'll take a bunch of pictures with varied lighting then pick what I like best. Occasionally I go back and reshoot.
It's important to me to turn off all the lights in the shop so to avoid color temperature conflicts. When I shot in a room with windows I closed the blinds to eliminate effects from shifting sunlight, clouds, etc.
I sometimes shoot the photos with the cell phone (step back some and zoom in to prevent perspective distortion.) I often use a good Canon digital SLR with a mild zoom lens on a tripod with a digital shutter release to eliminate camera shake. The zoom lens, again, lets me control the perspective (and the depth of field) so it looks right to me. If I use the cell phone camera, I also mount it on the tripod with a spring-loaded cellphone holder and trigger the shutter with the self-timer.
I don't worry too much about resolution since I'm not shooting magazine covers or for big posters - doesn't take a lot of pixels for a message or an email!
I have a zillion photos taken in the cube. Just a couple of recent examples.

Sometimes the best lighting to me is a delicate balance:

I find the photo cube capable of incredible control, limited mostly by my imagination! (and patience) A photo wizard could do wonders.
JKJ
This is the "Photo Cube" I've been using for years for photographing nearly all small things. Incredibly cheap to make.
The background is always grey, but sometimes I change the color a bit with Photoshop if it "feels right" for that subject.
The second pic is of a handbell ornament I cut in half to show the wall thickness to students and at demos.
A PVC frame (two sides each glued with one 2-way at the front and two 3-way connectors - back, top and bottom with two cross bars pressed fit) with thin white cloth attached to two sides with safety pins. For a seamless background I use a piece of light grey poster board (not white) sitting flat for about half of the depth then curved up towards the back, held in place by small clamps on sticks. I cut out some long 2" wide strips on the sides of the poster board so the front part is forced to sit flat on the table by the PVC then the cutouts let the back part curve upwards. I also put a dowel rod across the top for when I want to suspend something like an ornament. (I hang from fine wire that's thinner than hair.)
The whole thing comes apart in minute when I want to use the table saw it usually sits on! Hmmm. Seem to use the table saw less and less every year...
I think I made a 2' cube. I do something different for big things, usually outside with natural light. (I used to have a full studio setup with roll-down backdrops, lights on stands, reflecting boards, umbrellas, foils, etc - could photograph people and such - they I realized I hated to photo people and sold or gave it all away! Stuck with wildlife and nature until wood turning. All that was way before digital photography, shooting and developing B&W film and enlargements! Things are SO much easier these days!)
I have two photo CFL lamps in adjustable fixtures, one on each side. I can move this up and down, away or closer, etc to get the lighting I want. I have an gooseneck lamp in front for highlights. I used to tape a piece of tissue paper to the front of that but now I use photo flash diffuser fastened with velcro. (BTW, I've read a zillion books and articles with opinions on lighting for photography ("this is right, that is wrong") and pay no attention to them - the only opinion I care about is what suits me! Ego problem?) Sometimes I'll take a bunch of pictures with varied lighting then pick what I like best. Occasionally I go back and reshoot.
It's important to me to turn off all the lights in the shop so to avoid color temperature conflicts. When I shot in a room with windows I closed the blinds to eliminate effects from shifting sunlight, clouds, etc.
I sometimes shoot the photos with the cell phone (step back some and zoom in to prevent perspective distortion.) I often use a good Canon digital SLR with a mild zoom lens on a tripod with a digital shutter release to eliminate camera shake. The zoom lens, again, lets me control the perspective (and the depth of field) so it looks right to me. If I use the cell phone camera, I also mount it on the tripod with a spring-loaded cellphone holder and trigger the shutter with the self-timer.
I don't worry too much about resolution since I'm not shooting magazine covers or for big posters - doesn't take a lot of pixels for a message or an email!
I have a zillion photos taken in the cube. Just a couple of recent examples.
Sometimes the best lighting to me is a delicate balance:
I find the photo cube capable of incredible control, limited mostly by my imagination! (and patience) A photo wizard could do wonders.
JKJ
Last edited:
I think it is a very good photo to start with. However I would crop it on the sides to get less background, also some dark vignetting will emphasize the object.
Also I think it is very good that you have got a photo booth. I too often see pictures of probably beautiful bowls against a scattered backgrounds.
This is my setup. What I like most in my booth is the backdrop, an IKEA roller blind which I painted a mottled grey. Rolls up very easily, does not get creased and because it is rolled up, it does not get dusty/dirty. Have used the same for at least 20 years.

I also have a second roller blind to block too much light on the background.

With graduated light on the background I think the bowl gets a more 3-dimensional look.


Alternatively it is very easy to apply this in LrC if you use it. Select background, gradient and reduce exposure.
And if you wonder, the photo booth doubles as a spray booth. Roll up the roller blind and it is protected from spray mist.
Also I think it is very good that you have got a photo booth. I too often see pictures of probably beautiful bowls against a scattered backgrounds.
This is my setup. What I like most in my booth is the backdrop, an IKEA roller blind which I painted a mottled grey. Rolls up very easily, does not get creased and because it is rolled up, it does not get dusty/dirty. Have used the same for at least 20 years.
I also have a second roller blind to block too much light on the background.
With graduated light on the background I think the bowl gets a more 3-dimensional look.
Alternatively it is very easy to apply this in LrC if you use it. Select background, gradient and reduce exposure.
And if you wonder, the photo booth doubles as a spray booth. Roll up the roller blind and it is protected from spray mist.
Similar to what the instructor showed us and what I have. Yes I was using to lights but at 45 degrees from the piece. That looks like just a canvas board you’re using , correct? ThanksOf course! Here’s my set up and the image it captured.View attachment 85563View attachment 85564View attachment 85565
Thanks John!Too much light from the front casting an ugly shadow on the back ground. Ideally shoot a subject like that vertically so there isnt so much back ground around it. I would be glad to work with you sometime
Jaramiah Severns
TOTW Team
Correct. I just happened to have a blank canvas laying around, but any matte white material should suffice.Similar to what the instructor showed us and what I have. Yes I was using to lights but at 45 degrees from the piece. That looks like just a canvas board you’re using , correct? Thanks
I don't think I've seen anything concerning lenses.
Cell phone cameras shoot relatively wide angle, causing close-up work to start looking distorted, somewhat fish-eyed if too close to the subject. For stuff like this, I zoom out the lens to 1.5x to 2x, and step back a little bit, then frame the subject to fill the frame.
If using a real camera, mild telephoto lenses, say 75mm-100mm work well for close-up, tabletop photography. And mid-range f-stops of around f-8 to f-11 will provide good depth of field keeping everything in focus. Or smaller number f-stops (f-4 and lower #) start to create limited blurring of subject aspects that are behind the point of focus, a creative measure. With these settings, images remain natural in their perspective by limiting wide angle distortion and long telescopic over-flattening.
Bryan Peterson, long-time photographer and author, has a many really good books such as Understanding Exposure, Understanding Close-Up Photography, and Understanding Composition, among others, which would greatly aide anyone wishing to learn more about stepping up your technical and creative photography skills. Amazon sells his titles.
Your best photo will come from an extremely overcast day outside. There will be no shadows and if you are using a real camera you can bracket photos for best exposure. That said is why it is hard to duplicate with a photo setup with lighting. I use two umbrella lights (one thru and one reflecting) that are controlled by a device on the cameras hot shoe. I am never lower than F-18 and I use a telephoto lens. Even with that it still is hit or miss at times. I may take 20 or 30 photos or more depending on the piece. The one thing I did tire of was taking my best DSLR down to the photo room and then have to bring it back upstairs (I am never more than 5 or 6 feet from a camera). So I took a shot on Ebay at Roberts Cameras and bought a couple older DSLRs between $40 and $70 (Canon Rebel XTs) and they work great for Woodturning photography and I can leave one there all the time (which reminds me that the one down there probably needs recharged).
Attachments
Hi Ted, first of all, your piece is outstanding!
I will agree with most of the comments already made, and disagree with some. These are all my opinions, no rules are cast in stone. First of all, as John Lucas said, this piece has a vertical layout, so the photo should be vertical as well. In this case, the photo can be cropped.
The background should be a neutral grey, or a graduated neutral grey. If you ever submit photos for an exhibition or gallery show, they usually require a grey background. The shadow behind the globe is distracting. This is because the piece is too close to the vertical section of the background. Just move the piece forward toward you and away from the background to eliminate that shadow.
Looking at the shadows that are cast from the base, it looks to me that the lights are positioned too low. I would move them up so that they are shining down at a 45 degree angle as a starting point and adjust from there. As others have said, consider one light on one side and a reflector on the other. In this case I think two lights is fine.
If you are shooting indoors, make sure that all other lights in the room are turned off. If it is daytime, cover all windows. A mixture of your lights and daylight throws off the color. Also, windows create unwanted reflections. I cover my windows with an old quilt.
Never use a phone for this type of photography. Even with the latest and greatest, the quality just isn't there. Use a real camera with a good lens. To get true colors, go into the camera settings and correct the white balance. You only have to do this the first time if you leave it set that way.
I always shoot between F-18 and F-22 using aperture mode and manual focus. This insures a good depth of field and that the piece is in sharp focus from front to back. It requires a long exposure which in turn requires a tripod. I see too many photos of bowls where the front edge or back edge is out of focus.
Expect to take 20 or more photos while bracketing the exposure so that you can later pick out the best.
I hope to see you at SWAT again this year!
I would caution about using apertures from f-16 and smaller (higher number) due to inevitable lens diffraction, adversely affecting focus and image quality. Every brand, every lens. More here-
Last edited:
Thanks Ric! Unfortunately I’m not going to make SWAT this year. The AAW is within driving distance this year so I choose to go there, can’t do both due to time off . It was great meeting you too!Hi Ted, first of all, your piece is outstanding!
I will agree with most of the comments already made, and disagree with some. These are all my opinions, no rules are cast in stone. First of all, as John Lucas said, this piece has a vertical layout, so the photo should be vertical as well. In this case, the photo can be cropped.
The background should be a neutral grey, or a graduated neutral grey. If you ever submit photos for an exhibition or gallery show, they usually require a grey background. The shadow behind the globe is distracting. This is because the piece is too close to the vertical section of the background. Just move the piece forward toward you and away from the background to eliminate that shadow.
Looking at the shadows that are cast from the base, it looks to me that the lights are positioned too low. I would move them up so that they are shining down at a 45 degree angle as a starting point and adjust from there. As others have said, consider one light on one side and a reflector on the other. In this case I think two lights is fine.
If you are shooting indoors, make sure that all other lights in the room are turned off. If it is daytime, cover all windows. A mixture of your lights and daylight throws off the color. Also, windows create unwanted reflections. I cover my windows with an old quilt.
Never use a phone for this type of photography. Even with the latest and greatest, the quality just isn't there. Use a real camera with a good lens. To get true colors, go into the camera settings and correct the white balance. You only have to do this the first time if you leave it set that way.
I always shoot between F-18 and F-22 using aperture mode and manual focus. This insures a good depth of field and that the piece is in sharp focus from front to back. It requires a long exposure which in turn requires a tripod. I see too many photos of bowls where the front edge or back edge is out of focus.
Expect to take 20 or more photos while bracketing the exposure so that you can later pick out the best.
I hope to see you at SWAT again this year!
Actually I did some test and settled for f-19. Unfortunately cannot find the test right now.I would caution about using apertures from f-16 and smaller (higher number) due to inevitable lens diffraction, adversely affecting focus and image quality. Every brand, every lens. More here-
A few years back I started a thread with questions about photo booths that had appeared on the market and the photography purests all jumped in and showed their setups. I don't have a space in my shop or home that I could leave that equipment set up, which was what I was after, so I went against the experts and bought a booth.


The booth is large enough for any turnings I want to photograph and has a zippered door to keep the dust out when not in use. The booth includes 2 LED strip lights with a dimmer control permanently mounted on the wall behind it. The unit also included 4 backgrounds with the white one being in current use. The other accessories I have added is a cell phone clamp for the tripod and a blue toothe switch to snap the photo. The pedestal is the most recent addition used to raise smaller pieces.
The booth is large enough for any turnings I want to photograph and has a zippered door to keep the dust out when not in use. The booth includes 2 LED strip lights with a dimmer control permanently mounted on the wall behind it. The unit also included 4 backgrounds with the white one being in current use. The other accessories I have added is a cell phone clamp for the tripod and a blue toothe switch to snap the photo. The pedestal is the most recent addition used to raise smaller pieces.
There has been some good suggestions here Ted. May I ask what are the lights you are using? Are they incandescent or fluorescent or LED? The photo has an overall reddish cast. The meta data says you are using an iPhone which I would have thought would correct the overall color balance to something more neutral.
Don - is that the 32" size? Are you happy with it, and can you get the iPhone far enough away for a good pic? I recently had a horrible experience with perspective distortion. Lastly, how easy/quick is it to set up and take down (I also don't have the space for a permanent setup but am looking for something better than draping a roller blind on my tablesaw that I've been using for a while. ThanksA few years back I started a thread with questions about photo booths that had appeared on the market and the photography purests all jumped in and showed their setups. I don't have a space in my shop or home that I could leave that equipment set up, which was what I was after, so I went against the experts and bought a booth.
View attachment 85619View attachment 85620
The booth is large enough for any turnings I want to photograph and has a zippered door to keep the dust out when not in use. The booth includes 2 LED strip lights with a dimmer control permanently mounted on the wall behind it. The unit also included 4 backgrounds with the white one being in current use. The other accessories I have added is a cell phone clamp for the tripod and a blue toothe switch to snap the photo. The pedestal is the most recent addition used to raise smaller pieces.
I did some test by just photoing a ruled paper to see what f-stop I should use to get the best image. I settled for f-19, 105 mm with Pentax K3.I would caution about using apertures from f-16 and smaller (higher number) due to inevitable lens diffraction, adversely affecting focus and image quality. Every brand, every lens. More here-

I used to be one of those posting pics with pieces on random tables in the house until I discovered that the marketing department at work has a booth similar to this. I take my pieces to work and use the photo booth. You can get one that folds up and stores out of the way. They come in many different sizes. Easy to set up and play with.A few years back I started a thread with questions about photo booths that had appeared on the market and the photography purests all jumped in and showed their setups. I don't have a space in my shop or home that I could leave that equipment set up, which was what I was after, so I went against the experts and bought a booth.
View attachment 85619
The booth is large enough for any turnings I want to photograph and has a zippered door to keep the dust out when not in use. The booth includes 2 LED strip lights with a dimmer control permanently mounted on the wall behind it. The unit also included 4 backgrounds with the white one being in current use. The other accessories I have added is a cell phone clamp for the tripod and a blue toothe switch to snap the photo. The pedestal is the most recent addition used to raise smaller piece.
I've owned several Pentax DSLRs, including a K3. My current Pentax is a K3-III Monochrome. Only captures BW images, the sensor does not have the Bayer color filter. A wonderful camera!I did some test by just photoing a ruled paper to see what f-stop I should use to get the best image. I settled for f-19, 105 mm with Pentax K3.
View attachment 85634
john lucas
AAW Forum Expert
I hav
You have an excellent set up. That is very similar to what I use to shoot quick photos of my work.Of course! Here’s my set up and the image it captured.View attachment 85563View attachment 85564View attachment 85565
john lucas
AAW Forum Expert
Here is my light tent hand out. I'm not a fan of light tents but used properly you can get good results. I photographed art work for 27 years and picked up a lot of tricks. I started out using a light tent to photograph difficult work but later found better techniques. I photographed everything from jewelry, glass, ceramics, fiber, furniture and lots of turnings.
Attachments
WOW! Readers, don't pass up the handouts John just posted! Straight forward and excellent descriptions. Print them out and save them! Thanks John!Here is my light tent hand out. I'm not a fan of light tents but used properly you can get good results. I photographed art work for 27 years and picked up a lot of tricks. I started out using a light tent to photograph difficult work but later found better techniques. I photographed everything from jewelry, glass, ceramics, fiber, furniture and lots of turnings.
Yes it is the 32" X 32 X 32 and yes I am satisfied with it. I set the iphone/tripod about 2 feet from the opening and zoom in to fill the image. I don't remember how long it took to set it up, but it did include making the stand that it is sitting on. The booth is permanently set up as shown in the loft of my shop.Don - is that the 32" size? Are you happy with it, and can you get the iPhone far enough away for a good pic? I recently had a horrible experience with perspective distortion. Lastly, how easy/quick is it to set up and take down (I also don't have the space for a permanent setup but am looking for something better than draping a roller blind on my tablesaw that I've been using for a while. Thanks
Downloaded , thanks again John!Here is my light tent hand out. I'm not a fan of light tents but used properly you can get good results. I photographed art work for 27 years and picked up a lot of tricks. I started out using a light tent to photograph difficult work but later found better techniques. I photographed everything from jewelry, glass, ceramics, fiber, furniture and lots of turnings.