• July 2025 Turning Challenge: Turn a Multi-axis Weed Pot! (click here for details)
  • Congratulations to Bobby McCarly for "Hemostatmorphodon" being selected as Turning of the Week for July 7, 2025 (click here for details)
  • Welcome new registering member. Your username must be your real First and Last name (for example: John Doe). "Screen names" and "handles" are not allowed and your registration will be deleted if you don't use your real name. Also, do not use all caps nor all lower case.

oak experts

Joined
Jan 20, 2006
Messages
2,057
Likes
403
Location
Martinsville, VA
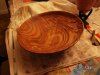
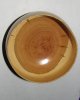
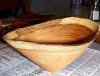
1st piece of oak turned, 1st bowl in a while also, i seem to have what hockenbery referred to as washboard efect on inside of bowl, i thought i had smooth finish til i put the finish on and it warped some also, outside finish is smooth, started out as 11 inches round now 11 on 2 sides and 10 1/4 on other 2, 1/4 thick no cracks
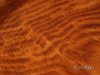
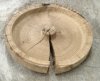
blank from Chester Lane, he said it was about 1 year old, outside moisture content 13 to 17% looks like i have some power sanding to do:eek:
 

Attachments

  • oak1a1.JPG
    oak1a1.JPG
    88.2 KB · Views: 541
  • oak2a2.JPG
    oak2a2.JPG
    87 KB · Views: 539
  • oak3a3.JPG
    oak3a3.JPG
    85.8 KB · Views: 536
Got to love a moisture meter. Betting you'll do the turn/weigh re-turn cycles in the future, eh? Spot readings of what might be on a given day is just not the route to circularity.

Must be some southern-grown stuff with those broad rings. Never get that rate of growth up here, even in the open.
 
After years of bowl turning, I can usually see the washboard effect before I sand. Part of it can come from your gouge. If you don't round off the bottom of the gouge before cutting, the square edge can cause some bruising, which can feel smooth, but show up after finishing. I do use a shear scraper on the inside of the bowl to remove this also, a very light cut, removing only the fluffyest shavings. The 80 grit gouge also helps.
robo hippy

Robo, you are a much better man than I. I have never been truly successful at sanding away the bruising. A very fine cut or shear scrape is usually what it takes.
 
oak

Must be some southern-grown stuff with those broad rings
yes, i believe it was locally grown oak, plenty around here, it was almost like the wood had different moisture content between the light and the dark, some shaving were dusty and some damp, the darker the color the more moisture in it

seems the form has stablized, still no cracks, and washboard effect has lessened if that is possible, i had put another coat of oil on before taking the picture, i believe the fibers must have been crushed just as described

oak sure does make me appreciate other woods :D
 
Jake,
I doubt that I am a better man than you. More experienced, probably. Better lighting, maybe. I do like the multi spectrum lights. They are almost as good as sun light and show things like bruising better than incandescent bulbs. Rounding off the bottom of the facet on your gouges after you sharpen helps, and a light touch also helps. I will never forget seeing Soren Berger start the inside cut on a bowl, then drop his left hand to his side while making the cut and merrily chat away while finishing the cut. I went from saying "you can't do that, it is dangerous" to "hey, that works pretty good!" This was one of the epiphanies of my turning education.
robo hippy
 
Jake,
Rounding off the bottom of the facet on your gouges after you sharpen helps, and a light touch also helps. I will never forget seeing Soren Berger start the inside cut on a bowl, then drop his left hand to his side while making the cut and merrily chat away while finishing the cut. I went from saying "you can't do that, it is dangerous" to "hey, that works pretty good!" This was one of the epiphanies of my turning education.
robo hippy

"Irish" grind innovation to compensate for the thicker section under the flute of the new cylindrical gouges, though I just revert to the old uniform thickness gouge for the final couple of passes.

Yes, once you get the bevel tracking, one hand becomes almost superfluous. I sometimes drop the right hand when I'm showing off.

Bait, from the looks of it, and it may be in part because of the photography, you were using a piece of oak that spent a while on the ground in the log. As you probably have read, oak is a stinker to dry properly because you have to push the interior so hard the exterior honeycombs.
 
oak

you were using a piece of oak that spent a while on the ground in the log
.

not sure because i was given the blank how long the wood was on the ground, the blank was very lightly moist, sort of like it was in a hot house???, the blank had no cracks and did not crack as i turned it

Chester Lane said the blank was about a year old

i am naming it 365, Amen :D
 
Robo, I have started to reduce the width of my bevels, one handed still is a bit down the road though.:)
 
I would never consider it advantageous to drop the hand from the tool rest. For those starting out, the lesson is:
If your tool rest hand is doing much once the inside cut is started, you may want to re-evaluate your technique.
 
more info

oak is a stinker to dry properly because you have to push the interior so hard the exterior honeycombs.

i talked to Terry Mitchell (he is a woodturning friend of Chester Lane and why we stopped by) and he says that some of Chester's blanks do crack, and that he uses a variation of the paper bag method, Chester has several large cardboard barrels, the type with the lid that has a metal clamp on them, and that he stores all his blanks of what ever type of wood in them, the blank i received had no anchor seal or other type of sealer on it :cool2:

i am trying to locate some of these barrels as of today and will probably use cardboard boxes til i can locate some at a good price (free)
 
Oak is a stinker to dry commercially in a kiln. Which explains why, even with a two-year old piece of firewood, the interior is often still wet. Seems the exterior dries so fast it forms a non-wicking dry exterior, similar to the way end checks self-limit. The way we work with it, TDT, it's not a big deal, because very little of it is far from the air through end grain. If it was still good in the chunk, no real excuse for losing a turning if you control the relative humidity by any of a number of ways.
 
Tdt

what does TDT mean?

Thermal Decay Time or The Domino Theory :confused:
 
Turn, Dry, Turn. The way we handle things with wet or green wood when we're hoping for round.
 
oak

mm

thank you for your patience and attention, the 11" bowl has now moved 3/4", what would you say to turn to 1 1/4" or larger rough in the future of that size bowl, seems oak the 10% rule is not enough

any other thoughts on the honeycomb effect and/or will it be present with an endgrain hollowform?? since oak is so plentiful i will probably put some up in boxes shortly, i would not think dried hf oak would move if turned thin to say 1/4"

while i am not an adcovate of one hand turning, i have escaped using Stan Townsend's made tool one handed i tried just for the :D & :eek: factor, not sure if i would try anybodies else's :cool2:
 
Oak

I think I have mentioned this before. I have turned red/white/black oak. Cracking is the probelm. I buy 20 cords of firewood in the 8 foot logs lengths(every 2 years), most of it oak. (from mid- northern Michigan)The last 2 years I got ahold of some that had been down for a couple of years. The smaller pieces (8-10" diameter) has more white sap wood than the larger logs and had spalted. I normally don't like the looks of oak-boring. But I have made some gorgeous round rim and natural edged bowls with the nice contrasty colors. Lots of crotch figure. It turns beautifully and sands even better. With the open grain, you can't see the gouge/sand marks well at all. Most of what I have turned in the last 2 years didn't split much (except black oak) at all or was already cracked and I filled. So I find turning dryish oak (doesn't turn your lathe beds as discolored when it is dry) pleasurable, and I now like some oak for appearance. Gretch
 
11" bowl has now moved 3/4", what would you say to turn to 1 1/4" or larger rough in the future of that size bowl, seems oak the 10% rule is not enough

any other thoughts on the honeycomb effect and/or will it be present with an endgrain hollowform?? since oak is so plentiful i will probably put some up in boxes shortly, i would not think dried hf oak would move if turned thin to say 1/4"

That is a HUGE amount of difference. Is that bowl pretty flat, by chance? I've done several experiments over the past few years with different woods, and it appears that the thickness of the wall is the best determinant of the amount of shrink when the bottom is tapered down. I use 1" or less for stuff in the 10 to 16 inch range, and get the same diameter loss within species. Going to 3/4 loses less. I would not go thicker, as I began to lose pieces at around 1 1/4 in the experiments. George Van leaves his thick, if his pictures are any indicator, but he coats, which I don't.

I doubt you'll run into a lot of honeycomb problems with thinner walls, even in long grain. It's difference, once again, which destroys, and it's tough to get a lot of difference at a quarter thick. It's the ray figure that transports water out in oak, so that's where the trouble starts.

Northern growth rates will take a lot of abuse without breaking. Think I posted this some time back. Lots of bend, but no break!
 

Attachments

  • Red-Oak-Rough.jpg
    Red-Oak-Rough.jpg
    73.5 KB · Views: 77
"I use 1" or less for stuff in the 10 to 16 inch range, and get the same diameter loss within species. Going to 3/4 loses less. I would not go thicker, as I began to lose pieces at around 1 1/4 in the experiments. George Van leaves his thick, if his pictures are any indicator, but he coats, which I don't. "

MM, I do follow the 10% rule and too find the larger stable blanks do not need this much allowance, therefore your experiences hold true for me also with our northern hardwoods. A lot of my roughs may appear thicker because the rim was left larger to accommodate a future rim design opportunity. If that is the case I taper toward the bottom. If the bottom is too thick the bowl will split usually half way up in some designs. Don't ask me how I know this:eek:
 
oak

That is a HUGE amount of difference. Is that bowl pretty flat, by chance?

the 2 sides that are 11" tall are 2 1/4" high and the 2 sides that are 10 1/4" high are 2 1/16"
still no cracks

delayed response because i attended the Southern Piedmont Woodturners's
A Day at the Lathe with Larry Hasiak, John Lucas, and Dixie Biggs
I had a great time! :D
 
BB, OK, it is pretty short relative to diameter/thickness of wall, so the amount of earlywood in a straight line is pretty great, allowing nearly every bit of the ~10% shrink to take place. Is it by chance also cut with heart side down? That'll make it look worse as the long sides rise. Heart up will drop the long sides, which is why even going thinner for drying purposes will preserve a safe thickness for re-turning and perhaps a bit of playing with contour. Part of what you lost in diameter would be in air anyway.

With as much distance to air as a flat/thick form like that has, it'll take a while to stabilize, even in oak.

George, I had forgotten you liked the more dramatic thumb rims. That's why they look thick. Next time you've time on your hands, take a look at your stock of blanks and see if it's not more the thickness of the walls rather than the width of the piece that influences diameter loss in similar contours. I found it consistent enough to be a believer, and it does make sense from a wood tech point of view as well.

Richard, it sure shows where the weaknesses are when you look at that cross-section, doesn't it? Right along the ray lines. Not all is lost. If you have patience, Nakashima the thing with some walnut and let the soup run out of your "art." I've often thought of using the wavy contrast cutting board router technique to make a complete contrasting patch, not just a butterfly. Some day when I'm in a "gimmick" turning mood, perhaps.
 
oak

only one quadant has no white streaks (heart wood?) and the side opposite that has the most white streaks (early wood) that is the 10 3/8" width side
(more accurate measurement with a tape than ruler)

the 11" width sides have consistant white streaks and the most honeycomb?

the back and front are consistant as would be expected

i can not tell weather the heart wood was up or down but if the heart wood is the quadrant with no white streaks the blank would not be cut endgrain??????


:confused::confused:

i saw Dixie have a bug take a bite out of one of her leaves and Larry do a one arm and bought John's hand mirror kit, but forgot to find out what kind of wood it is :D
 
Last edited:
Ah, white means sapwood, with a wall structure not yet fully formed and lignified, which carries a lot of moisture, and shrinks more than heartwood. As a long-grain piece where the lines run parallel to the axis of rotation is so risky, I hadn't even considered that's what you were turning. If you have a cross-grain piece, which looks like what I posted, rather than a long-grain piece, which is what Richard posted, you can rely on losing more diameter than normal. On a long-grain piece your differential should be on the order of 5-7% max if heartwood alone, with the face grain shrinking more than the quarter direction.

If the heartwood was down in a cross-grain piece, the rings will frown, if up, smile, as in the piece I showed. First picture below is an end-grain cherry piece with big sapwood differential, and an off-center heart. The second is a heart down piece of red oak, and you can see the white sapwood which was up, and the darker, which stayed waterlogged long enough to discolor
 

Attachments

  • Cherry-Top.jpg
    Cherry-Top.jpg
    55.2 KB · Views: 71
  • Standup Oak.jpg
    Standup Oak.jpg
    49 KB · Views: 71
Last edited:
oak

If the heartwood was down in a cross-grain piece, the rings will frown, if up, smile, as in the piece I showed.

i have the smile so the heartwood is up :)
 
What kept the pith from checking on this one? I would have thought that this being cherry the radial checks would be significant.


Thin and green cut, of course. Then the bottom was elevated on stickers, as I have mentioned, to promote even drying. It's been working pretty well, so I don't really shy away from an end grain piece now if it looks like one might be good.
 
Thin and green cut, of course. Then the bottom was elevated on stickers, as I have mentioned, to promote even drying. It's been working pretty well, so I don't really shy away from an end grain piece now if it looks like one might be good.

No sealer on the endgrain? Just started low to the floor on stickers?
 
Actually, left up on the table on stickers. Doesn't make a lot of difference if the RH is low on thin cut stuff.

I coat the ends of box blanks, and that's about it.
 
Back
Top