• June 2025 Turning Challenge: Turn a Wand! (click here for details)
  • Congratulations to Carl Ford for "Rings of Raindrops in Living Color" being selected as Turning of the Week for June 16, 2025 (click here for details)
  • Welcome new registering member. Your username must be your real First and Last name (for example: John Doe). "Screen names" and "handles" are not allowed and your registration will be deleted if you don't use your real name. Also, do not use all caps nor all lower case.

On the burn pile

Joined
Sep 1, 2024
Messages
25
Likes
7
Location
North Carolina
I was doing my monthly monitoring of the green bowls, weighing and checking for mold, etc and found a few with cracks.

I've attached pictures of a largish oak bowl, maybe 12x5, which has split horrifically.

I've not had much issues with cracking until now but this is pretty bad. Pith is removed, wood was defect free, two coats of anchor seal. Not sure what went wrong.

Anyway, I'll plan to periodically post pictures of bowls gone wrong in case anyone can help diagnose the issue. Feel free to post your own problem bowls.
 

Attachments

  • PXL_20250608_010947651.MP.jpg
    PXL_20250608_010947651.MP.jpg
    418.8 KB · Views: 65
  • PXL_20250608_010914091.jpg
    PXL_20250608_010914091.jpg
    349.7 KB · Views: 66
This bowl cracked big time. It’s 16+ inches in diameter. Going to add bigger pewa between the current ones. Haven’t removed foot yet View attachment 76299
Nicely done, Alan. I'd love to recover some pieces in a similar manner but with limited time to turn I'll probably just accept a fallout rate of a few percent and spend the time turning.

Do you do a lot of embellishment?
 
My first impression, perhaps the photo is deceiving, but the bowl appears to be a rather inconsistent thickness (gets thicker as it curves inward) - and perhaps a tad too thick overall , for oak... A consistent wall thickness is pretty important in the drying process (and should include any tenon left on) but other than that, sometimes it just happens - wood is relatively unpredictable.... What works perfect for one bowl may end up as firwood for the other bowl from the same log...
 
I was wondering if that was oak. Around these parts we have tons of oak and most of us wont touch it. Just never stops moving.
 
My first impression, perhaps the photo is deceiving, but the bowl appears to be a rather inconsistent thickness (gets thicker as it curves inward) - and perhaps a tad too thick overall , for oak... A consistent wall thickness is pretty important in the drying process (and should include any tenon left on) but other than that, sometimes it just happens - wood is relatively unpredictable.... What works perfect for one bowl may end up as firwood for the other bowl from the same log...
I thought I had done a decent job with consistent thickness but after going back and checking in think you're right. Buying a proper set of calipers now.

Walls were a bit over an inch think to stick with the 10% rule but maybe i should go thinner and risk the warp or just single turn it to minimize cracking chances
 
Couple coats of anchor seal. Sat in my garage for a few months before cracking.
Food for thought. What months did it sit in your garage and was the relative humidity particularly low the first month or so? I always anchor seal the end grain and paper bag it to slow the rate of evaporation.
 
Food for thought. What months did it sit in your garage and was the relative humidity particularly low the first month or so? I always anchor seal the end grain and paper bag it to slow the rate of evaporation.
I've not been monitoring humidity up till this point. March, April, May in central NC.

I might try paper bag for the next large bowl I do.
 
Also in central NC.

A few years back I had rough turned around 8 Oak bowls, pith at bottom, anchor sealed them, entire bowl. Went to the beach for a week, came back to find half of them cracked. These were quite green when roughed.

On the uncracked oak bowls, and every oak bowl since then (50+ bowls) I modified my approach. The issue, as I observed, is that the rim dries too quickly relative to the rest. Builds up too much stress. Oak seems to move quite a lot early in the drying process, much too fast for the fibers to adjust. Oak moves quite a bit. Being hard as it is, but having fairly low strength between adjacent fibers. It splits beautifully with an axe because of that.

So, to slow the rim movement, I coat the entire bowl in anchorseal. Them I cut strips of blue shop towels, wide enough to be able to cover the rim and an inch below on both inside and outside, all the way around the bowl. I apply the towels like paper mache, saturating with anchorseal. Put them on the shelf as usual. I’ve not had an oak bowl crack since.

I use this same method for any woods likely to crack such as apple.

Hope this helps. I enjoy oak, but respect it. It takes special care when green.
This is helpful. I will give that a try.

I just got back from a week at the beach, so clearly that must be the common cause...
 
James- I too live just outside Charlotte, so RH should be similar for both of us. I have switched to a glue/water mix to coat my bowls rather than Anchor Seal and am convinced I have less cracking. I started doing that because the wax AS on the painted concrete floor was hazardous, but the unexpected side effects have been great. I usually let my Oak sit for a couple months to a year before rough turning and have been known to wrap the rims in plastic wrap after coating with my mix, and I think that helps as well.
 
I've not had much issues with cracking until now but this is pretty bad. Pith is removed, wood was defect free, two coats of anchor seal. Not sure what went wrong.

The wall does look a little thick but if it's thicker at the bottom the upper sides will shrink faster, as Marc described, and split quicker. Oak can be bad. However, I've dried plenty of large blocks of wood of a bunch of species without cracks, including some oak.

Is it red oak? It has a higher T/R ratio, 2.2.

Instead of adding two coats of anchorseal, but since the second coat sometimes doesn't adhere well to the first coat I have better success with thickened anchorseal. I pour anchorseal into plastic coffee cans and leave the lid off and stir every day or so until some of the water evaporates and the stuff gets pretty thick! I keep a cheap paint brush in the can. A coat of this goes on much thicker than the stuff out of the jug or can. ( I think UC Coatings makes it thin on purpose so it can be easily sprayed on the ends of logs at the sawmill. I bought a 55 gal drum years ago and I still have a bit left.)

I don't have photos but here's a screen grab from my wood processing video, applying the thikened sealer to turning squares.
anchorseal.jpg

When I twice turn bowls (rarely) I tend to dry more slowly at first, say with the plastic bag method (remove the wood and invert the bag every day for a couple of weeks) - would be a pain if I did this a lot!
 
The wall does look a little thick but if it's thicker at the bottom the upper sides will shrink faster, as Marc described, and split quicker. Oak can be bad. However, I've dried plenty of large blocks of wood of a bunch of species without cracks, including some oak.

Is it red oak? It has a higher T/R ratio, 2.2.

Instead of adding two coats of anchorseal, but since the second coat sometimes doesn't adhere well to the first coat I have better success with thickened anchorseal. I pour anchorseal into plastic coffee cans and leave the lid off and stir every day or so until some of the water evaporates and the stuff gets pretty thick! I keep a cheap paint brush in the can. A coat of this goes on much thicker than the stuff out of the jug or can. ( I think UC Coatings makes it thin on purpose so it can be easily sprayed on the ends of logs at the sawmill. I bought a 55 gal drum years ago and I still have a bit left.)

I don't have photos but here's a screen grab from my wood processing video, applying the thikened sealer to turning squares.
View attachment 76365

When I twice turn bowls (rarely) I tend to dry more slowly at first, say with the plastic bag method (remove the wood and invert the bag every day for a couple of weeks) - would be a pain if I did this a lot!
I think it might be red oak? Not sure, pic attached.

Thickened sounds interesting.

The main reason I've avoided the bag method is I need a low maintenance process. I'd love to turn every day but realistically I'm just not able to get in the garage that often
 

Attachments

  • PXL_20250504_180339641.MP.jpg
    PXL_20250504_180339641.MP.jpg
    267 KB · Views: 24
  • PXL_20250504_180513418.jpg
    PXL_20250504_180513418.jpg
    995.7 KB · Views: 19
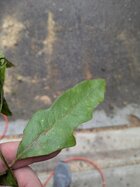
Red oak leaves have pointed lobes, White oaks have rounded lobes.

I haven't seen that particular leaf you show in the first picture on trees around here and I don't know a name for it. There are a bunch of species of trees in both the red and white oaks.
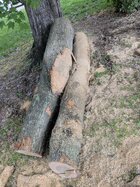
I'm not good at ID from bark.

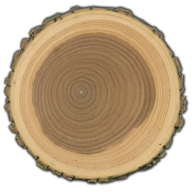
The best way is to prepare a small sample showing the end grain, sliced clean with a single=edge razor blade. This article explains in section 7, "Look at the end grain".

You have to slice off a bit showing at least a few rings of end grain in the heartwood in order to best see the pore structure. The sample doesn't have to be big - I usually cut a piece maybe 1/2" wide, 1" long, and thick enough to hold onto with the other hand is enough. (don't sand the sample)
Look at the pores with a hand lens, best about 10x. (I use a low power stereo microscope.)

Red oak and white oak both have large early-wood pores. The pores in red oak are open, like soda straws. The pores in the white oaks are clogged with something called tyloses - this prevents liquids from flowing easily make white oak a good choice for outdoor things and for whiskey barrels.

This shows both red and white oak. You can easily see the the empty early wood pores in the red oak.
red_white_oak.jpg

The "towers" of fine late wood pores with fine latices of tiny pores between are quite distinctive in oaks.
Another distinctive feature in the oaks is the large rays, visible without magnification. The rays in white oak can be quite long.

Examining the end grain this way may not identify the wood, but it can often let you know what wood it's NOT.

At the bottom of the Wood Database ID page is another way to identify a wood sample by sending it to a gov laboratory, free to all US citizens.

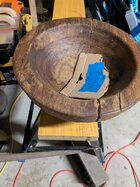
But regardless of the species, many have a high shrinkage rate. The wood shrinks as water leaves, mostly through the end grain. Anchorseal helps a lot but is mostly wax and wax slows but doesn't stop water and can't prevent the cracks from stresses. As mentioned, if the bottom is quite thick relative to the rim the rim can shrink sooner which might explain the cracks. If all the wood loses water at the same rate, it would just shrink and warp. If it leaves one area more quickly, that area will "feel" the stress.

JKJ
 
Last edited:
I don’t think that’s the best, or most telling leaf. That said, I think you have either water oak (red) or post oak (white). The pointed or rounded lobes on the leaves usually indicates red or white, (white oak has rounded lobes while red oak leaves are pointed) it doesn’t always hold true. It would be good if you can check for tyloses.

Both of these have a good amount of movement, which means faster moving, more cracking. It’s really important to slow the water loss, much more than with other species.

Considering rough turn thicknesses, uniform or similar thickness is important. Which can cause issues given the additional material necessary to provide a tenon. I incorporate my final foot into the tenon, so not a tenon below the foot, which allows me to keep the bottom much closer to that of the remainder of the bowl.

As to the rim area, the only part of the bowl with three drying surfaces. Inside, outside and top. 50% more than sides and bottom. Thus the need for special treatment in fragile woods. Wet and drying oak, I consider fragile.
 
I agree with Marc Post Oak or Water Oak. The only way to tell red from white if you only have wood is to cut a short piece with the grain from each and blow thru it like a straw into a bowl of water. The red makes bubbles and the white will not. This is due to those open pores.
 
I agree with Marc Post Oak or Water Oak. The only way to tell red from white if you only have wood is to cut a short piece with the grain from each and blow thru it like a straw into a bowl of water. The red makes bubbles and the white will not. This is due to those open pores.
And that is why whiskey barrels are made from white oak only.
 
The only way to tell red from white if you only have wood is to

The other way is to shave a bit of end grain with a razor blade and look at the earlywood pores: open for red oak, packed with tyloses in white oak. (picture, post #19 above.) Tyloses in the pores look kind of "sparkly" under magnification.

JKJ
 
The other way is to shave a bit of end grain with a razor blade and look at the earlywood pores: open for red oak, packed with tyloses in white oak. (picture, post #19 above.) Tyloses in the pores look kind of "sparkly" under magnification.

JKJ
Note not everyone can see and distinguish the method you are describing . That saying "I see it but don't know what I am looking at" just a thought.
 
Note not everyone can see and distinguish the method you are describing . That saying "I see it but don't know what I am looking at" just a thought.

The basics are actually quite simple. I first learned the process from the excellent book "Identifying Wood" by R. Bruce Hoadley. The only tools needed are a single-edged razor blade and a 10x hand lens. I show the method to anyone interested. The online Wood Database also has that article with basic instructions.

But maybe it's as my piano teacher was fond of saying: "Everything's easy once you know how."

JKJ
 
Back
Top