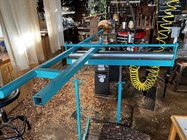
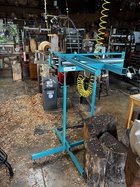
Today I got Brian McEvoy's giant hollowing system. I see that he has a website for his turnings. But nothing about the tools he sells. My system looks like it was never used before. Not once. The bar is massive. Luckily my Jamieson cutter with a Mike Hunter cutter fits the tip. I wonder if anybody knows where to buy a bracket for a laser, but I will be adding a webcam. I should call Dave, maybe he can advise me. I can weld, I have a little welding machine, so maybe I can weld the vertical bracket. Any ideas are welcome. Pictures too if you have upgraded yours. When I first saw the system, I thought it was Frank Sudol's system. I'm so happy I will be able to make deep urns, deep vases, and more! I think I got the tool that's going to bring me closer to greatness, LOL

-
Congratulations to Chris Lawrence for "Dragon's Grip" being selected as Turning of the Week for March 30, 2026 (click here for details) -
Welcome new registering member. Your username must be your real First and Last name (for example: John Doe). "Screen names" and "handles" are not allowed and your registration will be deleted if you don't use your real name. Also, do not use all caps nor all lower case.
You are using an out of date browser. It may not display this or other websites correctly.
You should upgrade or use an alternative browser.
You should upgrade or use an alternative browser.
One Good Turn Hollowing System
- Thread starter Emiliano Achaval
- Start date
Odie
Panning for Montana gold, with Betsy, the mule!
Today I got Brian McEvoy's giant hollowing system. I see that he has a website for his turnings. But nothing about the tools he sells. My system looks like it was never used before. Not once. The bar is massive. Luckily my Jamieson cutter with a Mike Hunter cutter fits the tip. I wonder if anybody knows where to buy a bracket for a laser, but I will be adding a webcam. I should call Dave, maybe he can advise me. I can weld, I have a little welding machine, so maybe I can weld the vertical bracket. Any ideas are welcome. Pictures too if you have upgraded yours. When I first saw the system, I thought it was Frank Sudol's system. I'm so happy I will be able to make deep urns, deep vases, and more! I think I got the tool that's going to bring me closer to greatness, LOL
Massive is right, Emiliano.....
")
Almost looks big enough to create problems controlling it through a smooth curve.......is it?
I once ran a vertical mill modifying commercial aircraft jet engine parts. This had a hydraulic feed that was guided by a pneumatic stylus manipulated by hand. Something like that would be awesome for hollow forms!
")
-----odie-----
That about sums up my thoughts on seeing that setup. The roller will help with the in out movement but the side to side movement is sliding friction that appears to require that the operator be in 2 different places at once (up at the entrance to the form and back at the stabilizing roller) and note that moving the cutter into the wood say 1/8" will require much more movement out at the captured roller.Almost looks big enough to create problems controlling it through a smooth curve.......is it?
Is that the old Carter Hollower XL that they stopped selling? I thought that Carter took it over from the original maker.
I have one from Carter and it is awesome.
Carter may have some laser kits still in stock.
I have one from Carter and it is awesome.
Carter may have some laser kits still in stock.
I believe he used a light to determine thickness. He has a video on usage.Today I got Brian McEvoy's giant hollowing system. I see that he has a website for his turnings. But nothing about the tools he sells. My system looks like it was never used before. Not once. The bar is massive. Luckily my Jamieson cutter with a Mike Hunter cutter fits the tip. I wonder if anybody knows where to buy a bracket for a laser, but I will be adding a webcam. I should call Dave, maybe he can advise me. I can weld, I have a little welding machine, so maybe I can weld the vertical bracket. Any ideas are welcome. Pictures too if you have upgraded yours. When I first saw the system, I thought it was Frank Sudol's system. I'm so happy I will be able to make deep urns, deep vases, and more! I think I got the tool that's going to bring me closer to greatness, LOL
Very nice. That should handle some pretty massive pieces. Great that Lyle’s cutter tips fit.
The shear mass of the system will make side movements a bit more difficult than your smaller Jamieson system, some paraffin wax on the tool rest and rear roller will let it slide easily, just as Lyle recommends.
A laser/camera mount could be made from wood (T fittings upper and lower) and tube - thin wall aluminum, ~ 3/4 to 1” OD, want stiff but light - for the riser and horizontal extension. Use Lyle’s molded plastic T fittings as design guides. Use a squarish chunk of wood, drill the tube holes, then drill mount bolt holes at each corner, then cut in 1/2 with bandsaw. Carve off some thickness off at bolt holes if desired. Could also use a chunk of Delrin, UHMW, could cast suare chunks of resin - several material options. No welds really needed. Or, if you have a machinist friend, make the T’s out of aluminum block. Interested to see what you come up with.
Wow that thing looks bigger than my shop.
That is an impressively large hollowing rig for sure! I have the Monster articulated hollowing system, and have some modified boring bars of larger size than the originals that came with my system. I had the tang machined down to 5/8" to be able to fit into the knuckle and be held in the Monster rig. I fabricated a laser arm system to be used with my Oneway Easy Core system earlier this week, by adapting a Ron Brown adjustable laser arm he sells for use with handheld tools. The laser unit on that is a really stout and solid unit.
I can set up the easy core base, and put the rod into the knife holder, and position it, where it shows me the exact arc of the swing which will be the kerf of the knife. I had a laser with my former WoodCut Max 3, and liked that method much more than plywood templates for each knife. Any core, any knife arc into the wood can be seen for setup of the easycore with this laser.
I machined a 5/16" hole in the end of a 25mm steel rod, and taped it with 3/8" x 16 tpi threads to make the Ron Brown threaded end to fit into it. The clamp screws off the end of the bar, and I could thread onto the 25mm bar for the oneway easy core.
I don't see why you could not make a similar unit to go on your hollowing setup, with whatever appropriate size steel or aluminum stock. I have a multiprocess welder that will do everything from stick welding, mig, tig, flux core and aluminum. I haven't gotten into aluminum welding yet, but may purchase the spool gun setup at some point to do it. here's a link to the Ron Brown setup that I adapted...good luck.
 www.ronbrownsbest.com
I can set up the easy core base, and put the rod into the knife holder, and position it, where it shows me the exact arc of the swing which will be the kerf of the knife. I had a laser with my former WoodCut Max 3, and liked that method much more than plywood templates for each knife. Any core, any knife arc into the wood can be seen for setup of the easycore with this laser.
I machined a 5/16" hole in the end of a 25mm steel rod, and taped it with 3/8" x 16 tpi threads to make the Ron Brown threaded end to fit into it. The clamp screws off the end of the bar, and I could thread onto the 25mm bar for the oneway easy core.
I don't see why you could not make a similar unit to go on your hollowing setup, with whatever appropriate size steel or aluminum stock. I have a multiprocess welder that will do everything from stick welding, mig, tig, flux core and aluminum. I haven't gotten into aluminum welding yet, but may purchase the spool gun setup at some point to do it. here's a link to the Ron Brown setup that I adapted...good luck.
Turners Laser Guide
www.ronbrownsbest.com
A bit of Teflon powder rubbed in the bar will help it slide easily.
After seeing what the video systems do, I wouldn't bother with a laser pointer.
robo hippy
robo hippy
john lucas
AAW Forum Expert
I took a class under Frank Sudol. We used that rig. Hollowed 16" deep effortlessly. We used a very light colored wood and judged thickness using a light on the end of the cutter to see the translucency of the wood. We needed it 2 to 3mm thick for piercing.
Impressive. I hav a friend that has a smaller system and he did a video system. He tried the laser, but said it was too hard to see where the laser fell off when using it. I don’t know if you would have a similar experience, but he is very happy with the video.
I hollowed with a laser for 5 years, switched to video 4 years ago, I’ll never go back to the laser!
I wouldn't be able to use that rig ... my shop is already bursting at the seams and the town board has put a moratorium on building permits for additions.
Frank Sudol to Brian McEvoy to Carter. I'd talk to Lyle Jamieson about a laser holder.
 www.aawforum.org
Frank Sudol deep hollowing rig advice
I recently got back into woodturning, after nearly 10 years off to pursue graduate education. Found a 2436 on Craigslist and boom, back into turning. The lathe came with tons of extras including 2 hollowing rigs. One of them seems to be made by Frank Sudol... a large rig made of mostly 1.25”...
I used the system all day today. I'm not sure what to think about the comments that say how difficult it would be to move it sideways, how heavy it looks and more. I used one 3M pad to clean the roller, the bar, and the tool rest. I then waxed everything. There is no difference from the Lyle Jamieson system. You can move the bar with one finger. I'm just guessing that those that commented never used it, I'm really puzzled by it. My urns are simple. I won't be using this for any tiny entrance hole hollow forms. This is strictly a helper to make urns fast. My urns go for $1000 for regular Koa. Curly Koa ones go for $1800 and up. The faster I make them the more money I have at the end of the month.
- Joined
- Jan 27, 2005
- Messages
- 13,223
- Likes
- 5,851
- Location
- Dalworthington Gardens, TX
- Website
- pbase.com
... I wonder if anybody knows where to buy a bracket for a laser, but I will be adding a webcam. I should call Dave, maybe he can advise me. I can weld, I have a little welding machine, so maybe I can weld the vertical bracket. Any ideas are welcome...
Definitely, no welding. You can buy a laser/camera bracket from Steve Sinner (that is what I have) or use Doug Freeman's instructions to make your own. The one that I have uses thin-wall aluminum tubing and UHMW brackets. Very lightweight, stiff, and easy to adjust. here is a picture.

If you use a webcam, remove the sensor and lens from the plastic housing if possible in order to remove mass.
... Almost looks big enough to create problems controlling it through a smooth curve.......is it?
I would expect it to be much like my Steve Sinner boring bar rig -- very smooth and easy to control. The mass gives you the advantage of making smoother cuts than you might experience with a small lightweight rig. For sure, it's not for sit-down turning, it's sort of like using a big bowl gouge where you use your body and not your hands to guide the cutting edge.
That about sums up my thoughts on seeing that setup. The roller will help with the in out movement but the side to side movement is sliding friction that appears to require that the operator be in 2 different places at once (up at the entrance to the form and back at the stabilizing roller) and note that moving the cutter into the wood say 1/8" will require much more movement out at the captured roller.
There really isn't any breakout friction because you are always moving the bar while hollowing. I suspect that my boring bar is heavier than Emiliano's rig and it is smooth and very easy to control. It is important to make sure that the surfaces are smooth and waxed. I used fine silicon carbide sandpaper to our a mirror-smooth finish on the rubbing surfaces.
... some paraffin wax on the tool rest and rear roller will let it slide easily, just as Lyle recommends.
My go-to wax is Johnson's Paste Wax. It's slicker than anything that I have tried. Rub it on .. let it dry ... buff it off with a clean cotton t-shirt.
Thank you Bill. I appreciate all the help I can get. I started another thread with the parts that I need. When I was searching for the screws for my Vicmarc chucks, the forum family was very helpful. I was a bit surprised at how easy the bar moved after I polished and waxed it. I can see why the adjustable tool rest has two small welded washers to stop the bar from sliding off and falling on you.Definitely, no welding. You can buy a laser/camera bracket from Steve Sinner (that is what I have) or use Doug Freeman's instructions to make your own. The one that I have uses thin-wall aluminum tubing and UHMW brackets. Very lightweight, stiff, and easy to adjust. here is a picture.
If you use a webcam, remove the sensor and lens from the plastic housing if possible in order to remove mass.
I would expect it to be much like my Steve Sinner boring bar rig -- very smooth and easy to control. The mass gives you the advantage of making smoother cuts than you might experience with a small lightweight rig. For sure, it's not for sit-down turning, it's sort of like using a big bowl gouge where you use your body and not your hands to guide the cutting edge.
There really isn't any breakout friction because you are always moving the bar while hollowing. I suspect that my boring bar is heavier than Emiliano's rig and it is smooth and very easy to control. It is important to make sure that the surfaces are smooth and waxed. I used fine silicon carbide sandpaper to our a mirror-smooth finish on the rubbing surfaces.
My go-to wax is Johnson's Paste Wax. It's slicker than anything that I have tried. Rub it on .. let it dry ... buff it off with a clean cotton t-shirt.
Today, not one but 2 guys told me, "I hate to give advice to a pro like you" Darn! I quoted guy number one, but number 2 was along the same lines. I told both of them, I'm still learning every day. I'd be a fool not to take advice from other turners. Here is the link to the other thread. I wonder if we should merge it with this one?
Searching for Parts
I visited my good friend Wayne Omura today. He has the same giant hollowing system as me. He has the original Frank Sudol rig. When I told him that I wanted to add a rig for a webcam, he pulled just what I need from one of his many drawers around his shop. Problem is, he can't remember where he...
- Joined
- Jan 27, 2005
- Messages
- 13,223
- Likes
- 5,851
- Location
- Dalworthington Gardens, TX
- Website
- pbase.com
I think that you might waste more time and money trying to find that part than just making something out of UHMW or Delrin. I would use 3/4" square tubing for the horizontal member and ¾" round tubing for the vertical member.
I was looking at the Steve Sinner laser rig. Looks like a good one, if I can attach a camera might work for me.Definitely, no welding. You can buy a laser/camera bracket from Steve Sinner (that is what I have) or use Doug Freeman's instructions to make your own. The one that I have uses thin-wall aluminum tubing and UHMW brackets. Very lightweight, stiff, and easy to adjust. here is a picture.
If you use a webcam, remove the sensor and lens from the plastic housing if possible in order to remove mass.
I would expect it to be much like my Steve Sinner boring bar rig -- very smooth and easy to control. The mass gives you the advantage of making smoother cuts than you might experience with a small lightweight rig. For sure, it's not for sit-down turning, it's sort of like using a big bowl gouge where you use your body and not your hands to guide the cutting edge.
There really isn't any breakout friction because you are always moving the bar while hollowing. I suspect that my boring bar is heavier than Emiliano's rig and it is smooth and very easy to control. It is important to make sure that the surfaces are smooth and waxed. I used fine silicon carbide sandpaper to our a mirror-smooth finish on the rubbing surfaces.
My go-to wax is Johnson's Paste Wax. It's slicker than anything that I have tried. Rub it on .. let it dry ... buff it off with a clean cotton t-shirt.
@Emiliano Achaval Don't forget to get his original videos still available from Todd Raines at the woodturning store. I get the tungsten carbide tear drop cutter that the system uses from him as well.
Enjoy. its alot of fun.
Enjoy. its alot of fun.
When it comes to deep hollowing I go with my Alan Trout Pro-Rail Hollowing System coupled with Mike Hunters boring bars and hollowing tools. Easily go 18" deep with no vibration. I also only use a laser (tried video and I saw no advantage just disadvantage for me). I like watching the piece and not a screen and I can get as thin as I want with the laser. When making a hollow form I adjust the laser 3 times (and with a screen I had to make those same three adjustments). Once when I mount the straight tool, once when I mount the hook tool for under the lip and curve and the lastly once going back to the straight tool to finish the depth. With the laser I have no screen to worry about or the wires going to it and again I am looking at the piece. With my lasers I can adjust to a very fine clear dot that I can put it an exact 1/16" from the edge of the tip and make the piece 1/16" thick with out a problem.
Here is a pic of how I attached my camera to my Jamieson laser holder, might help you think of something. Depends on how the laser mounts in Steves rig, from the small pic on his website I cant tell if it threads in or is clamped.I was looking at the Steve Sinner laser rig. Looks like a good one, if I can attach a camera might work for me.
